Help Center
ACCOUNT MANAGEMENT
-
How do I link my SurveyCrest account to my Facebook account?
If you have not created a SurveyCrest account yet, you can signup/login through your Facebook or Google account ID by simply clicking the ‘Sign In’ link and then the ‘Login with Facebook’ (or Google) button. The system will ask for your permission, and once you agree, we create a new SurveyCrest account based on your Facebook or Google email address. This becomes your SurveyCrest username, and a password will be assigned to you.The next time you visit SurveyCrest, just click the ‘Sign in with Facebook’ (or Google) button to automatically login.
-
How can I change the password of my account?
Passwords can be changed under the ‘My Account’ section through the following steps:Step 1 : Login to SurveyCrest
Step 2 : Click ‘My Account’
Step 3 : In the “Profile” section click on ’Change Password’ next to the username label
Step 4 : In the new pop up window, enter your new password and retype for confirmation
Step 5 : Click ‘Change Password’
-
I have forgotten my password. How do I log in now?
If you have forgotten your password simply click on “Forgot Password” under the “Sign In” window. You will be prompted to provide your registered email address or username. After filling in your email or username, click on “Reset Password” button. You will get an email with a link to reset your password. Enter your new password, and confirm it. You can now log-in with your new password.
-
I have logged in using my Facebook/Google credentials. Where do I find my surveys?
Regardless of your login credentials, your surveys are accessible via the Dashboard at SurveyCrest.com.
-
How will I be billed?
SurveyCrest's services are bundled in convenient packages. Customers will be charged monthly with the frequency of Monthly, 6 Month or 12 Months (Annual) depending on the frequency Customer has chosen.
For example:
Billing Frequency (Monthly) - Customer will be billed monthly.
Billing Frequency (6 Months) - Customer will be charged a lump sum of 6 months. This will occur every 6 months.
Billing Frequency (12 Months) - Customer will be charged a lump sum of 12 months. This will occur every 12 months.
-
Can I integrate SurveyCrest with other services?
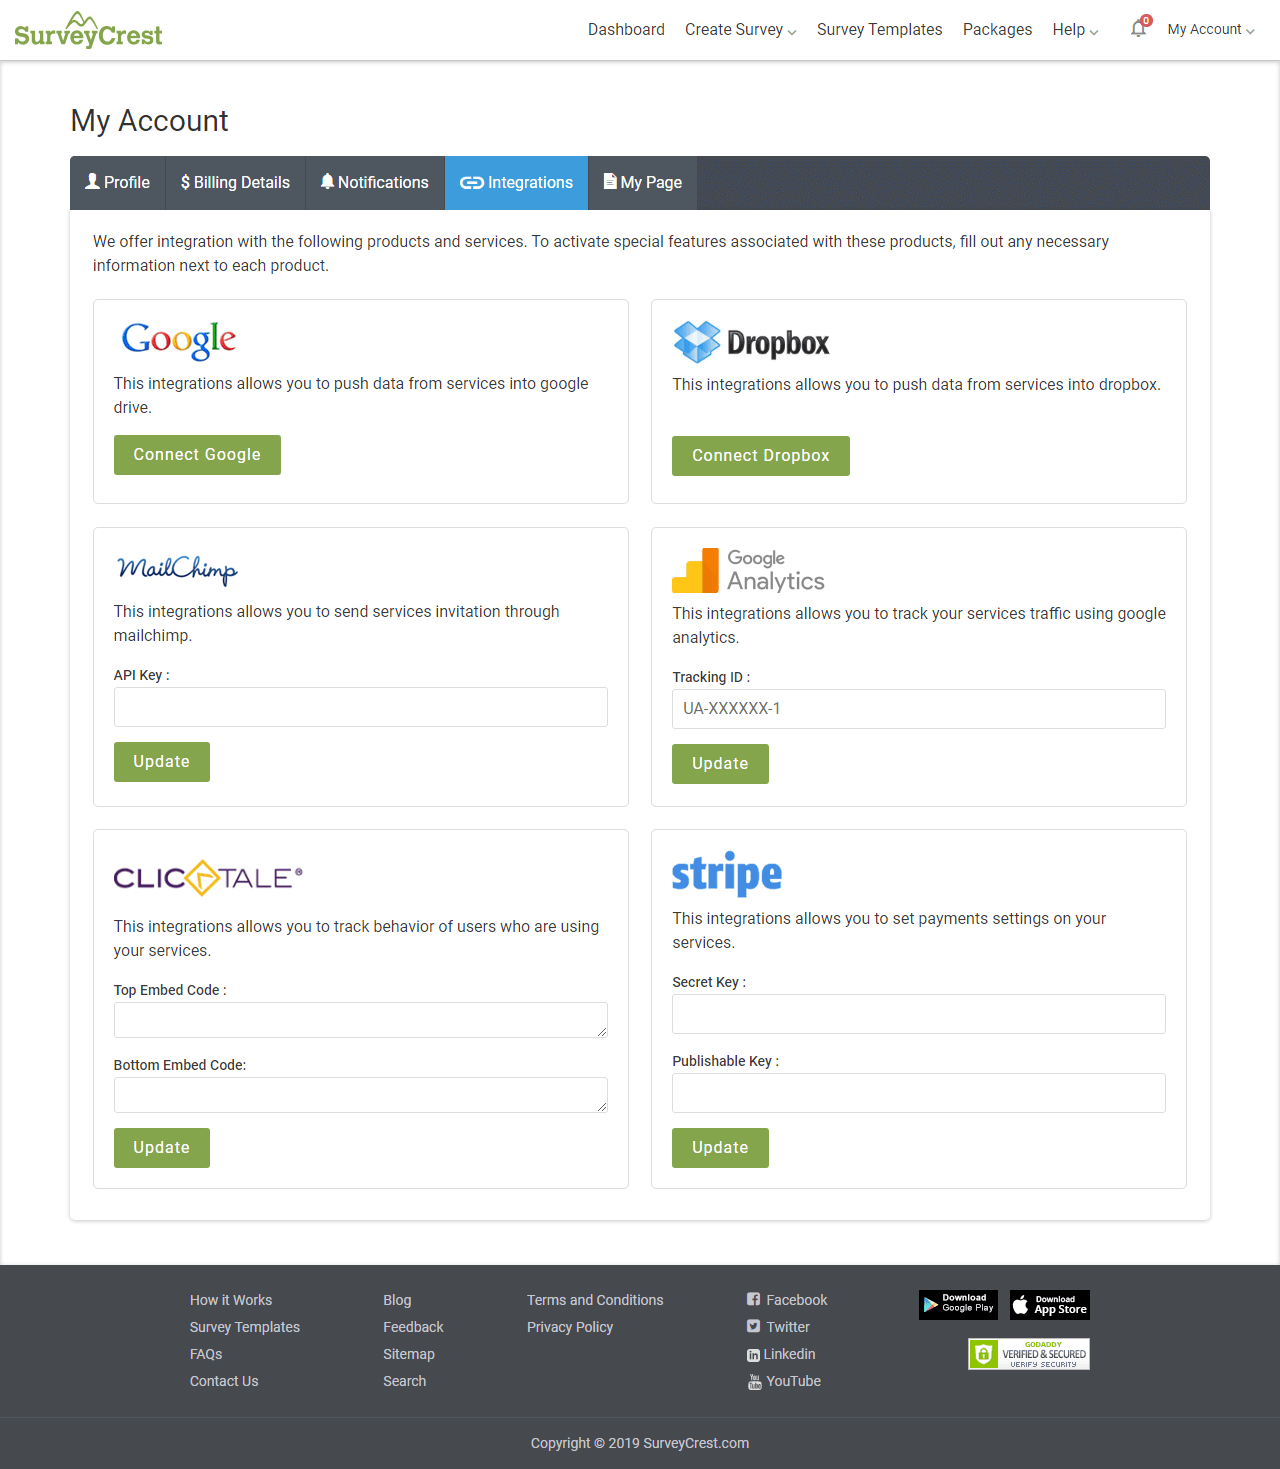
You absolutely can. To see a list of websites you can integrate with, go to My Account > Integrations. We offer integration with many products and services. To activate special features associated with these products, fill out any necessary information next to each product.
-
What are image choice questions and how can I use them?
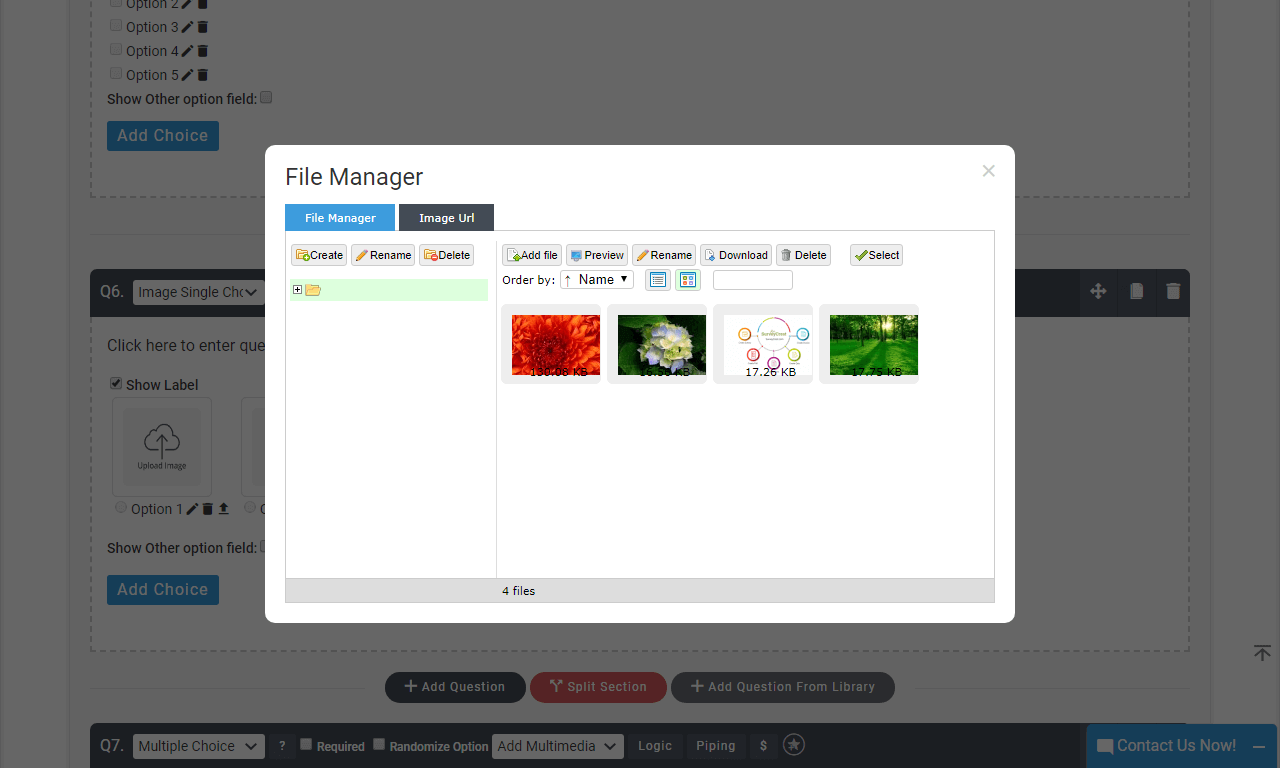
Unlike Multiple Choice questions, you can add images to each option with an Image Choice question. You can label each picture choice if you like. Click on ‘Upload Image’ to add an image to each option using the file manager.Two types of image choice question:1. Image Single Choice.2. Image Multiple Choice.
-
What are the ranking question types?
When you are creating a survey, you have the choice of selecting one of the following questions in the ranking category:
1. 5 points
2. 10 points
3. Net Promoter Score
4. Slider
5. Order Ranking
6. Star Rating
7. Multiple Star Rating
5 Points: The 5 points ranking questions can be used when you want the participant or user to rate products or services from poor to excellent.
10 Points: The 10 points ranking can be used when you need to get a detailed answer. These scales are mostly utilized when you want to know the depth of the feeling of the participant.
Net Promoter Score: Net Promoter Score* or “NPS” is a metric commonly used by companies in customer loyalty research. The metric is based on customer answers to the question: “How likely is it that you would recommend [company name] to a friend or colleague?”
Slider: The slider questions can be used when you want the participant or user to rate products or services from poor to excellent. User can define their range style b/w two numbers.
Order Ranking: The order ranking option is used for questions that have answers that need to be arranged from good to bad or vice versa. For example, if you have some products that have similar functions, you can ask your customers to rank them according to their performance.
Star Rating: This option can be used for questions where you want to know how the customer rates your product or services.
Multiple Star Rating: This option can be used from the ranking questions type when you want to compare products that have similar functionalities.
-
How can I customize button text?
The text that appears on all of the buttons within the survey, poll etc can be modified at your choosing.
Buttons that can be customized include: Finish, Previous, Next, Submit.
To change the text of the navigation buttons at the bottom of your survey go to survey "Theme & Settings" page & click the "Customize" Tab.
Respondent's can use these buttons to navigate through a survey, poll etc.
Previous : Allows the respondent to go back to the previous page to review or edit their response.
Next : Allows the respondent to go or proceeds to the next page in the survey.
Finish & Submit : Submits the survey and saves the response as Complete in the Analyze Results section.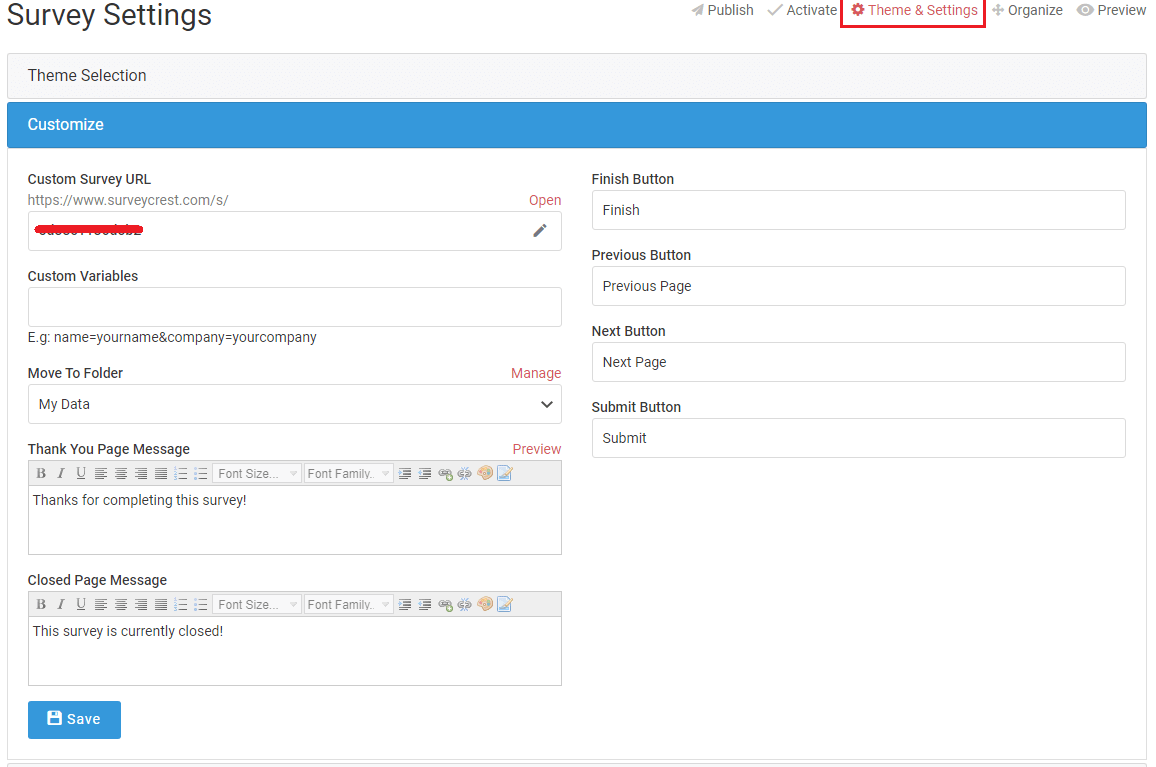
-
How can I organize survey questions or sections?
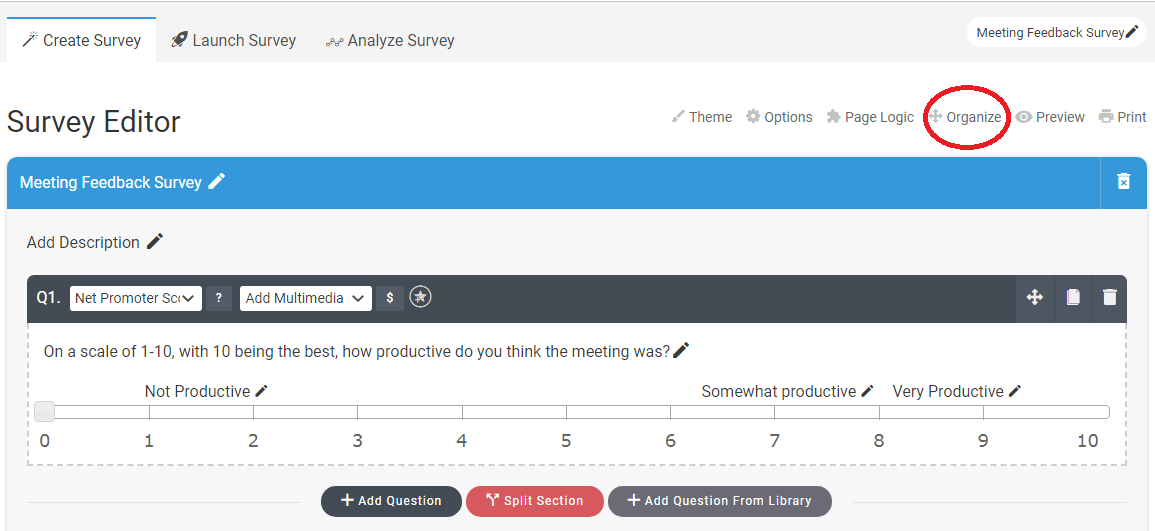
The order sections and questions appear in your survey can directly impact the responses you gather.To make placement or arrange questions in order you just need to drag and drop that question from section to section or within the section.You can even give order to sections in same way.Click the "Organize" link in top area of survey editor page.
HOW TO GET STARTED
-
How do I get started with SurveyCrest?
Use the SurveyCrest ‘Register’ button to create a new account. Simply click on ‘Register’, enter all details (username, password and email) and sign up. You can also create an account using Facebook or your Google email account.
After you have created your account, you can start creating surveys right away.
-
How do I start creating surveys on SurveyCrest?
To create a new survey or survey templates, click Create Survey from the top navigation bar and choose one of the following options from the list:
-
What is the ‘Dashboard’ Option?
 The ‘Dashboard’ option contains a list of your created surveys, polls, forms, quiz's & invoices. You can work on these services using the following options we have provided on the dashboard:
Status: Using this option you can activate your survey, poll, form, quiz , or change its title, start or close date, survey format & default language.
Edit: Using this option you can edit your survey sections, questions, options and some other settings of the survey.Settings: Using this option you can change a logo, theme, font family, theme structure and some other custom survey settings.
Publish: You can share your activated survey, poll, form, quiz via Email, Facebook, Twitter, LinkedIn & other Social Media networks.
Responses: Using this option you can view your results from the Analyze Results section of a survey. You can see a collective or question base view of your data, browse individual responses, use filters to focus on specific data views and segments, and easily download your results in multiple formats.
Report: Using this option you can view your results from the Analyze Results section of a survey. You can see a summary view of your data,create custom charts, use filters to focus on specific data views and segments, and easily download your results in multiple formats.Copy: Using this option you can copy a survey, poll, form, quiz within your account.Copy/Transfer: You can copy or transfer one or more surveys from your account to another paid account. In transfer case the entire survey, including collectors and responses, is transferred to the new owner and removed from your account.
Delete: It deletes your selected survey with their all responses or data. -
What is the red star on my Dashboard?
A red star on the “Responses” icon on your “Dashboard” indicates that you have new “unchecked” response(s) for your survey, poll, form, quiz or email-survey. To review, simply click on the “Responses” icon.
-
Why can’t I open my survey on Internet Explorer (or any other browser like Google Chrome, FireFox, Safari etc.)?
Sometimes technical errors occur because of several reasons. We are here to help. But before you contact us you might want to try the following:
- Check your browser error by turning off all popup blocker.
- Our website and surveys are optimized for Internet Explorer 9 or above; try to upgrade browser to this version.
- Refresh your browser or restart your computer system after you have made all relevant changes.
If you still have a problem, email us at support@surveycrest.com or call us at: 855-752-5503 (Mon-Sat, 9am-5pm EST)
-
What is Quiz?
Quizzes are typically used in teaching, training, and learning to build and test knowledge. They are sometimes also called tests & exams.Quiz includes features to better serve the use case such as automatic grading, result in score calculations, pass/fail results, certificate generation, and reporting.A SurveyCrest Quiz is a series of questions. You can create a quiz of any type you want and distribute it to respondents. Each person who takes the quiz receives a score. You have to specify the scoring criteria yourself. you can do so using our SurveyCrest quiz tool.
-
What are email surveys?
Email - Surveys are defined as a data collection method used to collect quantitative data using surveys or questionnaires that are sent to targeted respondents via email. Respondents can then answer these surveys directly in embedded questions or respond over email, depending on the survey delivery method chosen by the researcher.
One of the most popular methods of online research is email surveys. With SurveyCrest now you can conduct online email surveys easily.Two types of email-survey1. Standard2. Net Promoter Score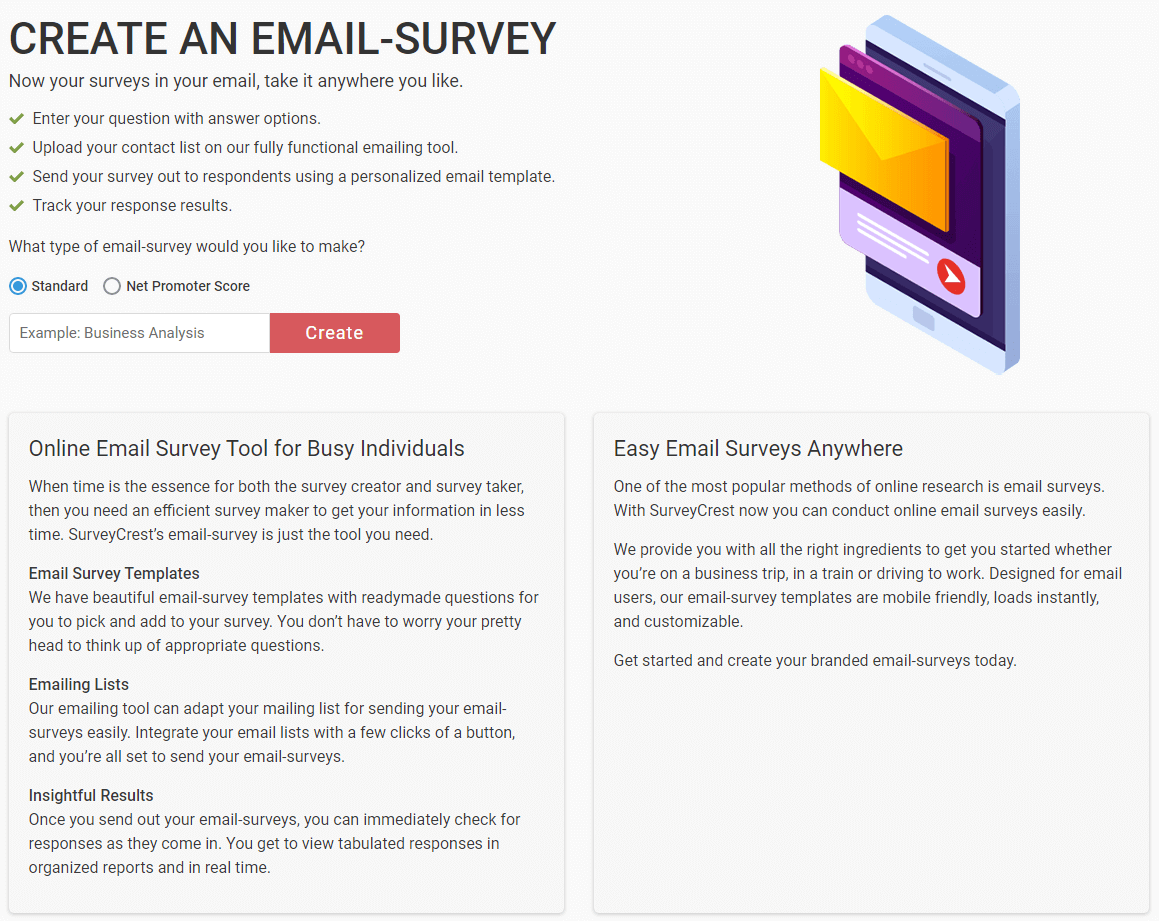
HOW TO CREATE & DESIGN SURVEYS
-
How can I create a survey from scratch on SurveyCrest?
SurveyCrest makes it easy to create a survey from scratch. Follow the steps below to get started.1. Create a Survey:To create a new survey, click Create Survey from the top navigation bar. Get started with a blank page give survey title and create or build your survey.2. Add Questions & Sections:Once you create your survey, use the add question button to add your own questions or choose pre-written questions from our Question Library. You can apply question settings to further customize them.If you have a long survey, break it up into multiple sections. Sections help you organize your survey into pages, which makes it easier for people to take. Plus, every time they go to the next page, their previous responses are saved.3. Apply Logic & Piping:Required Checkbox: You can make any question in your survey required so that respondents must answer it before submitting the page.Logic: After your survey questions and sections are set up, it's a good time to apply logic to the survey. Logic (Visibility Criteria) allows you to take your respondents through a certain path, depending on the answers they give to a previous question.Piping: Piping is a way to automatically repeat survey elements based on a survey taker's answer(s) on a previously added question.4. Customize the Design:After your questions, logic, and piping are in place, you can focus on fine-tuning the look & feel of your survey with our design and display options. For example, show or hide question numbering on the survey page, add a logo, add a font family, theme, theme structure or create your own custom theme.5. Activate, Preview & Send Your Survey:Activate the survey & get a preview of your survey before sending it to survey takers so you can find or catch any mistakes or issues. Once you're ready to send it out, create a collector to get responses.
-
How can I delete a question while making a survey from scratch?
If you make a mistake in your survey design or in other services, deleting a question is easy and simple.From the Dashboard:• Go to the Survey Design page of your survey.• Find the question you want to delete within your survey.• On the right-hand side of the question, click the Delete Question icon.Note: Deleting any question in the survey design page will delete their related or collected responses if that question contains.

-
How can I save a survey?
Saving and creating survey is easy on SurveyCrest. Whenever you make any changes related to question title, question options, sections etc in survey editor your changes will be automatically saved during design of your survey.
-
How can I choose from a pre-designed templates on SurveyCrest?
Building surveys can be time-intensive. Start your survey with a template to reduce survey build time by using pre-made templates.Creating a Survey from a TemplateFrom your dashboard:2. Click the Template you would like to use from a list of survey templates.3. From Templates drop-down menu select the template you would like to use.4. From Theme drop-down menu select the theme you would like to use.5. Click the red "Continue to Edit" button.
-
What is a question option?
A “Question Option” is the option type that you want to have for your survey question or other services. This can be text type, multiple choice, scale ranking, drop down menu,matrix and others etc. Choose the question option that is most suitable for your question for the type of response you are searching for.
-
How to add a question?
To add a question to your survey design page click the Add Question button at the bottom of question box.

-
How can I add a question from the question library?
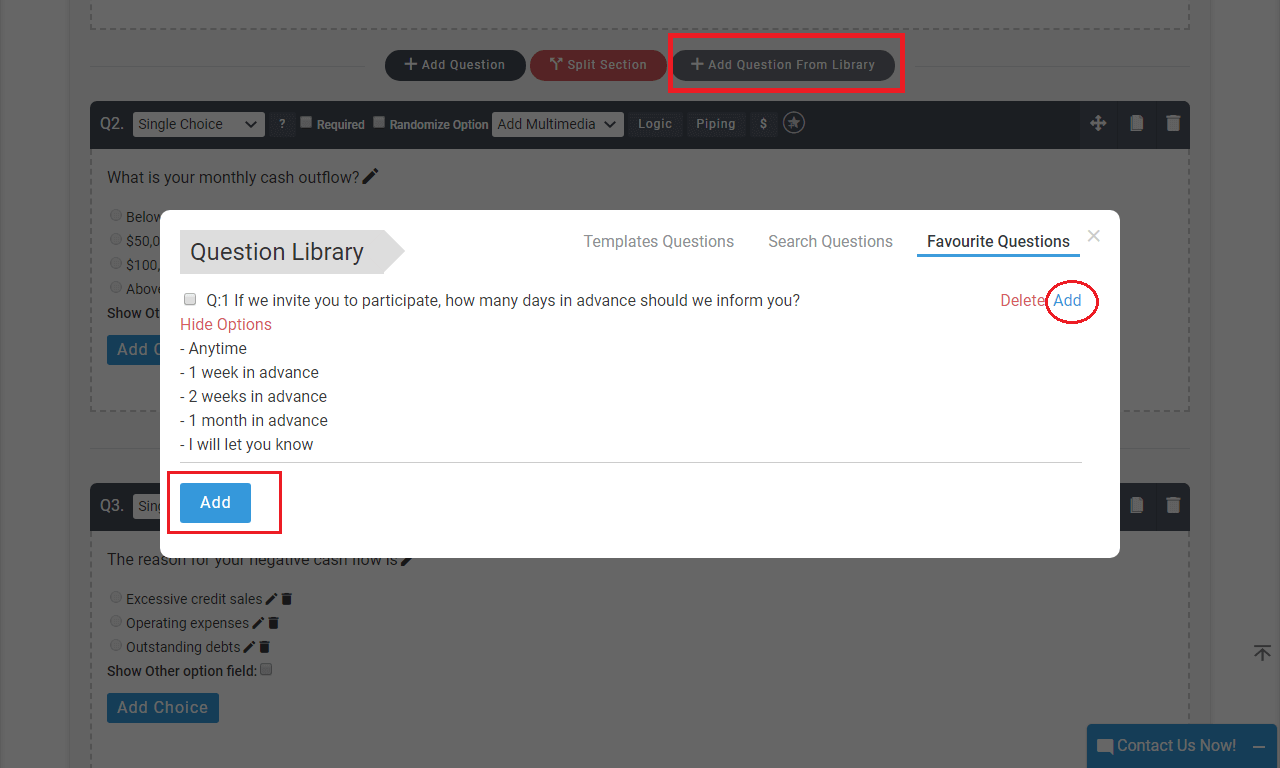
To add a question to your survey page from Question Library.Follow the below steps :1. Click the 'Add Question From Library' button at the bottom of question.2. In the Question Library panel it shows selected survey template questions & favorite questions.3. Under Questions, check the box next to the question you wish to use.4. Click the "Add" button.

-
How can I add a section?
You can add section or add page to your survey to organize the questions, so that your respondents don’t have to load them all at the same time. Sections or Pages are also critical if you decide to include skip logic.When in the design page of your survey :1. Look for the Add Section button in your survey to add a new section.2. Optionally, type a Section Title and Section Description.

-
Is this possible to add a single question per page in survey design?
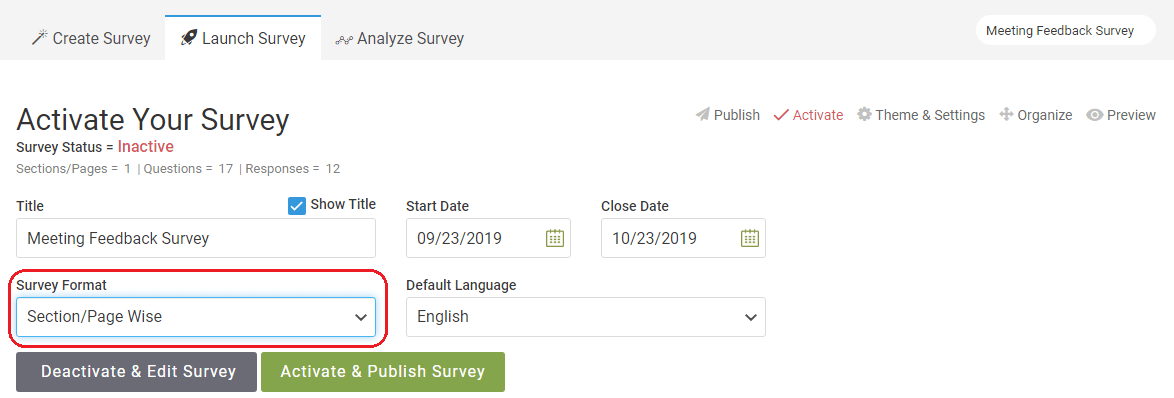
Yes, this is possible. To add single question per section or page, you need to add one by one a single section with a single question.Then go to "Launch Survey" page.Survey Format > Section/Page-Wise.
-
What is piping?
Piping feature allows you to control the wording by automatically including the answer choice as part of a question. You can also pass a previously selected answer as a new answer choice into a follow-up question. This feature makes designing a survey easy! It also helps respondents feel more comfortable when answering your survey.In simple words we can say that piping can be used to take the answer from a question, and then insert that answer into subsequent questions in the survey or other services.For Example : You ask the respondentQ.1 "What is your favourite movie?"If respondent answered Ghostbusters, the next question could ask,Q.2 "What genre is Ghostbusters?"- Thriller- Drama- Horror- Comedy- Science Fiction- Fantasy
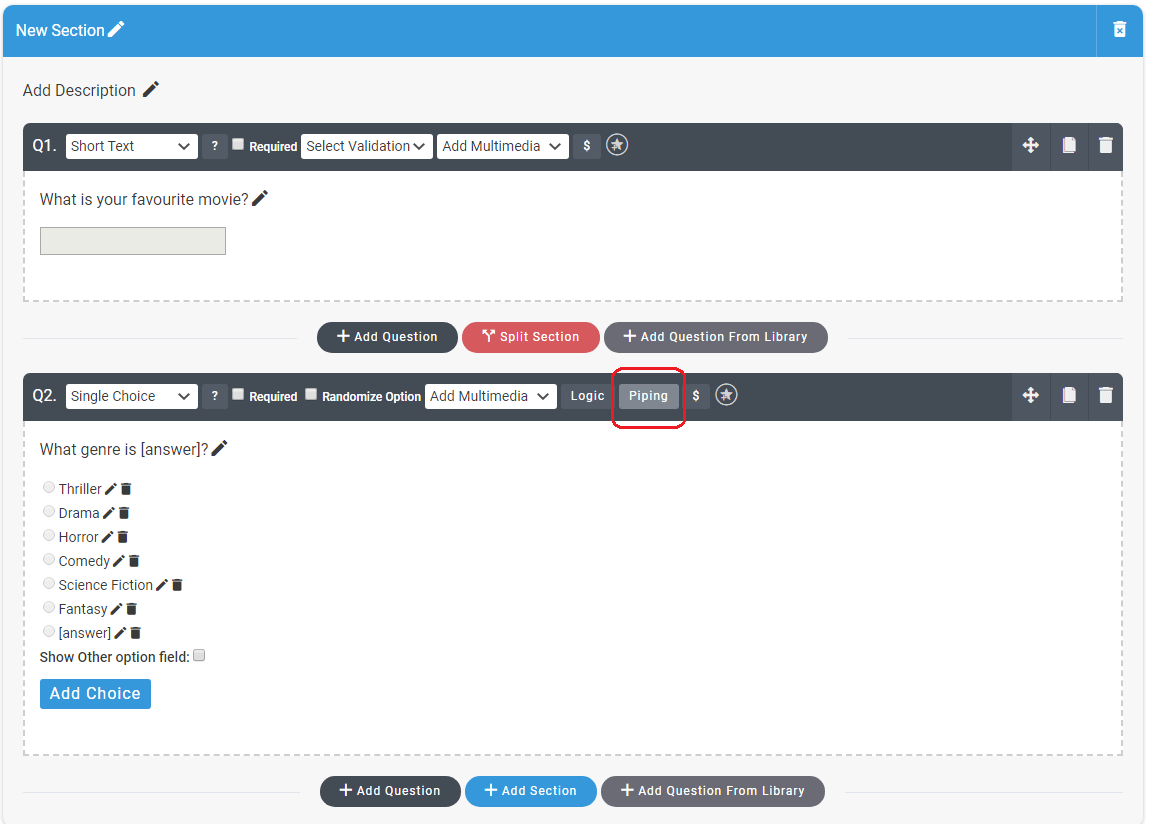 Click on “Piping” button and follow these steps
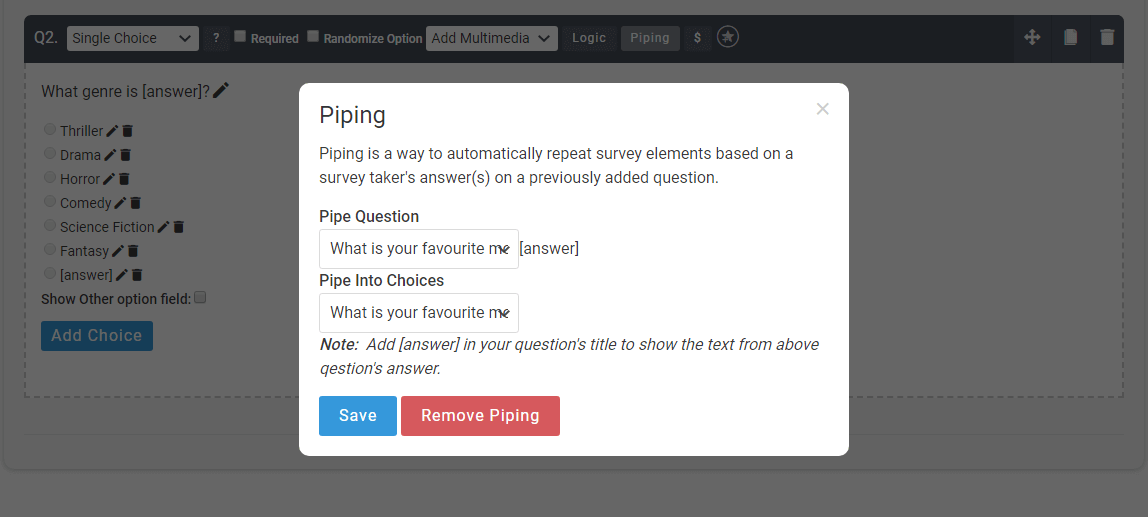
- Pipe Question: Select this option to use answer of this question in your question title
- Pipe Into Options: Select this option to use answer of this question in your answer options
- Add “[answer]” without quotes in your question or option to show the above answer in your question/options
-
What is skip logic?
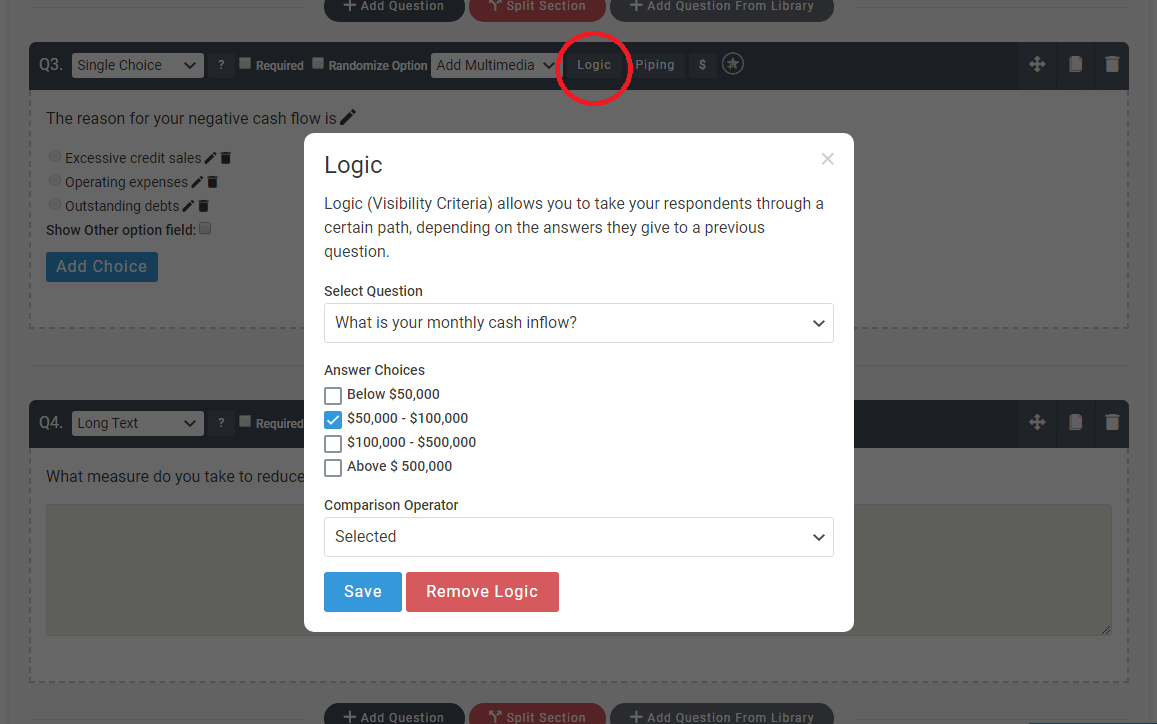
Skip logic is a feature that changes what question a respondent sees next based on how they answer the current question.Skip logic surveys, on the other hand, offer a local pathway through the questionnaire as users only get questions that relate to them.Skip logic is often referred to as branch logic.
-
How can I get personal information of my respondents?
Most survey respondents like to remain anonymous when they fill our surveys. However, you can still get their personal information for tabulation purposes by adding a question contact information. We recommend you to refrain from asking for:

- Identity related questions like name, social security number, address, workplace etc.
- Age, gender, race, religion related questions unless the goal is to find out statistics related to them.
-
How to integrate SurveyCrest with Mailchimp?
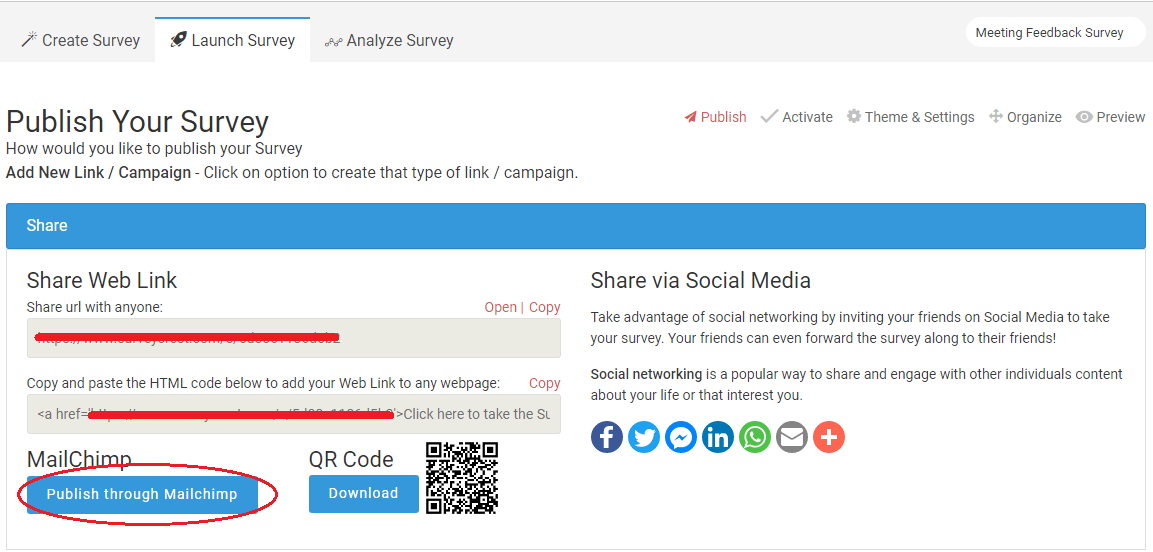
MailChimp is an email marketing management service which allows you to mass market your campaign or project efficiently. If you have an account with MailChimp, then all you need is to install its API.The Mailchimp API makes it easy for programmers to integrate Mailchimp's features into other applications.Follow the steps for Copy or Create A Key in mailchimp account :1. Login into MailChimp2. Select “Account” from the drop-down menu.(it’s in the upper right-hand corner of the page).3. Select API Keys from extras drop-down.4. Create and copy a API Key from list.Follow the steps for survey invitations through mailchimp :1. Log in to your SurveyCrest account.2. Click on My Account(it’s in the upper right-hand corner of the page). You’ll see a drop-down appear.3. Select “Integrations” from the drop-down menu.4. Paste the API Key in Mailchimp field.5. Click “Update” button to save it.6. Select Survey from Dashabord.7. Go to Publish page.8. Click on "Publish through Mailchimp" button for survey or other services invitations.
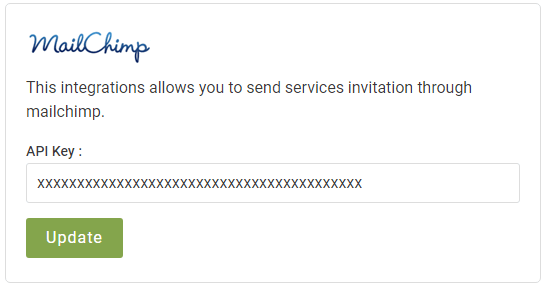 Once done, you can start sending out invite emails through MailChimp contacts by clicking on “Publish” tab of survey.
-
How can I split a section?
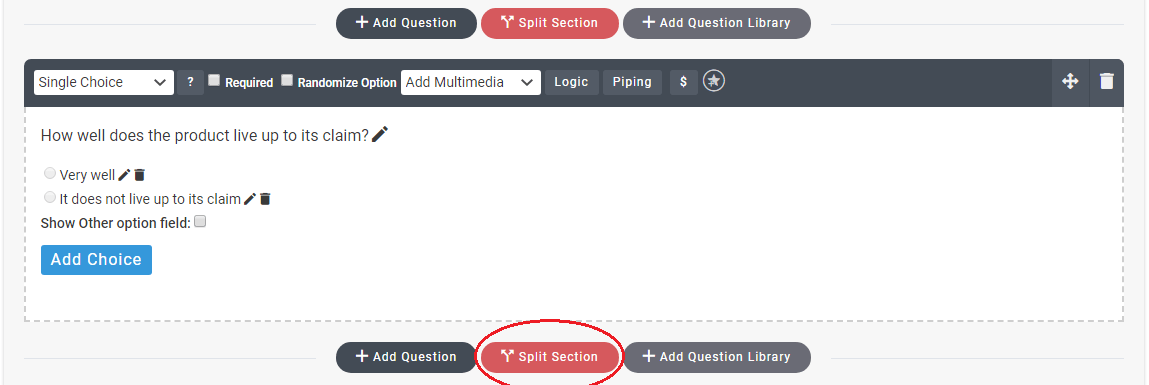
By default, your survey questions will be displayed together on one section.Using multiple sections in your survey(other services) to help organize and break up a long list of questions. This makes it easier for your respondents experience to take the survey.Respondents will feel they are making progress, and every time they go to the next section, their partial responses are saved.Follow the steps :1. Select the question you want to display before the section break.2. In the survey design page, click “Split a Section” button.Note : By breaking your survey up into several sections can make it seem less difficult for respondents as they won’t see all the questions at once. Sections and Pages is same thing.
-
Is there a way to keep track my email invites sent out to responders?
Yes! When you have activated survey/poll questionnaire you can start sending out invites to responders by going to Launch > Publish > Email Campaign.
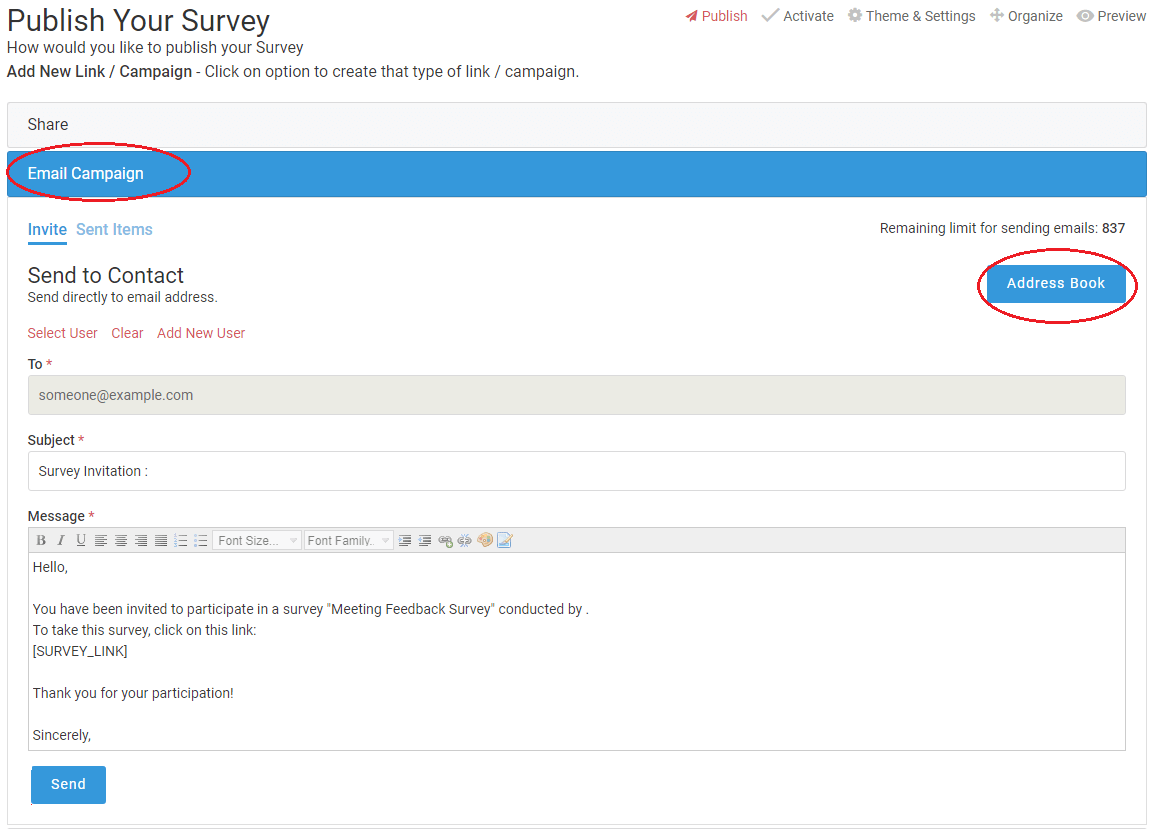
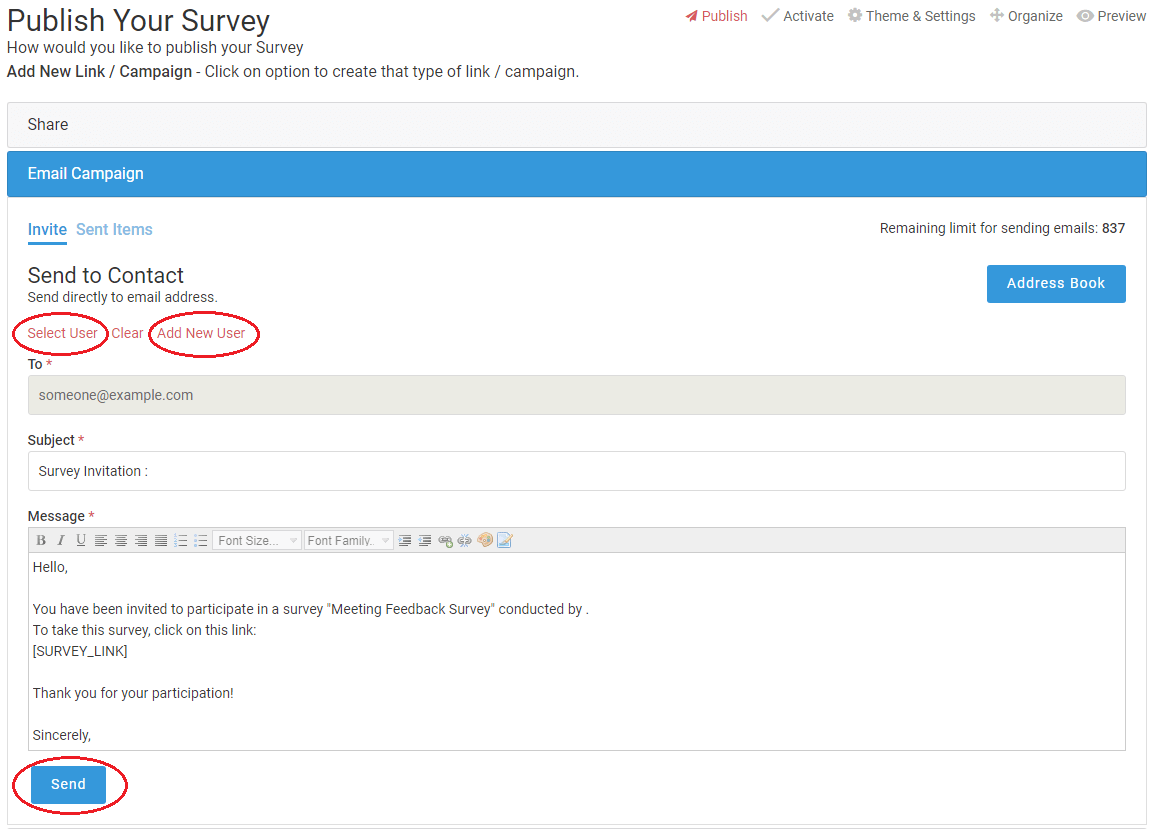 Here you will have the option of importing your contacts list, adding contacts individually, and sending a customized email invites to your responders. In the “Invite” tab, simply add email addresses by clicking on “Add New User” or select the responders you want to send emails to from a pre-imported list (via Address Book) by clicking on “Select User”, then “Send”
You can send out email invites in bulk which will be then robotically sent out in batches (say 25 invites each batch) if the total number of recipient is large (say around 100 or more recipients).
To keep track of the number of invites sent, click on “Sent Items” tab. Your campaigns and the number of email invites sent are listed here. You can view their status, whether invites have been sent out or not. The auto-sender works in batches, hence check the status of email recipients after a few minutes after “Send”.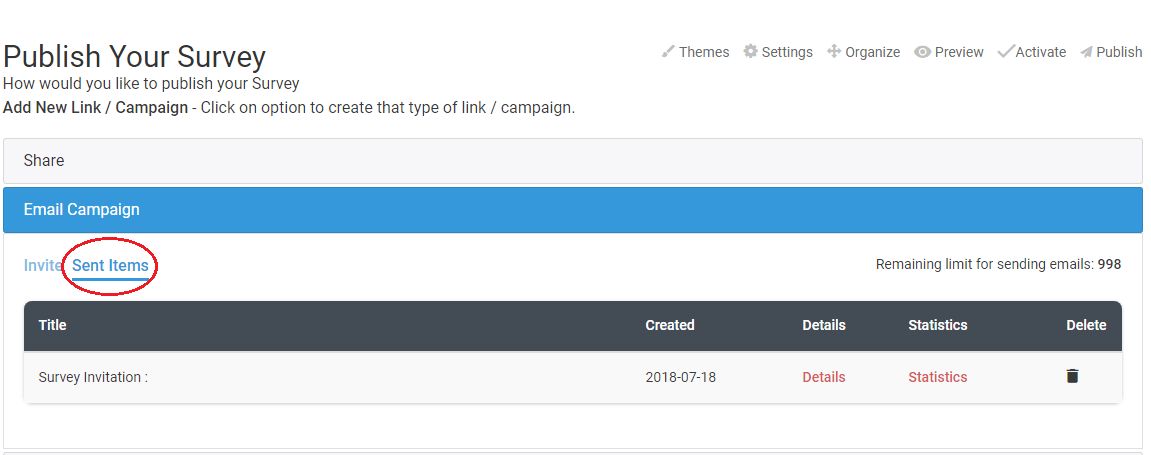
-
How can I copy a question?
Copying a question will create a duplicate version of the question in the same survey or service.To copy a survey question click "Small Paper Icon" of selected question.

-
How can I add Other option in a question.?
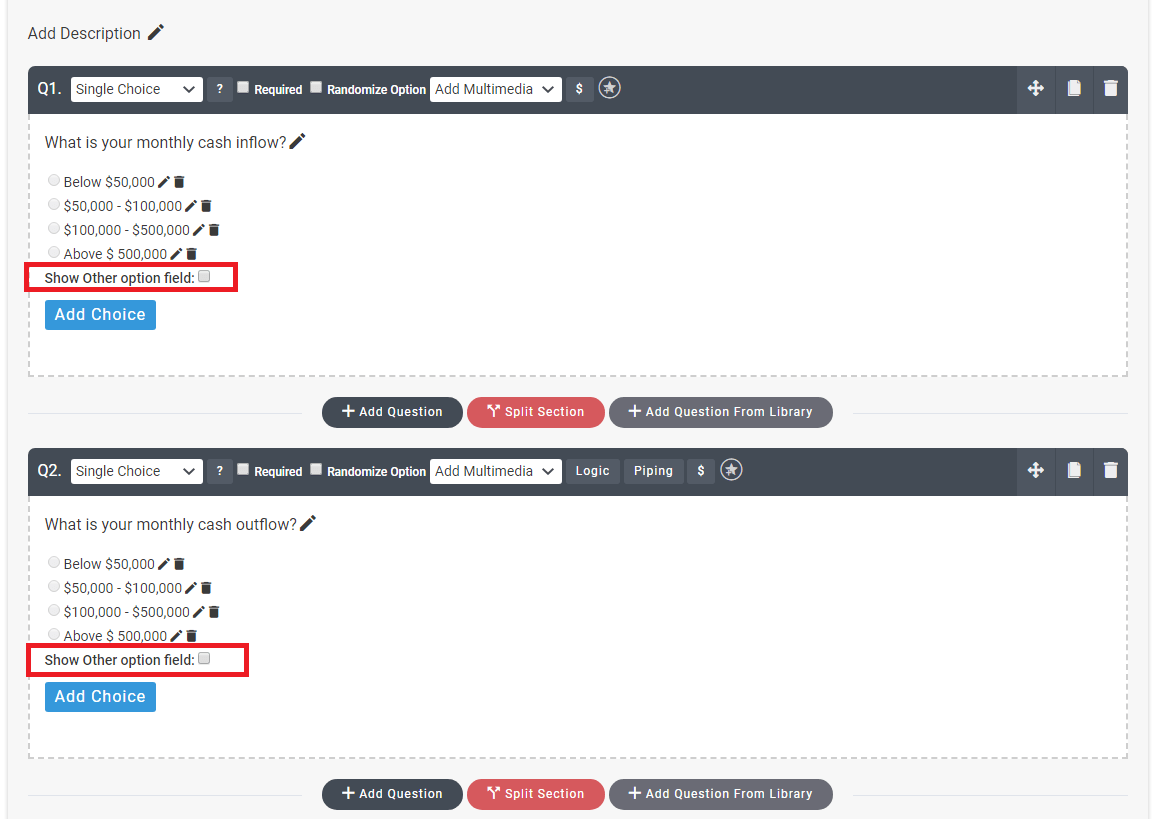
Adding "Show Other option field" allows respondents to provide an alternative answer if the available answer choices don't apply to them. Other option or choice is only available for single & multiple choice question.
-
How can I add a section description?
Section Titles and Section Descriptions are text fields that are available to add topic headings and descriptions to each section of your survey or service.
To add a section description in each section. Click on "Add Description" label of that section area.

-
How can I add a question as favourite in library?
In a question toolbar of a survey design page click on star icon to add a question as favorite in library.
 To check your saved or favourite question in library. Click "Add Question From Library" button. Library questions can be used for other survey or service, you simply need to click on "Add" button.
-
What are question types and how can I use in a survey?
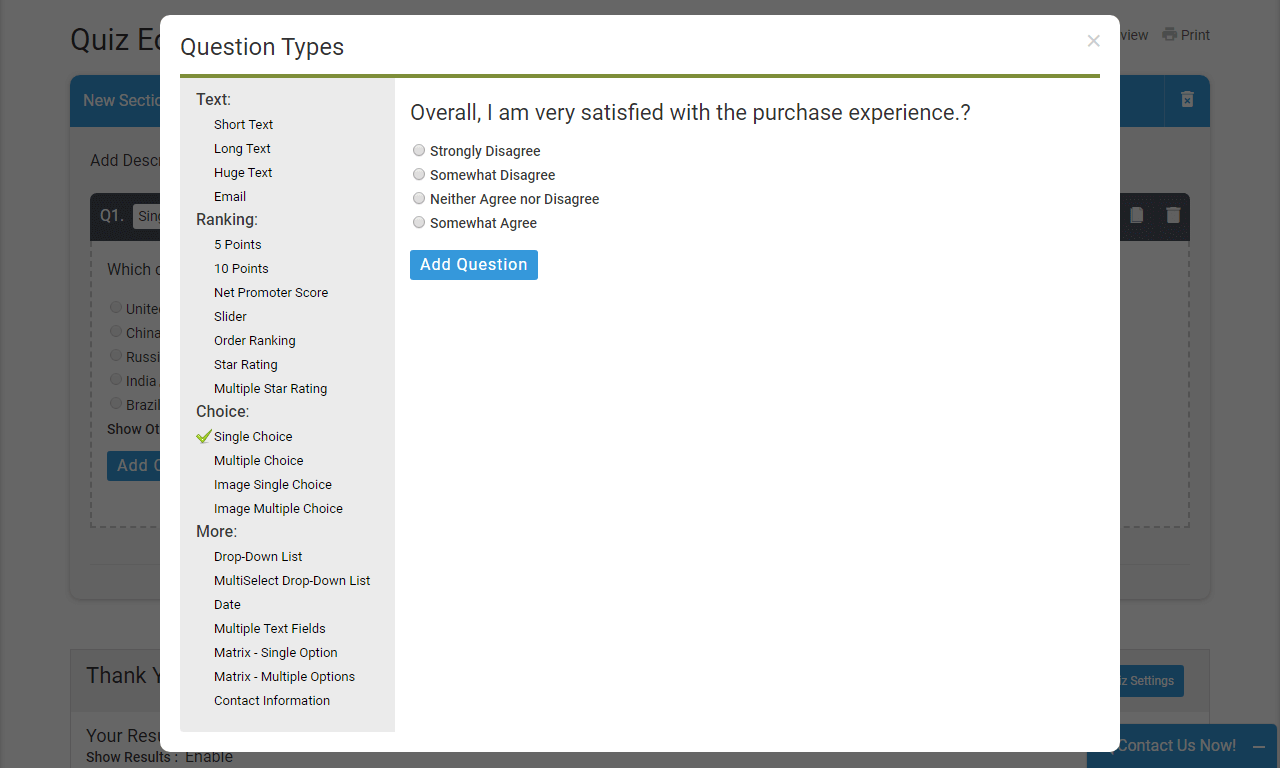
We offer over a dozen types of survey questions. The most popular are multiple choice questions, but different question types serve different purposes. To view an example of each question type before you add it to your survey.In a question toolbar of survey design page, click on “?” button near to question type drop-down.
 It will show you a list of question types. Select question type from that list and click on "Add Question" button to add a that question in a survey.
-
How can I send ideas or feedback to SurveyCrest?
We welcome your compliments, complaints and suggestions. Your feedback or ideas will help us improve the quality of our information, products and services.The purpose of this form is to collect feedback from clients about their interaction with the SurveyCrest.Follow steps:1. To send a feedback you need to login first & click "Feedback" link of a footer area.
 2. Give your feedback details here.
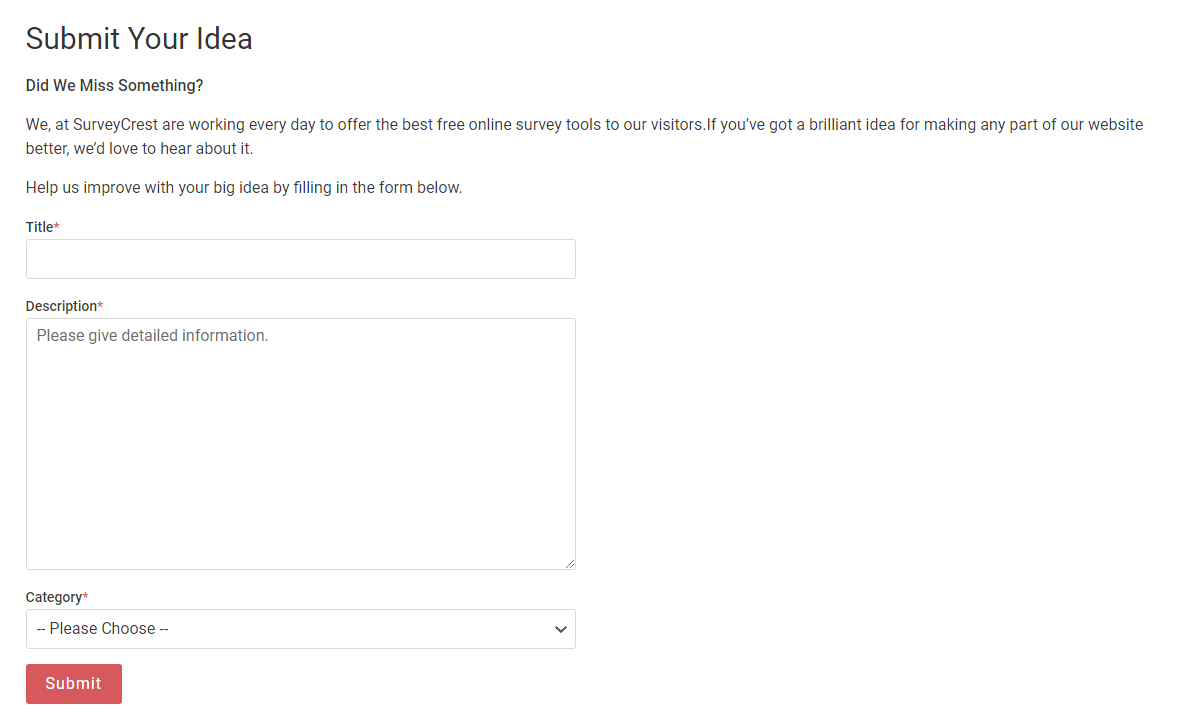 3. Click "Submit" button.
 -
How can I hide or show question numbering.?
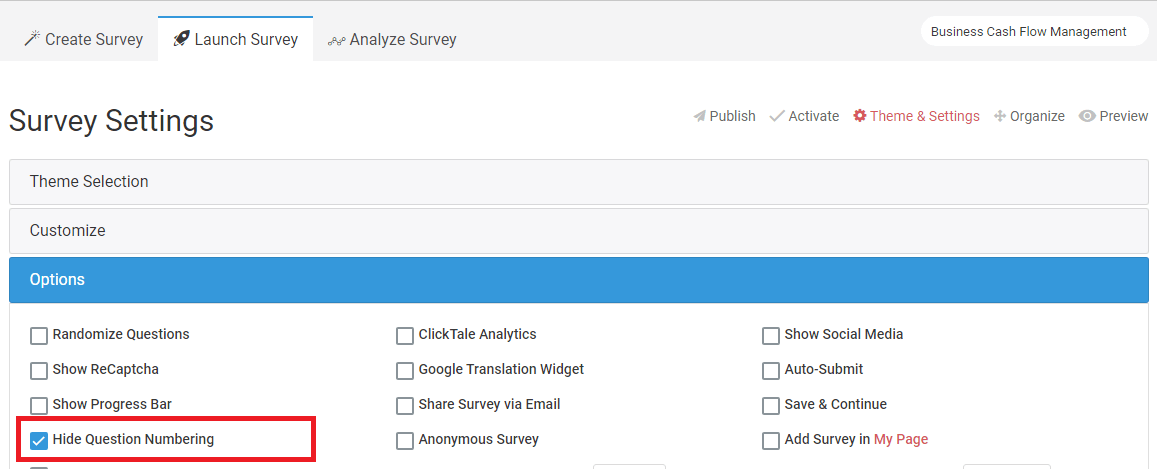
By default, question numbering will be set to all questions over the entire survey or service.You can choose to hide question numbering altogether in your live survey go to Publish Page > Options > "Hide Question Numbering" > Save.
-
How can I create a quiz?
To create a quiz is very easy and simple.Follow Steps :1. Click “Create Quiz” option that appears in the "Create Survey" drop-down menu.
 A quiz landing page will be open.
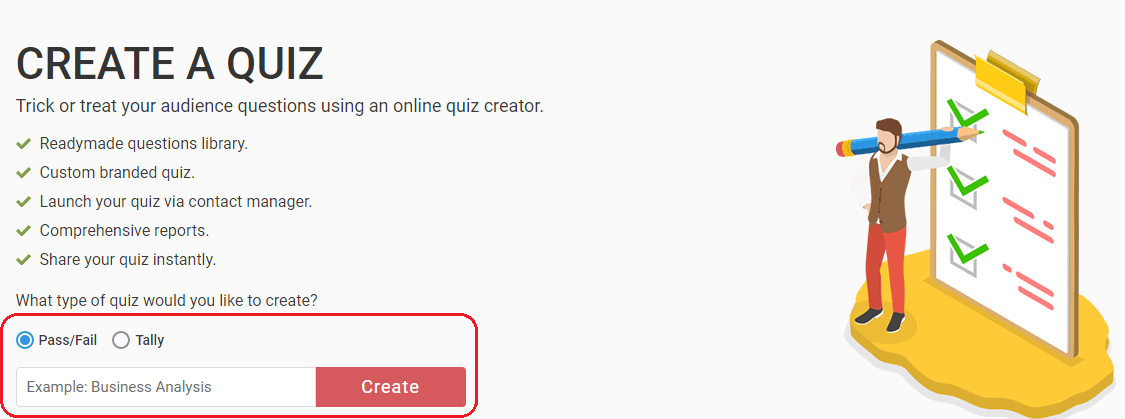 2. Select the type of quiz (Don’t worry too much about the quiz type option, you can change it later on if you like.)3. Enter quiz title in text field.4. Click "Create" button
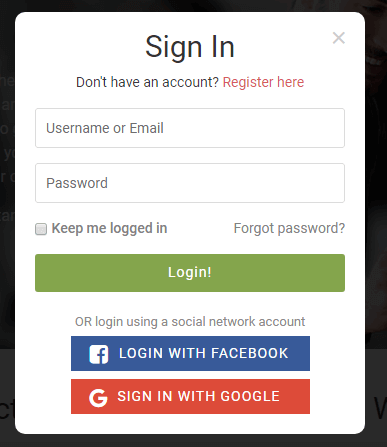 5. It will ask you for login. If you don’t have an account click on the Register button to get access, it only takes a minute & will redirect you design page of quiz.
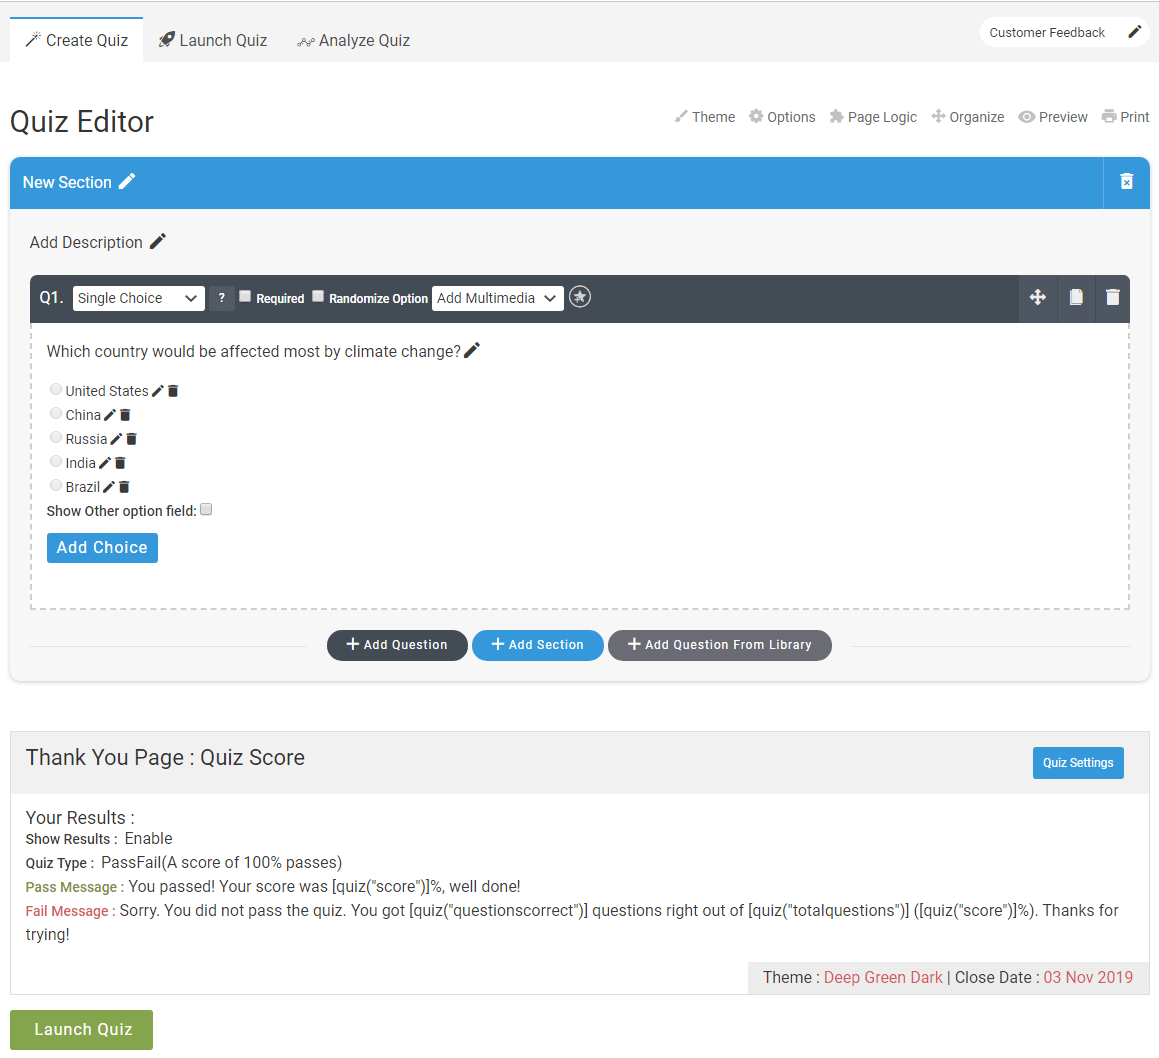 Using quiz design page you can add questions, set up scoring criteria in quiz settings page and much more.
 -
What do the Pass/Fail and Tally options mean?
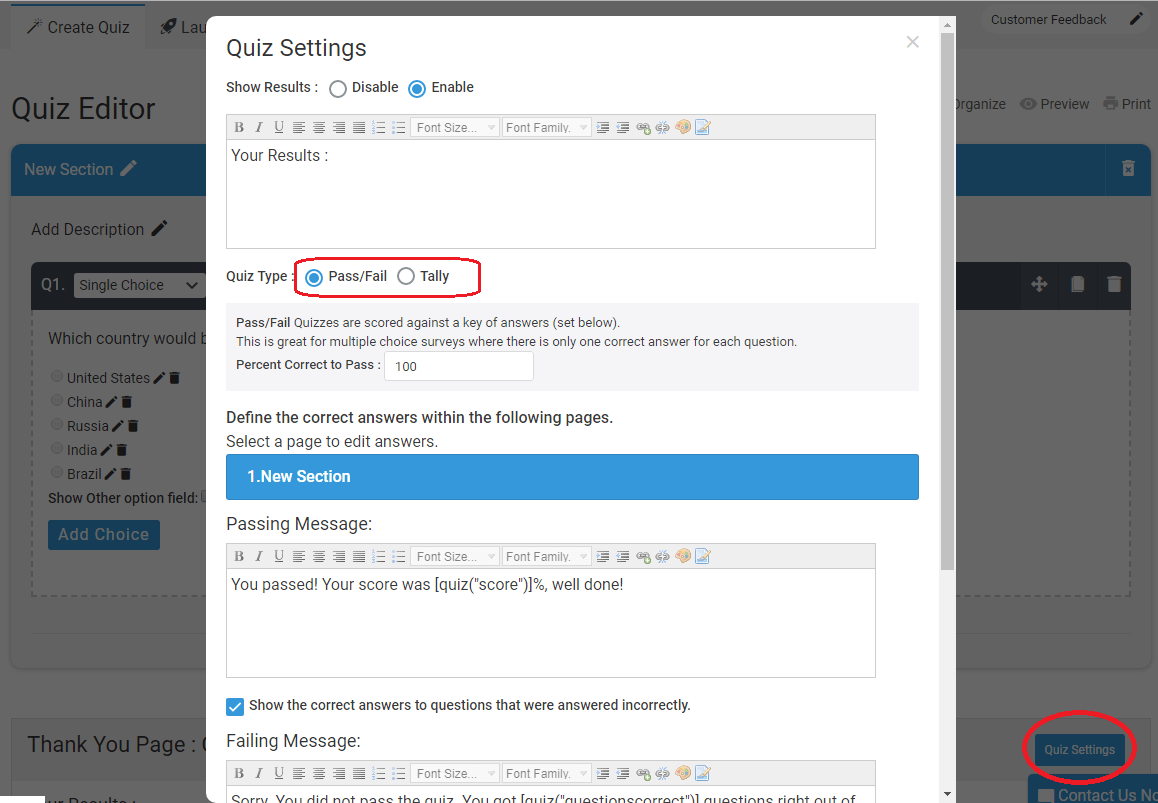
SurveyCrest allows you to create two different types of quizzes, Pass/Fail or Tally. Both have a different scoring system that lets you evaluate the participants’ knowledge in unique ways.The differences are described below. Don’t worry if you pick the wrong one, you can change the Quiz Type later on.1.Pass/Fail QuizThis is like a typical pop quiz. Each question has only one correct answer, which counts as +1 points. The final scores are added and checked against a specified percentage. Any participant scoring above (or equal to) the percentage is declared as “Pass”, if not then is categorized as “Fail”.Find more details about how the Pass/Fail scoring system works.2.Tally QuizA Tally quiz lets you assign different points to each answer option. All points are added (or averaged) and compared to different score ranges (for example, 0-60, 61-69, 70-85, 85-100). Each range displays a different result to the participant.Find more details about how the Tally Quiz scoring system works.
-
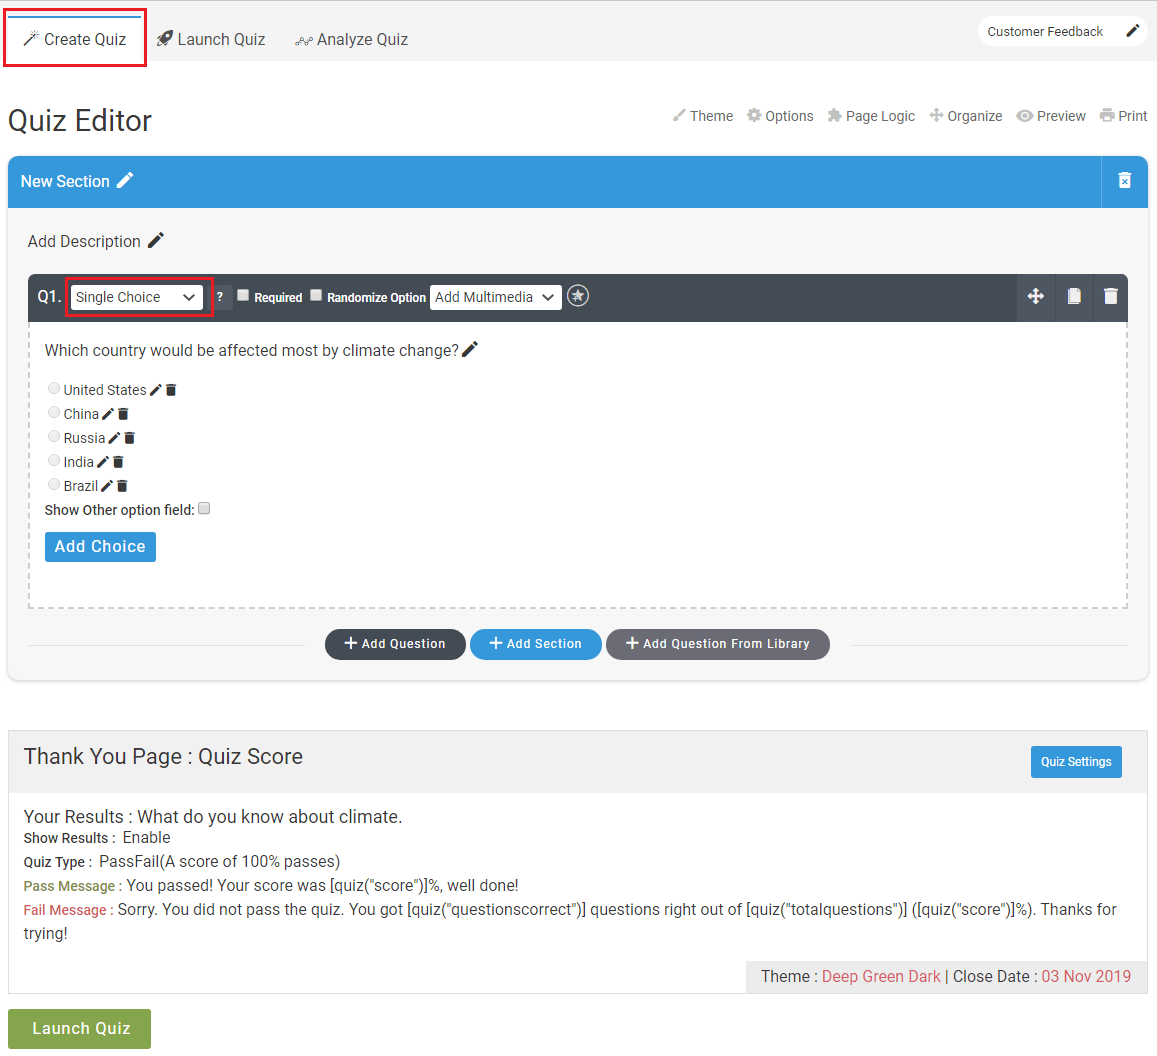
How can I add questions to my quiz?
To add a question to your survey design page click the "Add Question" button at the bottom of question box. You can change question on your choice from the "Question Type" drop-down menu. Usually, the choice type questions are works best for quiz in most situations.
-
How do I add answers and set up scoring criteria for a Pass/Fail SurveyCrest Quiz?
Click on the “Quiz Settings” button located at the end of the “Quiz Editor”. A popup will appear, select the quiz type you are using and specify a pass percentage.
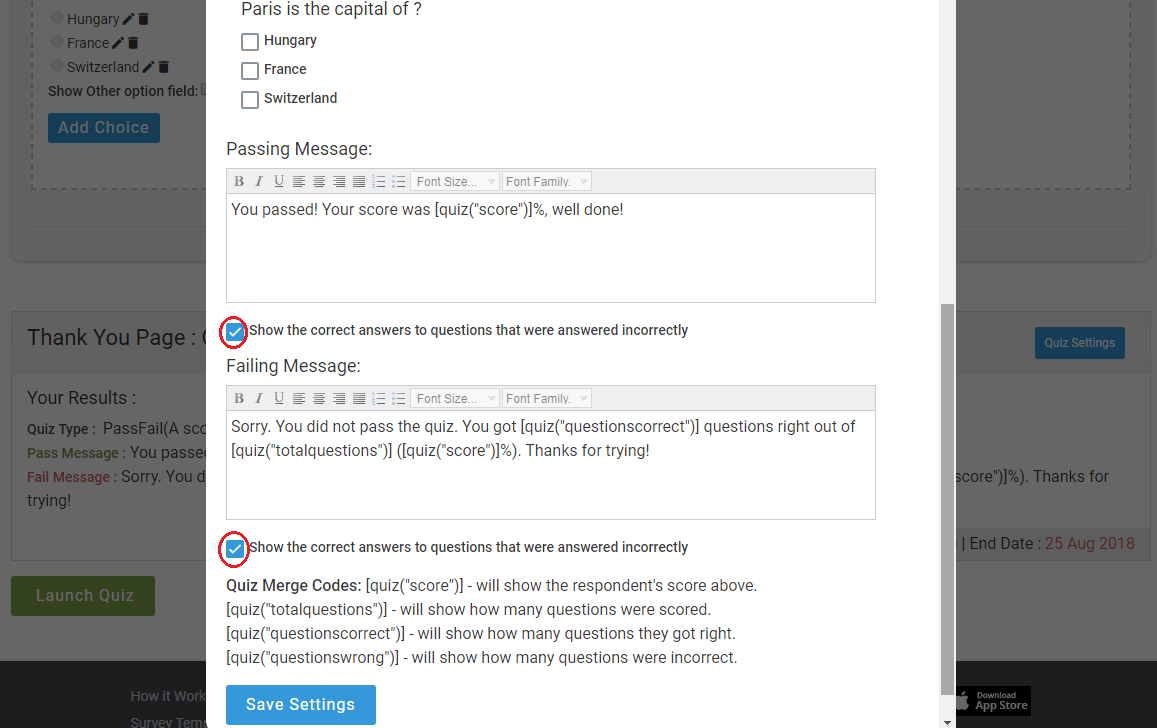
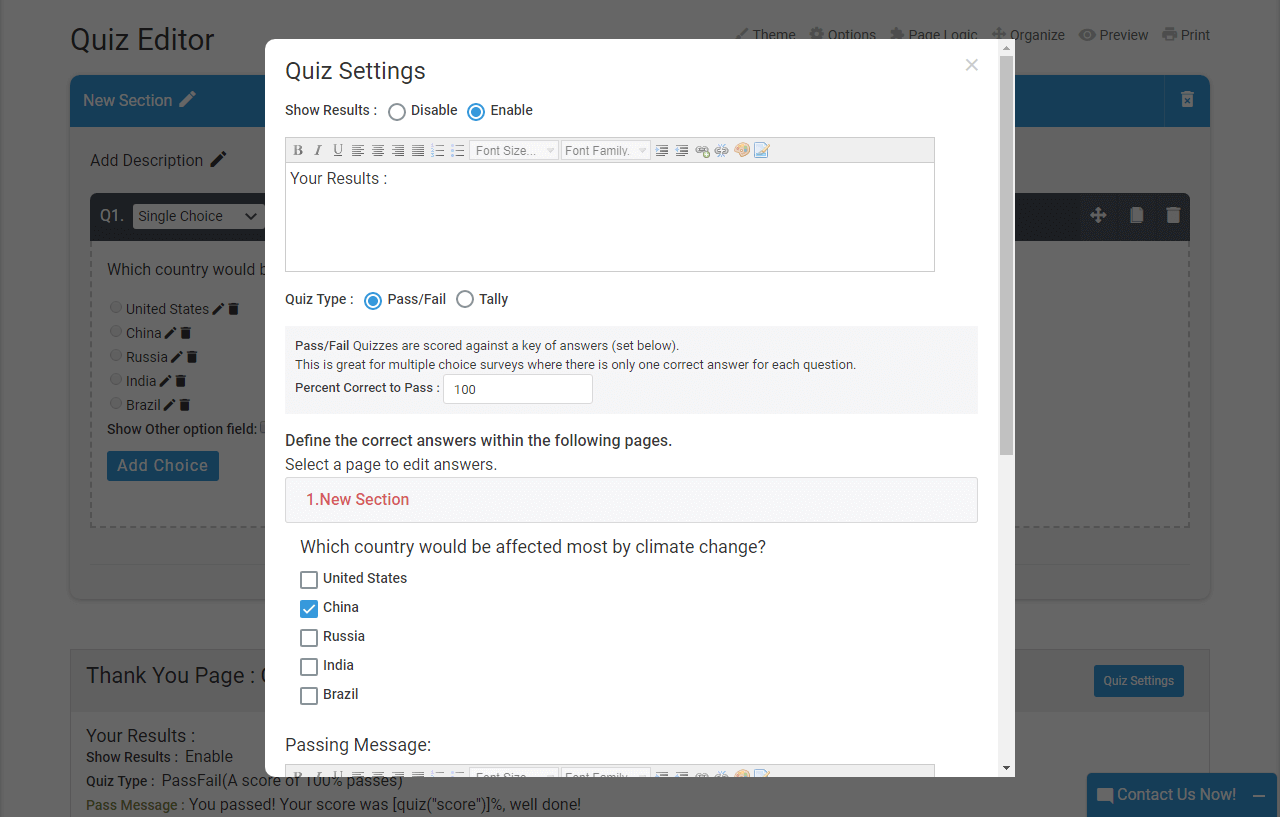 You can specify an answer key here. Simply check the checkbox next to the right answer. Repeat this for each question and you are done. The Pass or Fail status of the participant is decided according to the percentage you have set up in the “Percent Correct to Pass” section.You can also display a custom Passing/Failing message to you respondents. If you want the right answer to be displayed after the result, check the “Show correct answers to questions that were answered incorrectly” option.
-
How do I add answers and set up scoring criteria for a Tally SurveyCrest Quiz?
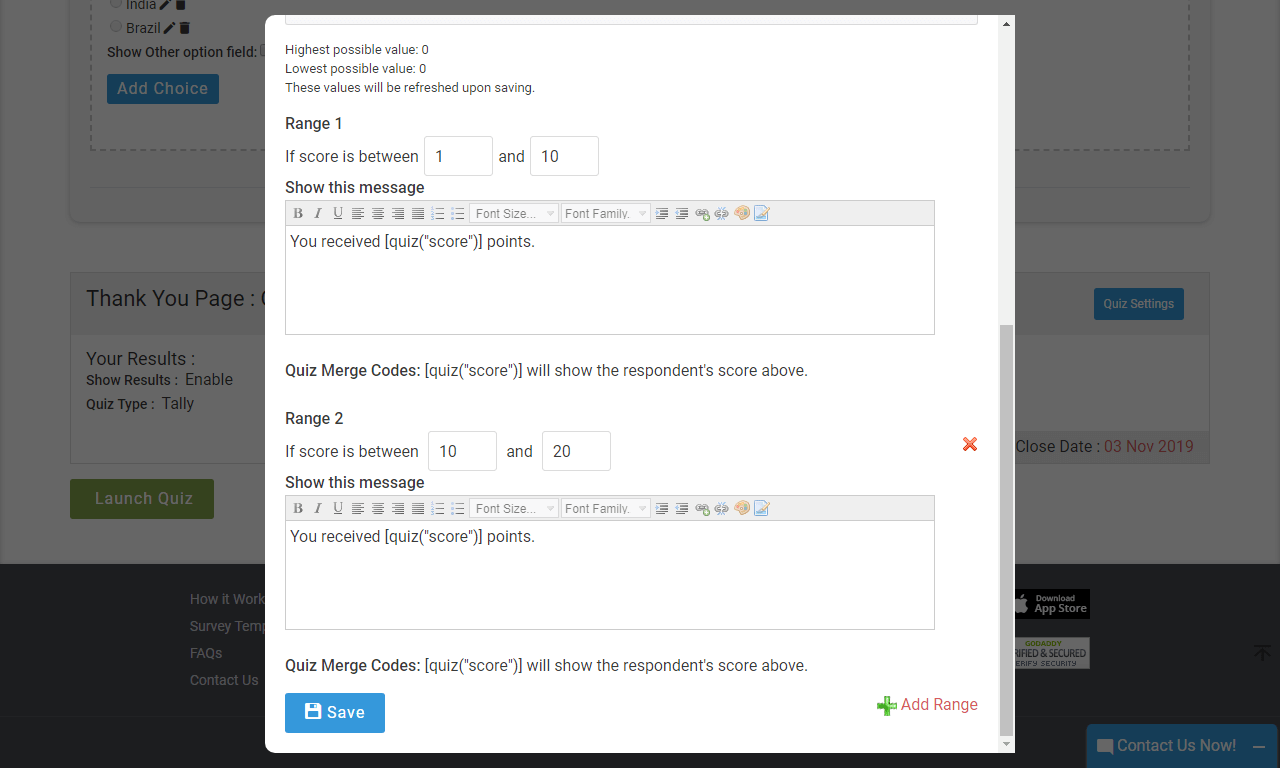
Click on the “Quiz Settings” button located at the end of the “Quiz Editor”. A popup will appear, select the quiz type as “Tally”, and specify the scoring system—addition or average.
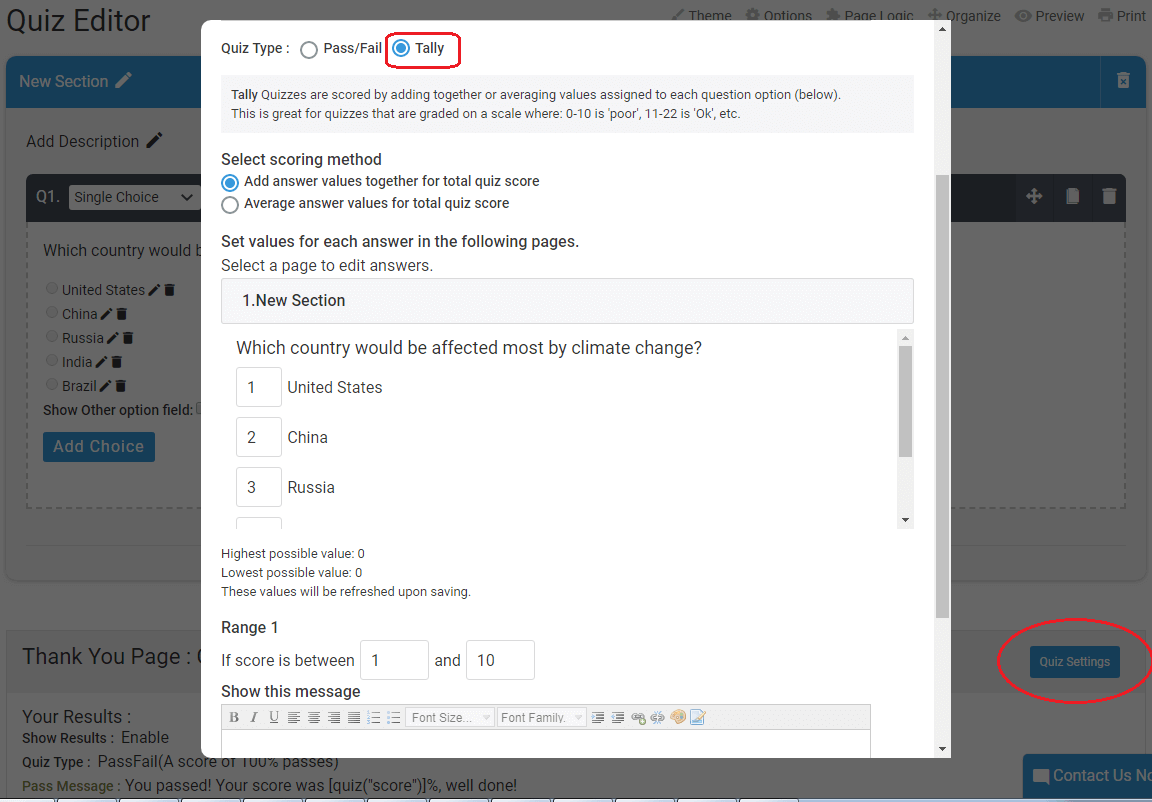 In this case, you also have to assign points to each answer option. Please note only positive numbers are applicable here. Decimals are allowed, but make sure you specify the ranges in decimal as well.Once you are done, set up the scoring criteria by specifying ranges. Be careful your choices for two ranges don’t overlap, for example, 0-10 and 10-11 is not correct, use 0-10, 11-20, and so on. A maximum of 10 ranges can be set up.Specify what message you want to display if the participant scores within a particular range.
-
How do I display the final scores of a SurveyCrest Quiz to the participants?
How do I display the final scores of a SurveyCrest Quiz to the participants? Final quiz scores need to change according to each participant’s answers. A quick way to manage this is to use merge codes. These simple formulas change as the score changes. You can use the following merge codes to display results inside the quiz score message.(These merge codes apply to both kinds of SurveyCrest Quizzes)
Merge Code
Purpose
[quiz("score")]
Displays the score within the quiz score message
[quiz("totalquestions")]
Displays the total number of questions within the quiz score message
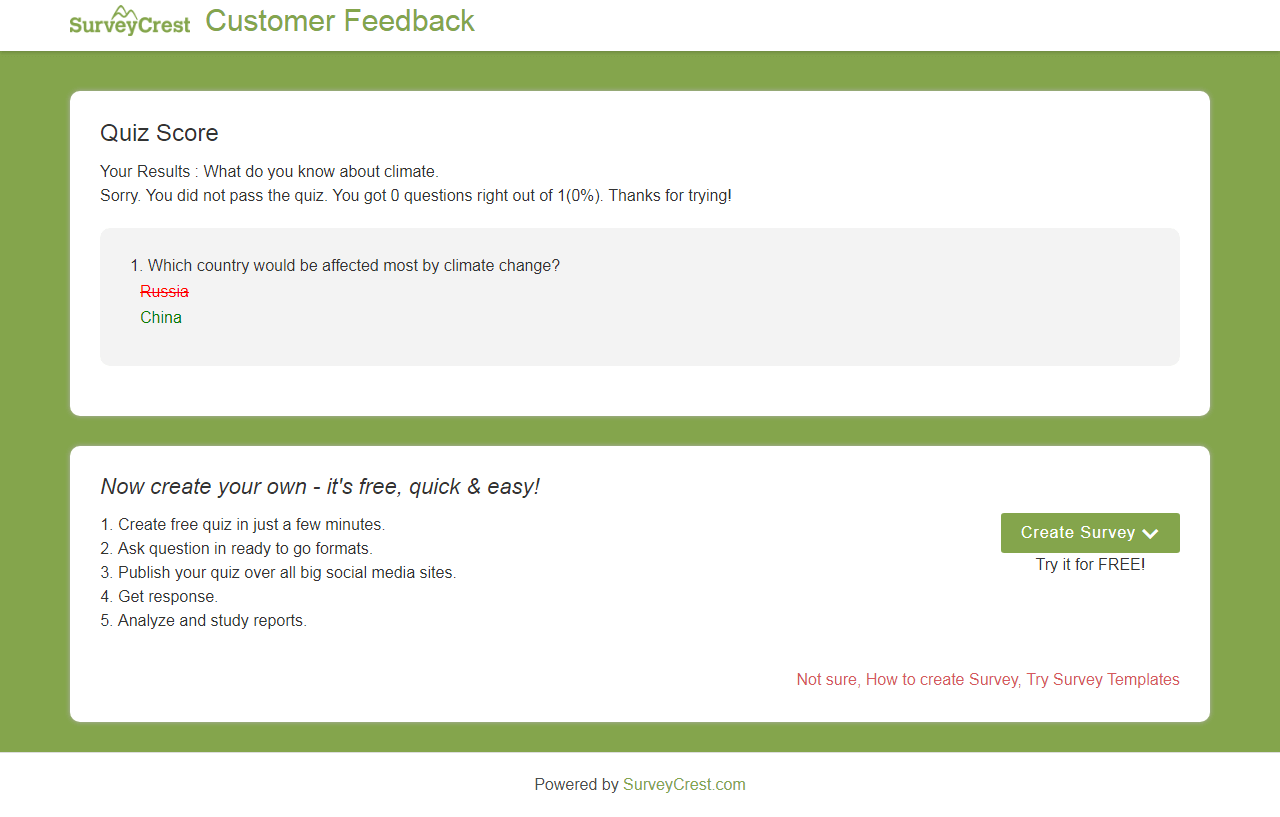
[quiz("questionscorrect")]
Displays the total number of questions answered correctly within the quiz score message
[quiz("questionswrong")]
Displays the total number of questions answered incorrectly within the quiz score message
The following examples show the results of using merge codes:a) Results of a Pass/Fail Quiz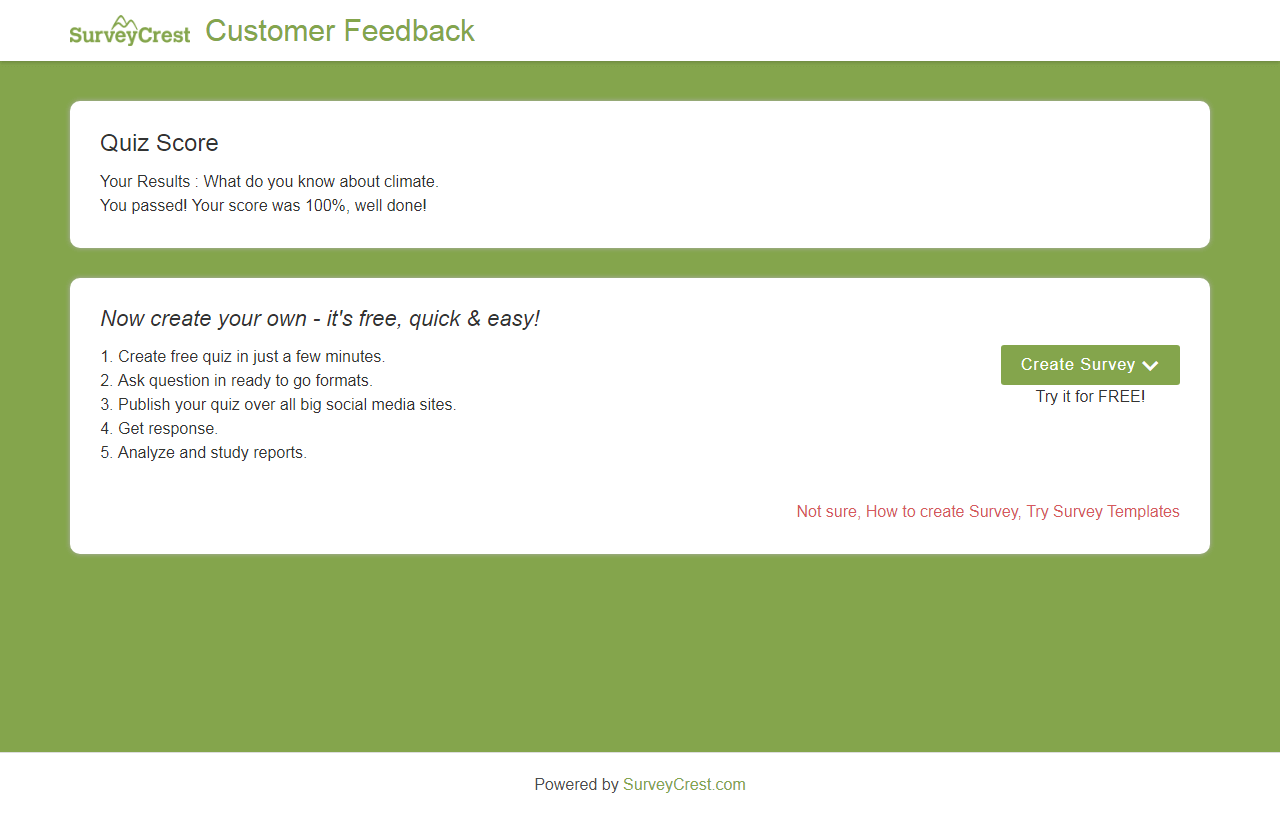 b) Results of a Tally Quiz
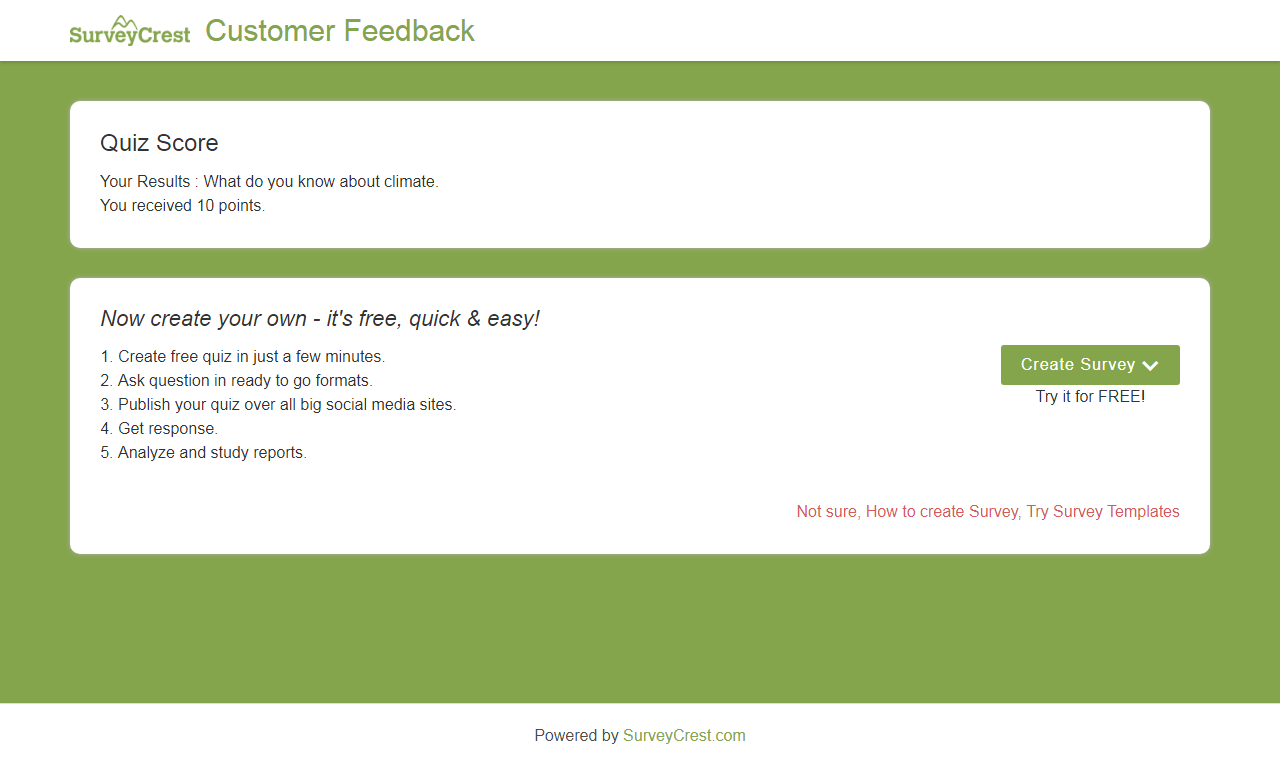 c) Correct Answers and Total Number of Questions
-
How can I add multimedia features in survey?
You can add multimedia (audio, image, you-tube videos, vimeo videos, slide-share, text & google map) features in survey or other services.To find out Multimedia option go to "Survey Design Page".

-
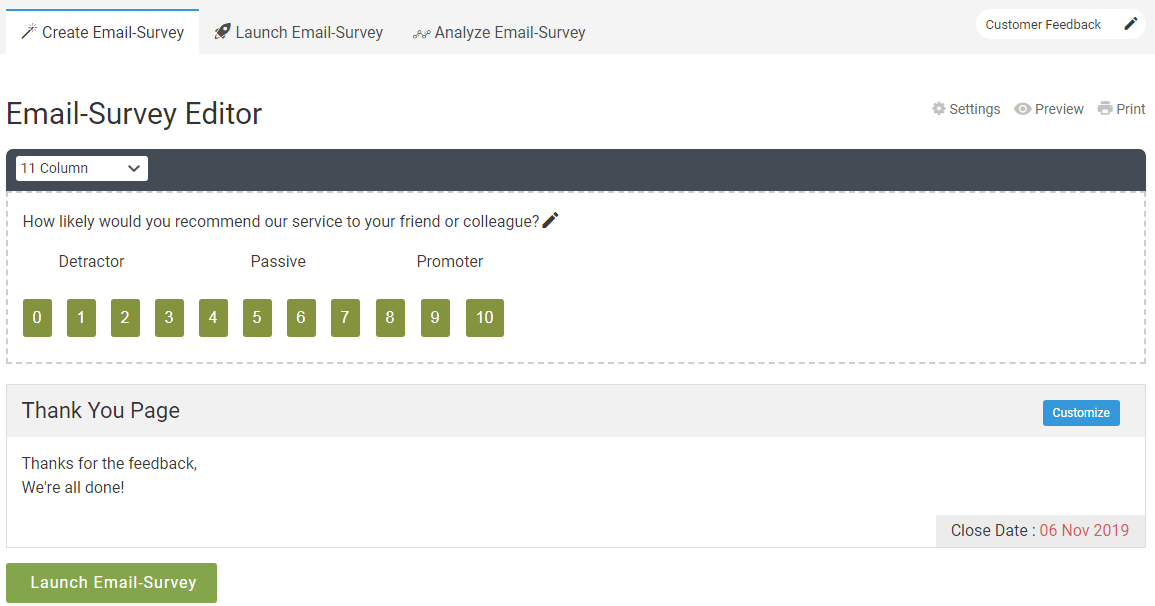
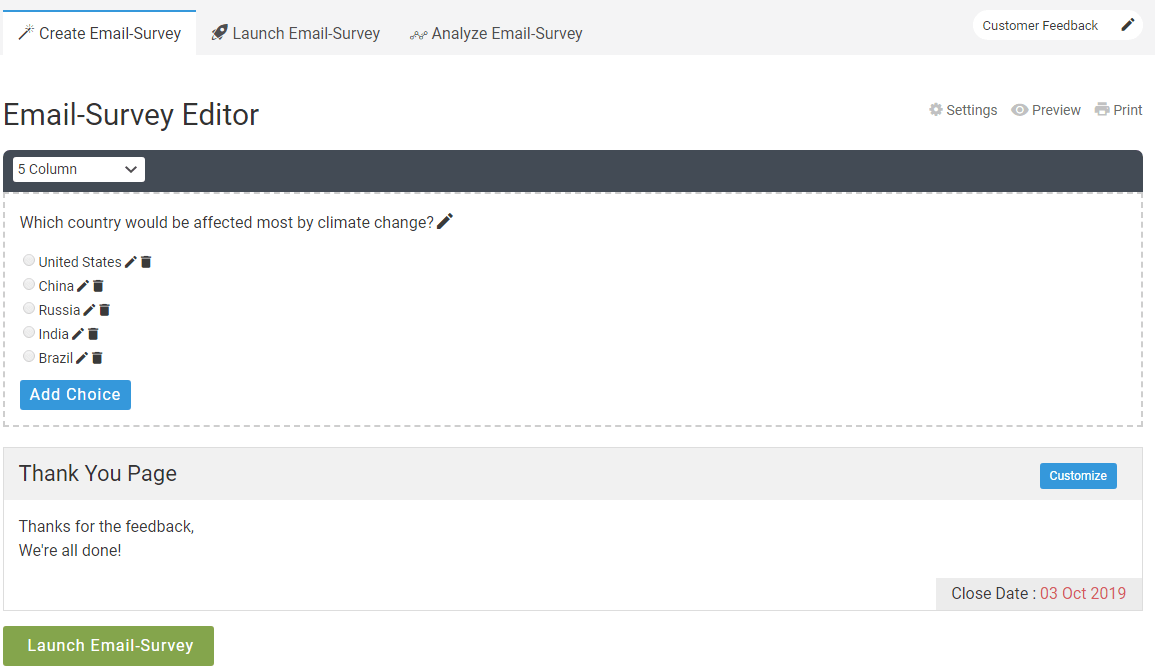
What type of questions email survey supports ?
Email surveys support just two type of questions.1. Netpromoters
 2. Single Choice.
-
How can I hide or remove footer from survey?
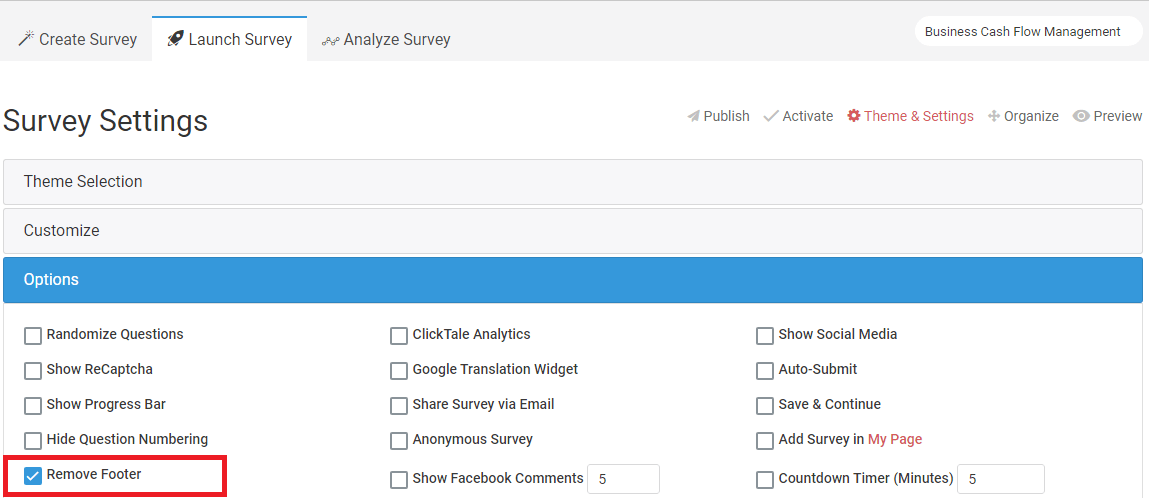
The "Powered by SurveyCrest" footer appears by default at the bottom of your survey page. Depending on your SurveyCrest plan, you can hide/remove the footer from the bottom of your survey or other services completely.You need to it off in each of your surveys individually.To remove or hide the SurveyCrest footer:Go to "Launch Survey" > "Theme & Settings" > "Options" > "Remove Footer"
HOW TO LAUNCH AND PUBLISH MY SURVEYS
-
How can I activate my survey/poll?
Once you are done making your survey/poll, go to Launch > Activate. Update the title of the survey/poll and select the ‘Start Date’ and ‘End Date’ of the survey/poll. You can also change the survey format by selecting ‘single page survey’ for a single-page or ‘section/page wise’ for a block-wise or paged survey.
You can personalize your survey/poll URL by inserting your company name, survey title or name or a reference number. This will become your unique survey/poll URL.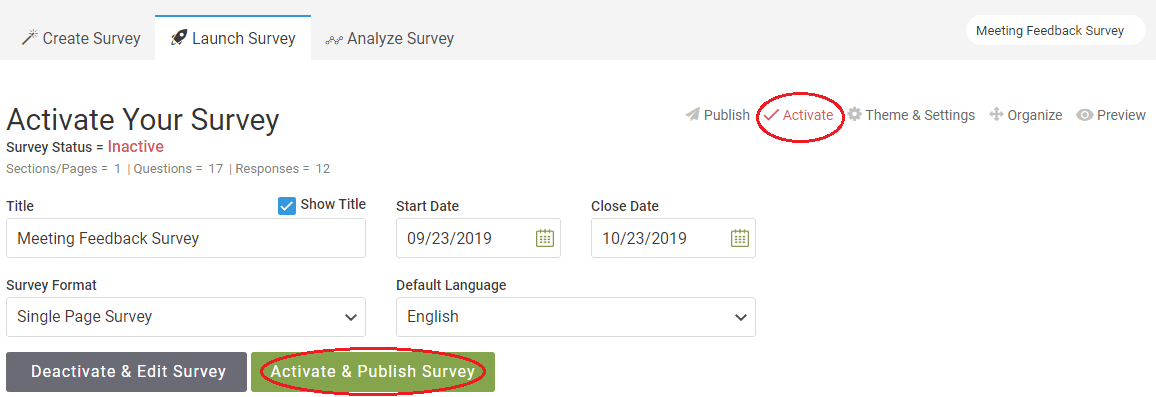 Once done, click on Activate & Publish Survey’.
-
What is Random Question feature and how does it work?
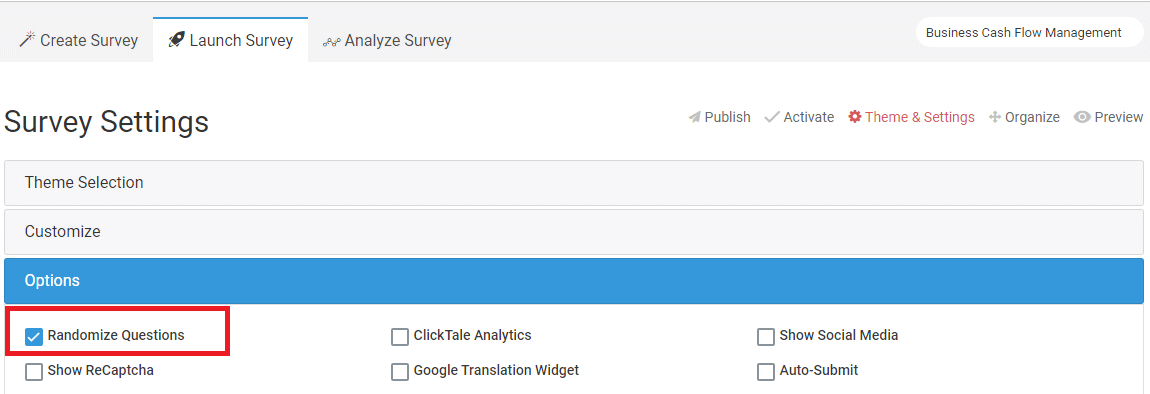
The random question feature is a great way to display random choice of questions in a survey. Ideal for surveys that may be taken more than once by the same person, making sure that they don’t answer the same questions in sequence every time. Just add several questions to a page and every time the survey is published, a single question is displayed randomly.
-
How can I keep my survey/poll questions private from search results?
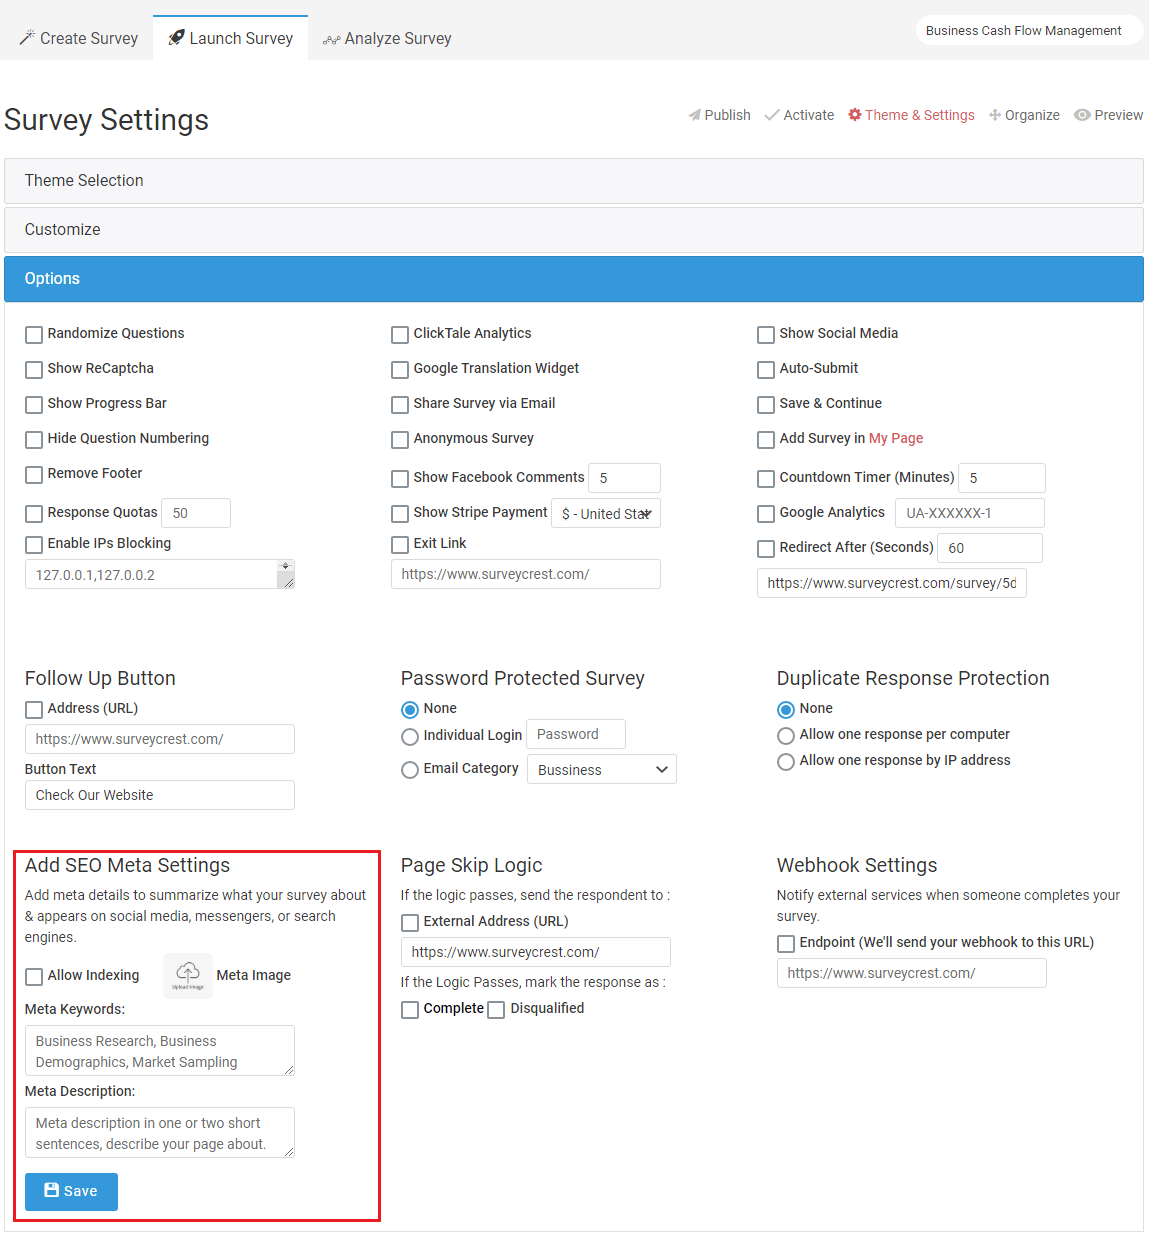
The "SEO Friendly" feature allows you to keep your survey/poll/form/quiz questionnaires either public or private if searched through a search engine. If you want to keep your surveys/polls/forms/quiz's private and have designed them for internal use only, make your survey/poll private so it cannot be searched through a search engine.
-
How do I use the Captcha feature?
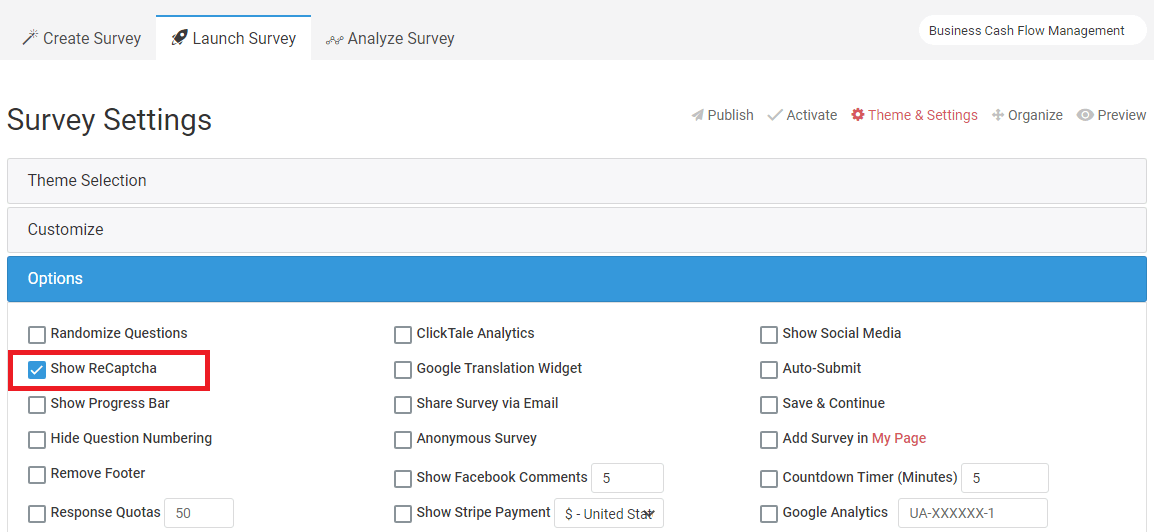
Captcha is an added security feature that you can incorporate in your survey/poll and ensure that it is not filled by robots. To enable it, you need to go to Launch > Settings Page > Show Captcha. When your res-ponders access your survey/poll, they will have to fill in the correct Captcha displayed to proceed further with the survey/poll.
-
Should I enable Captcha on my survey/poll?
Captcha is a relatively better way to get rid of SPAM. If you are sending your survey/poll to a large audience and through open forums, we recommend adding the Captcha as this will keep spam data away from your survey/poll responses and you will get responses from real users.
-
Can I create my survey in parts and will the data be saved for the previous part if I am not done completely?
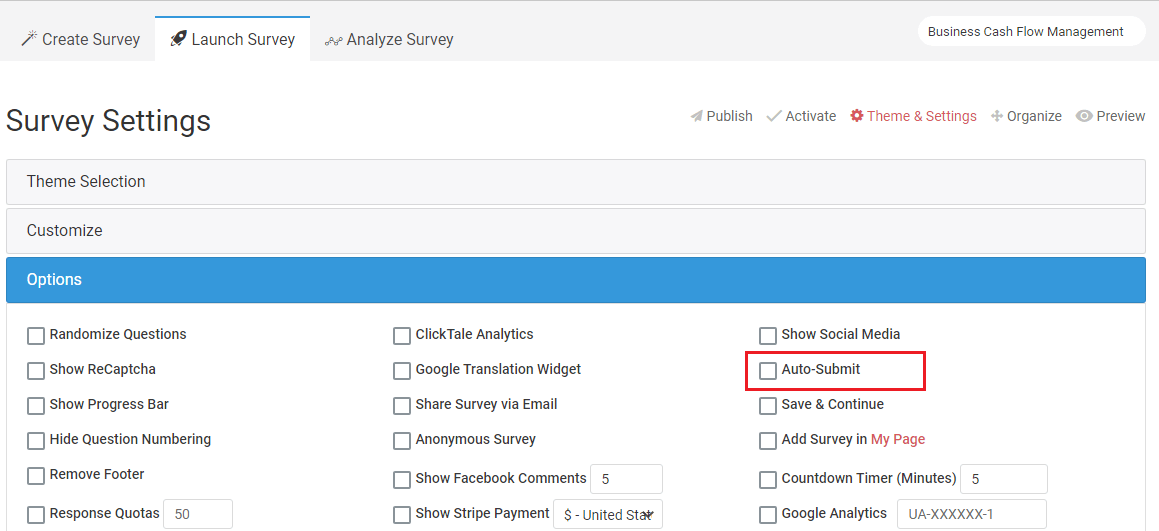
The Auto-submit feature saves the data as it is submitted. You don’t need to worry and have to necessarily complete the survey in a single go. If you have a lot of questions to be added to your survey and need intervals to get the survey completed, no need to worry, our auto submit feature will save data on the go.
-
How would the respondents know when the survey will be completed?
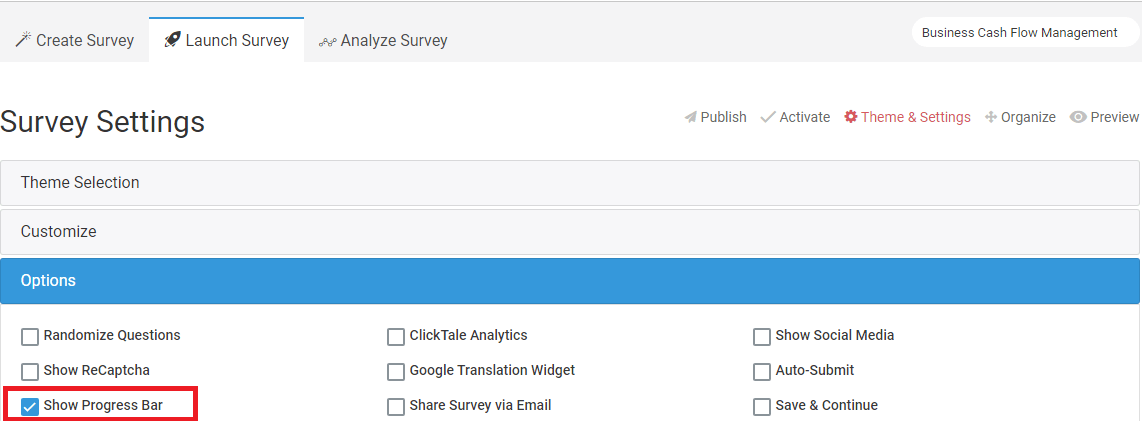
If you have a lot of questions in your survey, and you feel informing the respondents well before and show the progress as he/she completes your survey, then showing the progress bar will benefit you as the respondents would know how much time they need to spent completing your survey.
-
What is Duplicate Response Protection?
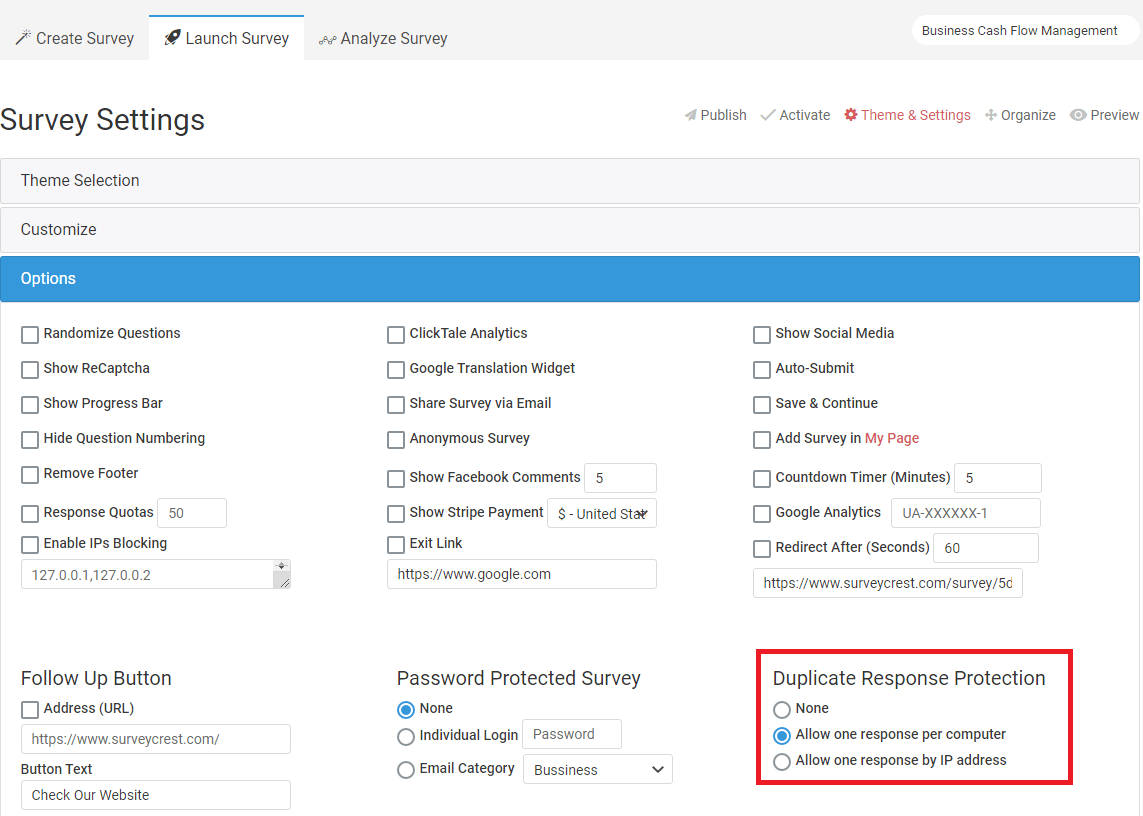 You can prevent your survey/poll/form/quiz from having duplicate responses by the same people by enabling this feature based on IP or through a browser cookie. Go to Launch > Settings > Duplicate Response Protection. The three options which you can choose from are:None: users can send multiple responses from the same browser.Allow one response per computer : users can send a single response from same the same IP.Allow one response by IP address : users can send single response from the same computer
 -
How can I protect my survey/poll/form/quiz ?
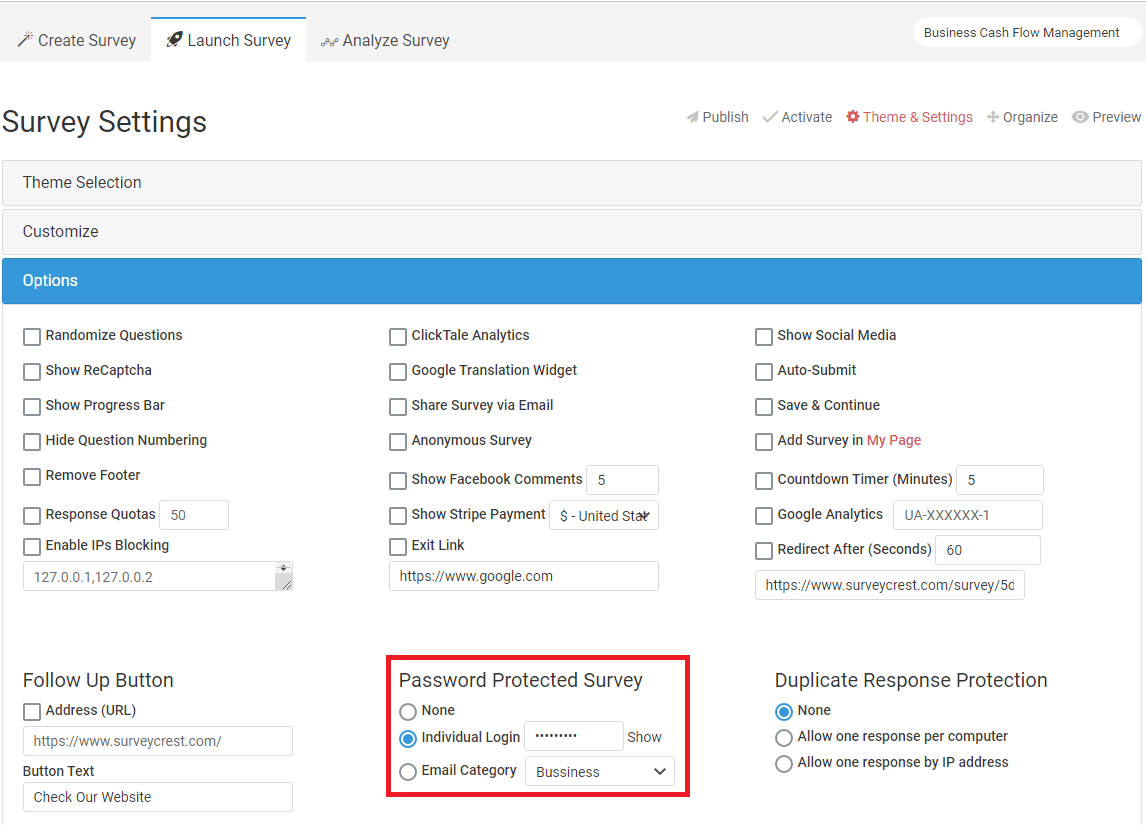
If you want to get responses from selected users of a group OR protect your survey/poll, enable password protection on your survey/poll/form/quiz, and email the respondents that you wish to respond to your survey/poll/form/quiz the password. The respondents will only be able to respond to survey/poll/form/quiz after entering the password you provide.
-
How can I share/publish the survey/poll?
Users will be able to access your survey/poll/form/quiz using a link. You can customize this link as you like by going to Launch > Publish.
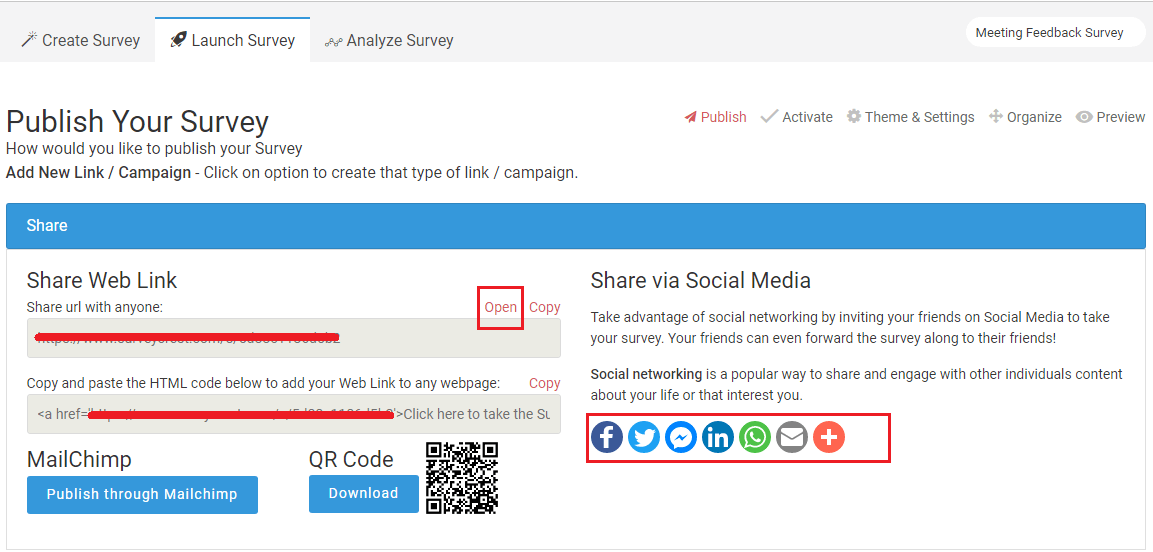 You can also share the link via email, Facebook, Twitter & LinkedIn.You can even embed a survey/poll on your company’s website.Or you can use your “Address Book” or "Email Campaign" option.
-
How to import emails from csv file in address book ?
A CSV (comma separated) file can be created for a list of email addresses separated by comma format. You can create a CSV file by using MS Excel file, and upload it via the “Add Email by CSV” feature under the Launch > Publish > Email Campaign > Address Book tab. Make sure, when you create your email CSV file, it has a proper header like “Email” or “E-mail” and all email addresses of your contacts listed under it. This will allow our “robot” to read the file correctly.

-
Can I edit my question after it has been launched?
Survey/Poll/Form/Quiz questions cannot be edited after it has been launched or activated. You may, however, edit it by de-activating your survey/poll/form/quiz. After making the required editing, you may activate it again.
-
How do I de-activate my survey/poll?
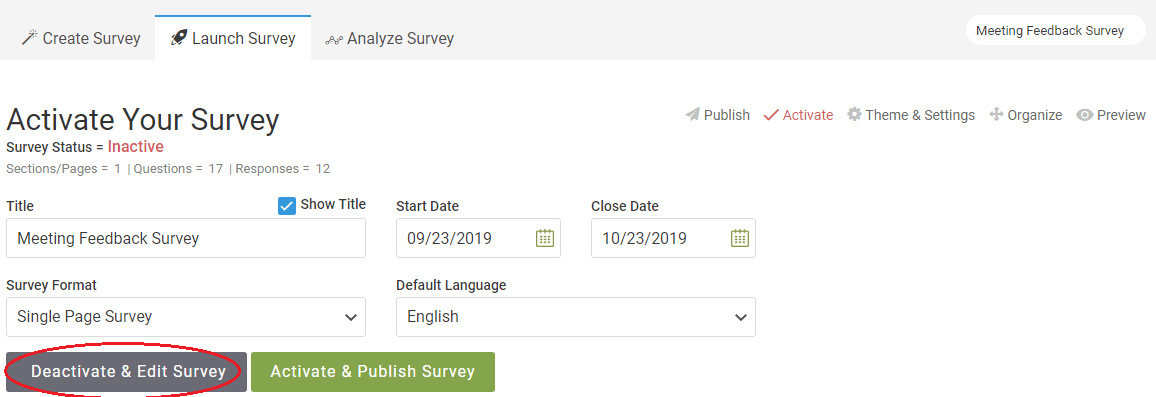
On your Dashboard, under the “Status” header, click on the “Active” icon. This will take you to the Activate tab, where you can choose to “Deactivate & Edit Survey”. If you want to resume the survey/poll/form/quiz at any other time, simply click on “Activate & Publish Survey”.
-
What are the different options for publishing my survey/poll/form/quiz ?
Once your survey/poll/form/quiz is activated, you can publish it using different mediums as follows:
- Email Campaign: You can send email link of your survey/poll/form/quiz using Email Campaign tab to invite responders through email addresses. You can also upload your selected “Address Book” to upload contact list.
- Share via Social Media: You can choose any social media platform to share your survey/poll/form/quiz link. You can also choose to install a Facebook Application to link your survey/poll/form/quiz.
- Embed in Website:
- You can open your survey/poll/form/quiz using iFrame by simply copy pasting the code to embed in a frame in your website.
- You may also use the Overlay Link option by copy pasting the code on to your website and the user simply click on the named link to have the survey/poll/form/quiz popup in a window.
- You may embed codes in your website that will allow respondent to fill a survey/poll/form/quiz in new tab or upon closing the existing one.
- Share Web Link: You can share your survey/poll by creating a web link as well to be used in a website, blog or anywhere else online.
- Download QR Code: Your respondent can access the survey/poll using QR codes
- MailChimp: You can invite respondents by inviting them using your MailChimp API code and mass publishing your survey/poll/form/quiz.
-
How long can I keep my survey/poll on the website?
You can create your survey/poll/form/quiz/email-survey and it will remain on our server for unlimited time duration.
-
What are response page settings?
SurveyCrest lets you customize and personalize your survey according to your requirements for ease of use as well as for protection of your survey information. The following given are response settings options. Go to survey Theme & Settings page, and check mark the options ones to enable:Randomize Questions: This feature will randomize the question sequence which you have created in your survey to ensure that no one survey responder answers the same way.ClickTale Analytics : This option allow to collect and analyze how your respondents interact with your survey. Click Tale’s analytics service is qualitative and provides a video playback option for each individual visitor's session. You may see user behavior before they changed their answer, or how they navigated about the survey. This sort of information can help you to redesign and optimize your survey to its potential.SEO Meta Settings: Add SEO Meta to summarize what your survey about & appears on social media, messengers, or search engines..Show Social Media: If you would like your responders to share the survey/poll after they have completed it, enable this feature so they can share via social media like Facebook, Twitter or LinkedIn etc.Show ReCaptcha: Enable this feature if you are sending your survey/poll to a large audience and don’t want to receive spam responses. It secures your survey/poll from spammers.Auto-Submit: Enable this if you want a user to automatically submit partially filled survey or accidentally closes their window.Show Progress Bar: Survey responders are usually impatient. Showing a progress bar will assure that the survey is progressing and when it is nearing its end.Google Translation Widget: If your audience speak foreign language(s), enable this button so that they can translate your survey etc into their particular language using Google Translate.Share Survey via Email: Enable forwarding option so that after the user has completed the survey/poll/form/quiz to widen the circle of responders.Save & Continue : This option allow respondents to edit their responses .The respondents can complete a portion of a survey after save and continue he needs to provide his own name and email to access that survey later to finish the rest.Hide Question Numbering : By default, question numbering will be set to number questions over the entire survey from 1 to n. You can checked this option to hide question numbering.Anonymous Survey : When you select this option for an anonymous survey, information about the respondent’s geo location, IP address etc. will not be stored. What this basically means is that there will be no respondent tracking so you will only have access to their forms data.Add Survey in My Page : This option allows you to add individual survey in a your page, for giving an access of all your public services to audience you must need to set page url & status in my-account section.Remove Footer : This option allows you to hide the SurveyCrest footer of a survey.Show Facebook Comments : This option allows you to show or hide facebook comments from a survey.Countdown Timer : This option allows respondents have to complete the survey within a certain period of time and when the timer runs out, the response will be automatically submitted.Response Quotas : The option is the total number of completed responses for the entire survey. If you want to limit the total responses for your survey, this is the type of quota you will want to use. Once that quota is met, your respondents will no longer be permitted to submit a response.Show Stripe Payment : This option allows you to set up an order or donation form for purchasers to select various products and services and submit a payment!Google Analytics : This option is a very powerful web analytics suite. It allows you to track survey conversions, path analysis, sources of survey traffic and even various versions of your forms and surveys.Enable IPs Blocking : This option control survey access at the user ip level by specifying a range of comma separated IP address.Exit Link : This option allows respondents to exit from the survey without saving the responses entered on the survey page & send participants to a related website.Redirect After (Seconds) : Using this option, you can add a survey redirect to send participants to a related website after they complete the survey.Follow Up Button : Using this option you can grow your lifetime fans and get your visitors to follow you on social media or website.Webhook Settings : Trigger a webhook whenever someone responds to your survey. A notification containing the survey response data in JSON formatis immediately sent to your defined destination URL. By default this option will be set to OFF until you turn it ON by selecting endpoint checkbox checked.Page Skip Logic : If a respondent doesn't meet your targeting criteria or consent to your terms, you can disqualify them from the survey using Page Logic.Using Page Logic allows you to route respondents based on their answer to a question. You can choose to allow respondents who answer a certain wayto continue through the survey, or you can exit respondents from the survey based on their answer.There are 3 options available for what you would like to have happen if your logic condition is met:- External Url : This option will immediately direct a survey respondent to a external URL of your choice.- Complete : When the logic condition is met, the response status will be marked as complete & send the survey respondent to a thank you page.- Disqualified : When the logic condition is met, this option will send the survey respondent to a thank you page with your customized disqualify message.Duplicate Response Protection: You can prevent your survey from having duplication of response.- None : By default this option is selected,It means respondents can send multiple responses from the same browser.- Allow one response per computer : Respondents can send single response from the same computer- Allow one response by IP address : Respondents can send a single response from same the same IP address.Password Protected Survey: Restricting Survey Access by Password.- None : By default this option is selected,It means no any restriction on survey or no need to need enter password in order to take the survey.- Individual Login: If you turn on this option, respondents need to enter a password in order to take the survey.- Email Category: If you turn on this option, you can to create a unique password for each respondent on base of respondent email using address book . respondents need to enter an email & password both in order to take the survey.
-
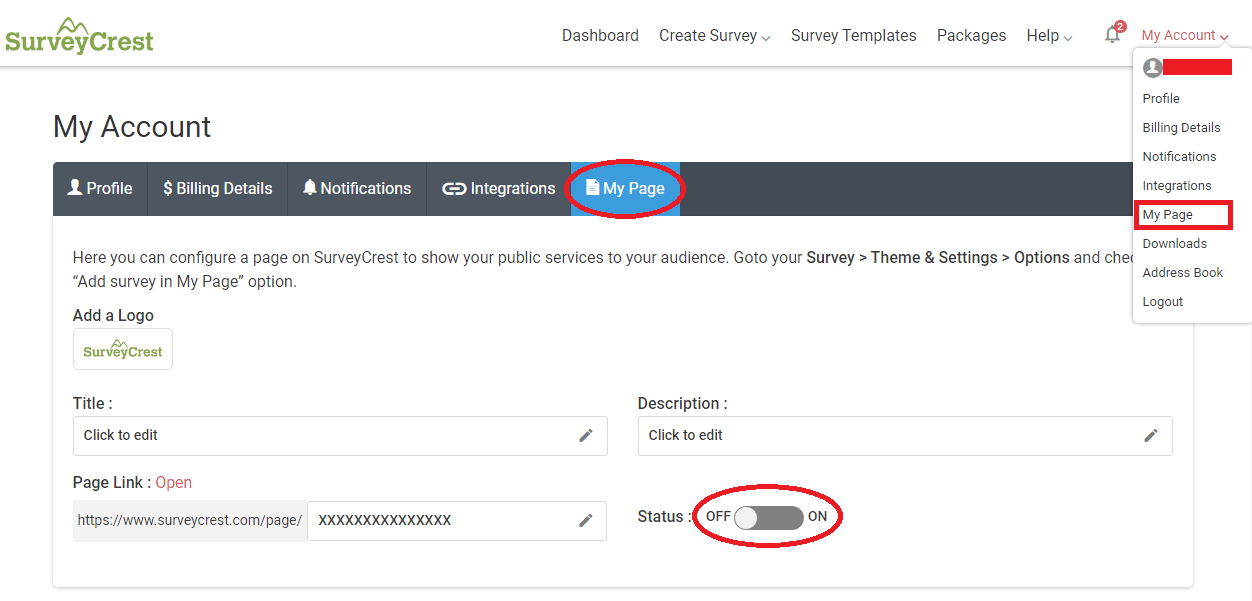
How to give access or sharing of my page to your aduience.?
Here you can configure a My Page on SurveyCrest for giving a access of your public services to your audience.- Your Page Link should be unique one.- To give access/enable "My Page" URL your status should be On.- To Add Survey/Poll/Form/Quiz on My Page , you need to go Launch > Settings > Options > Add Survey in My Page
-
Is there an option to use my contact list to publish a survey/poll?
You can add and manage your contact list by going to Launch> Publish > Address Book. Here you can add your contacts listed and saved in a CSV file by clicking on “Add Email by CSV”. A popup window will open; select the CSV file you want to upload.
 You can also add individual contacts with details by clicking on “Add New Email”. A popup window will open where you can enter your contact details in multiple fields.
Once you have a list of contacts you can arrange them by categories, like school, work, social or friends contacts. You can add more as and when you like by clicking on “Add New Category”.
-
What’s the difference between installing a Facebook Application and publishing my survey using Facebook social media?
You can publish a survey/poll/form/quiz by sharing the survey/poll/form/quiz URL via social media like Twitter, Facebook, Google+, Tumblr etc. You can do so when you go to Launch > Publish > Share via Social Media, and choose Facebook. This allows you to publish your survey/poll/form/quiz URL anywhere and on anyone of your social media account.
Or, you can install our Facebook Application onto your Facebook page that you manage.Go to Launch > Publish > Share via Social Media and install it from the Facebook app link.
This Application allows you to customize the type of survey(s)/poll(s) you want to launch on a specific Facebook page, and who can access it. You have control over the following options when you install our Facebook Application on your page:
FanGate: You may create a FanGate onto Facebook page. This means that visitors will have to “Like” your page before they can view or access your page content. Instead, you can customize your Facebook page to engage your visitors with an image uploaded with specific information, URL to your site or an HTML code. By clicking on the “Like” button they will then be able to view the page’s content.
Main Content:
You can also choose to engage your fans with a creative image on your fan page header by enabling it. One way is to set your survey/poll/form/quiz URLs in the main content that you want your visitors to take. Simply enter the unique survey/poll/form/quiz URL in the box, and a title to be displayed on the header image. If you wish, you can also set the tab height for better view.
General: On your page you can enable a SurveyCrest share option with a customized text message and look.
Insert an attractive “Share Title” for your visitors to entice their friends and colleagues to take the survey/poll/form/quiz. Enter a brief text message that will appear under the title when the survey/poll/form/quiz is shared. You can customize the message that will appear when your visitors have clicked on the “Share” button. Upload an image to make your survey/poll/form/quiz stand out.
Once done, save these settings so that your survey go live with the new message and look.
Analytics: If you have Google Analytics, simply enter the code here and click “Save” so that your survey/poll/form/quiz visitor activities on the Facebook page can also be monitored. -
How do I select a theme for my survey/poll ?
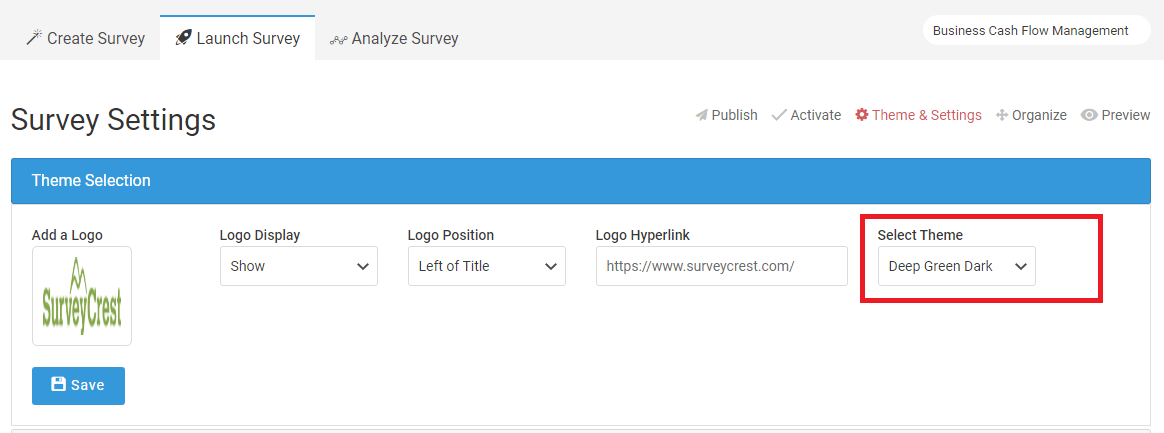 SurveyCrest lets you personalize your survey/poll by selecting a theme. Go to Launch > Settings > Logo & Theme. To set a theme, make sure you are on the settings section & you will then see a drop down menu titled ‘Theme’ which you can browse through to find one which matches your profile.
 -
How can I set my closed survey/poll page content?
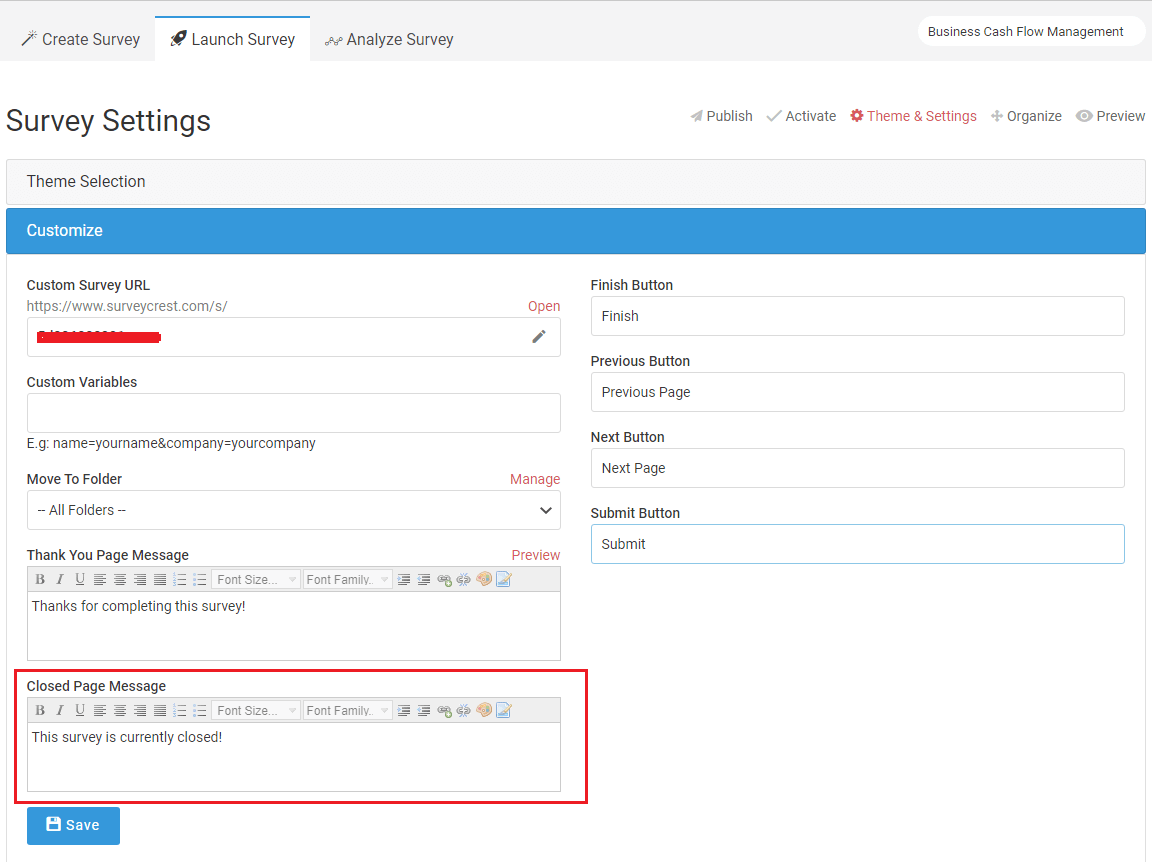 You can change the message which appears when someone tries to access your survey/poll/form/quiz after it has expired. Go to Launch > Settings. On the settings page, scroll down to “Survey Closed Text” and type your message.
 -
Can I create a custom URL for my survey/poll ?
 Yes, you can.Go to Launch Survey > Settings > Custom Survey URL. Click on the small pencil icon add the desired extension.
 -
How can I use a custom variable with my survey/poll ?
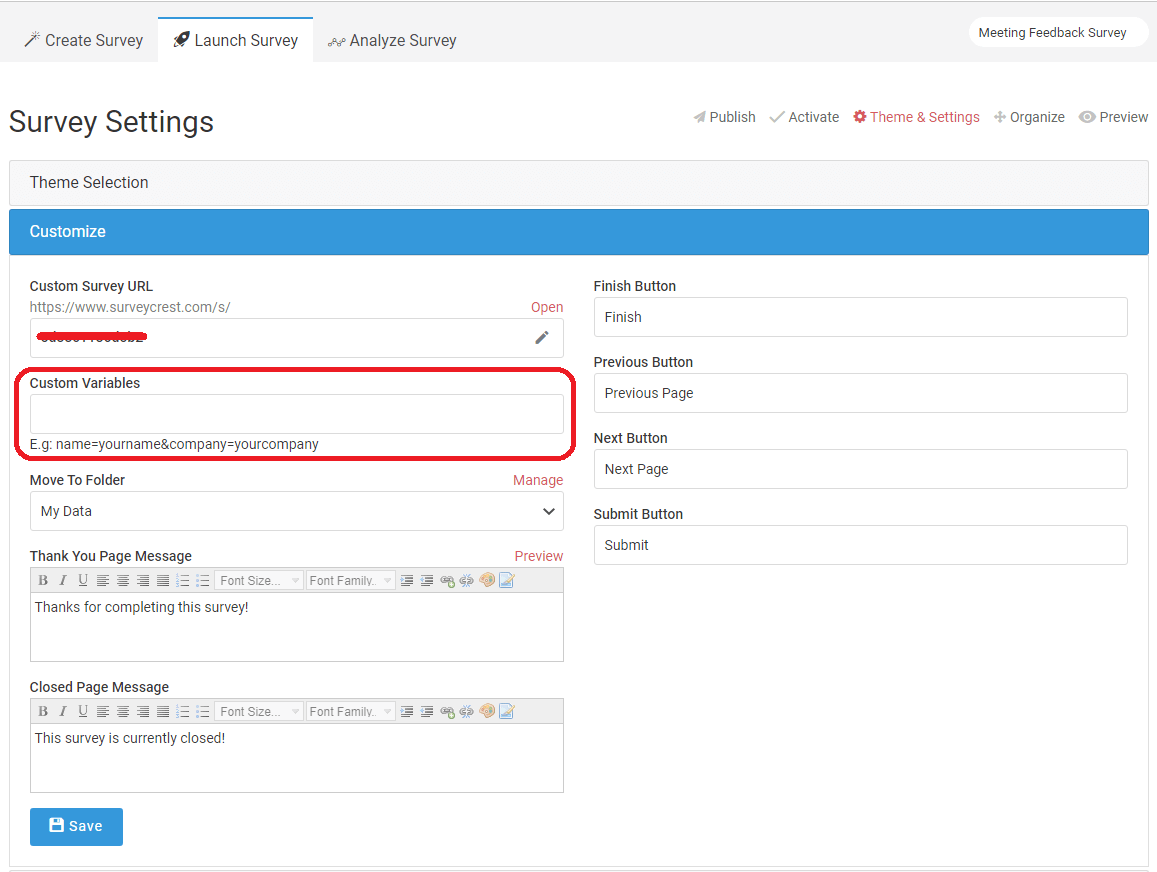
You can use a custom variable with survey/poll/form/quiz, Go to "settings" page, enter parameters in "custom field".You will then be able to see the information you require in the response page with respondent details.
-
How can I add a logo to my survey/poll?
Follow these steps to add a logo to your survey/poll
Step 1: Click on Launch Survey > Settings once you have entered the questions for your survey
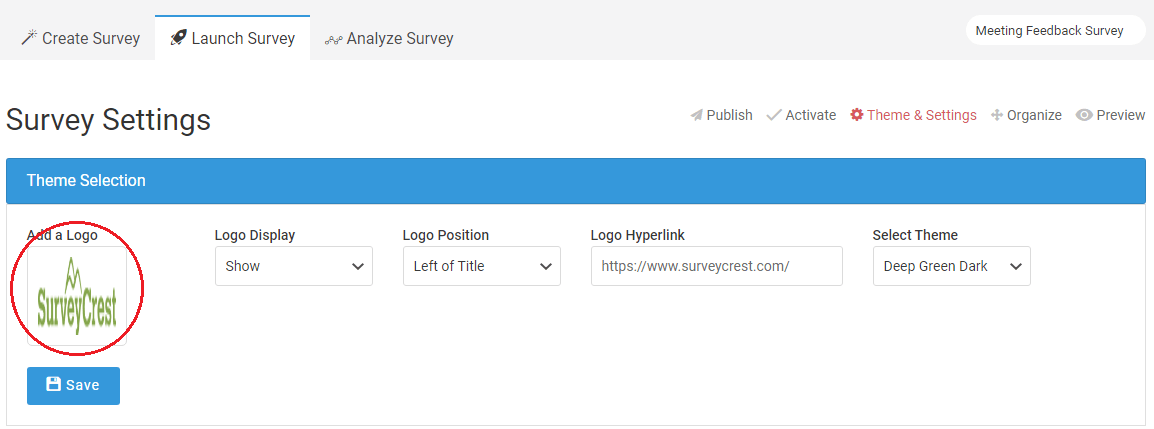
Step 2: Under Logo & Theme, click on logo image which shows you file manager where you can either upload a logo or enter a logo URL address.
Step 3: Next, choose your logo position from left, center or right
You also have the option of including a hyperlink to your logo which will take your customer to the mentioned URL when they click on the image.
-
How can I move multiple surveys into a folder?
Here is how you can easily move several surveys into a folder:
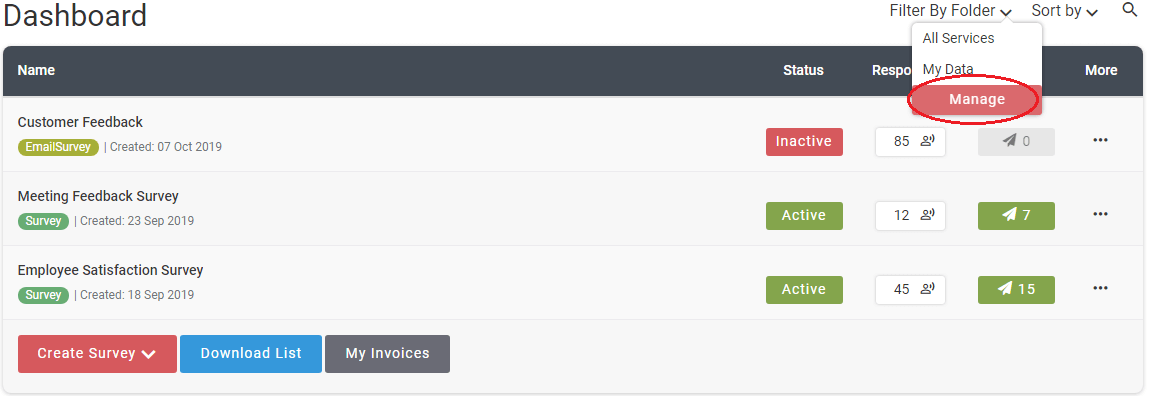
Step 1: Once you are on the dashboard, you will see an ‘Filter By Folder’ drop down menu on mouse over, click "Manage" option.
Step 2: After you have been redirected to folder page list ,click on "Create New Folder", a popup will open where you can define folder name & finally click Save button.
Step 3: Click on "organize" icon a popup will open where you can organize your surveys/polls/forms/quiz/email-survey in particular folder by filtering "Filter By Folder". Step 4: Select the surveys/polls/quiz's/forms & "Move to Folder" drop-down option & finally click ‘Move’ button.
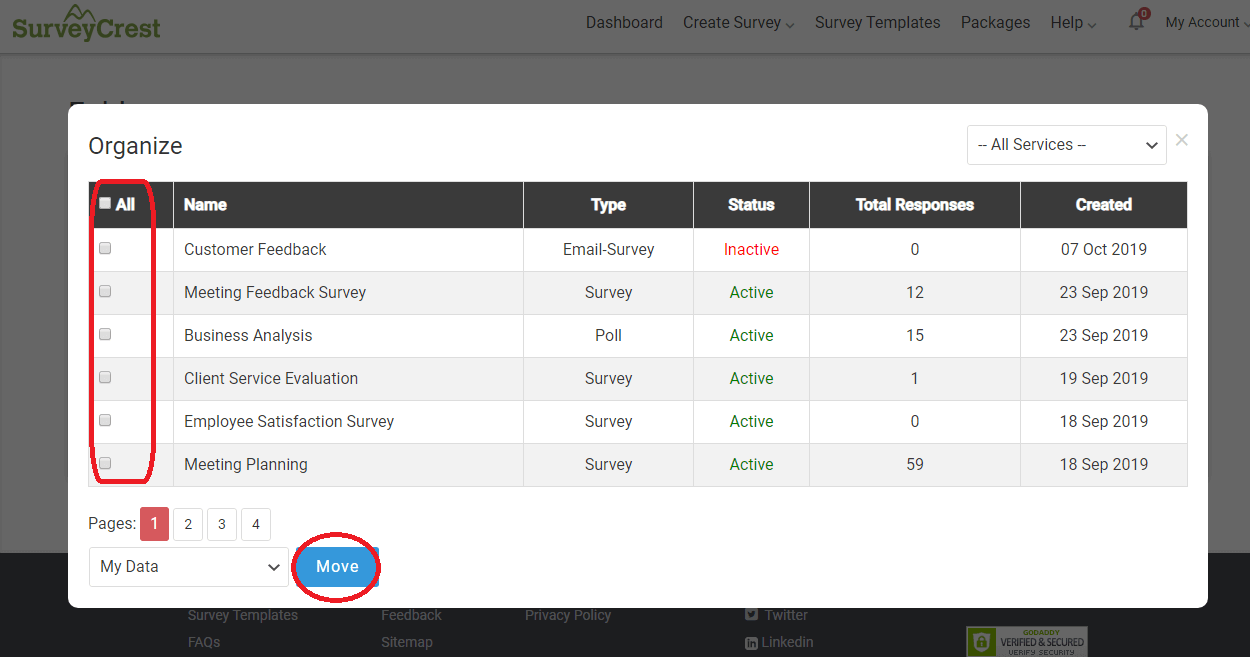
You have now moved several surveys from one folder to the next.
-
What Is The Custom Variable And How Can I Use It?
Step 1: Go to Launch on your survey and click on settings page
Step 2: Under the custom survey url, there is “Custom Field” which is used to handle custom variables.
Step 3: The custom field can be used to over-ride or pass a predefined variable or information according to your preference.

-
How can I transfer/copy ownership of a survey or poll to someone else?
By transferring a survey,poll,form or quiz, you will be giving the individual the full right over it. However, the ‘copy’ option will only help in copying the structure of the questionnaire to the other user.
If you want to transfer or copy the rights of a survey,poll,form or quiz to another user, follow these steps
Step 1: Go to your dashboard
Step 2: From the " More " option panel, click the transfer feature of the survey which want to transfer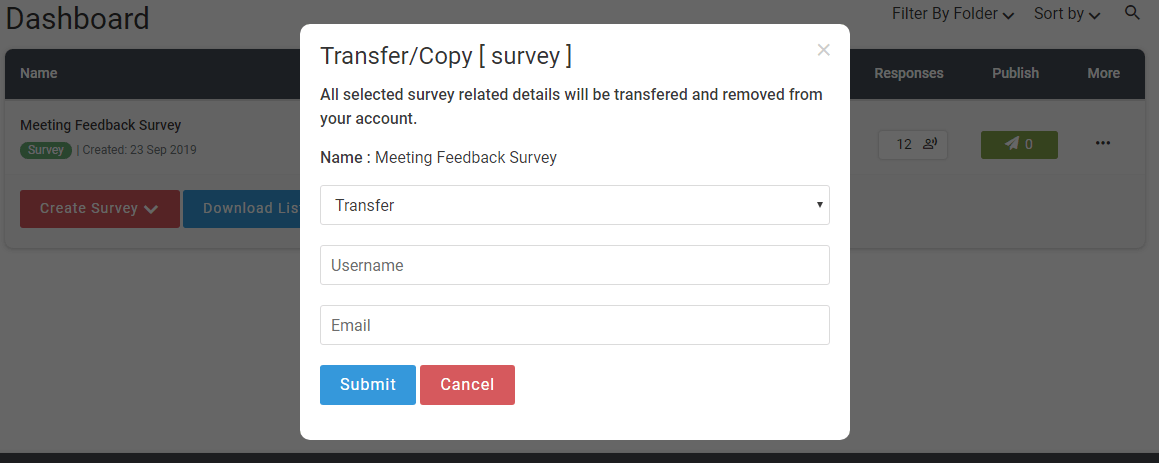
Step 3: Select transfer or copy option from drop-down.
Step 4: Type in the user name and email of the person you want to transfer ownership to and click ‘submit’. -
What does the save & continue option do?
The save and continue option is for anyone who wants to come back to responding to the survey at a later time or wants to fill it once they're free. Through this option, your respondents can save the form they have filled and come back to it using an email link. You can enable this option for your own survey in this wayStep 1: Go to your dashboard and select the survey where you want to make the changes
Step 2: Go Launch Survey > Settings > Options > Save & Continue of the survey.
Step 3: Click Save button .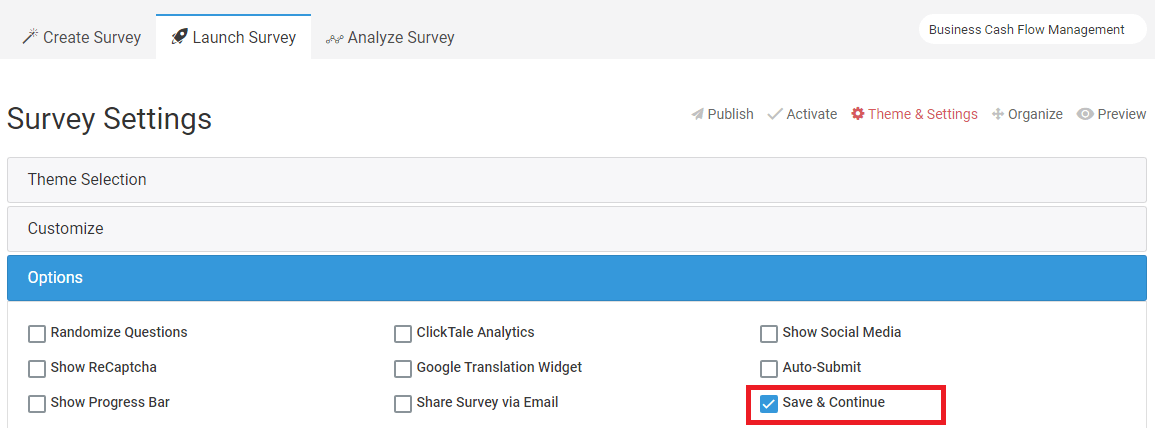
-
Can I set timer for my surveys?
Yes, you can set time or countdown timer for your surveys so the respondent only has a set number of minutes to answer all the questions in the survey. This option is ideal for timed tests and you can enable it in the following way.Step 1 : Go to your dashboard and select the survey where you want to make the changes
Step 2 : Go to Launch > Settings > Options Tab > Countdown Timer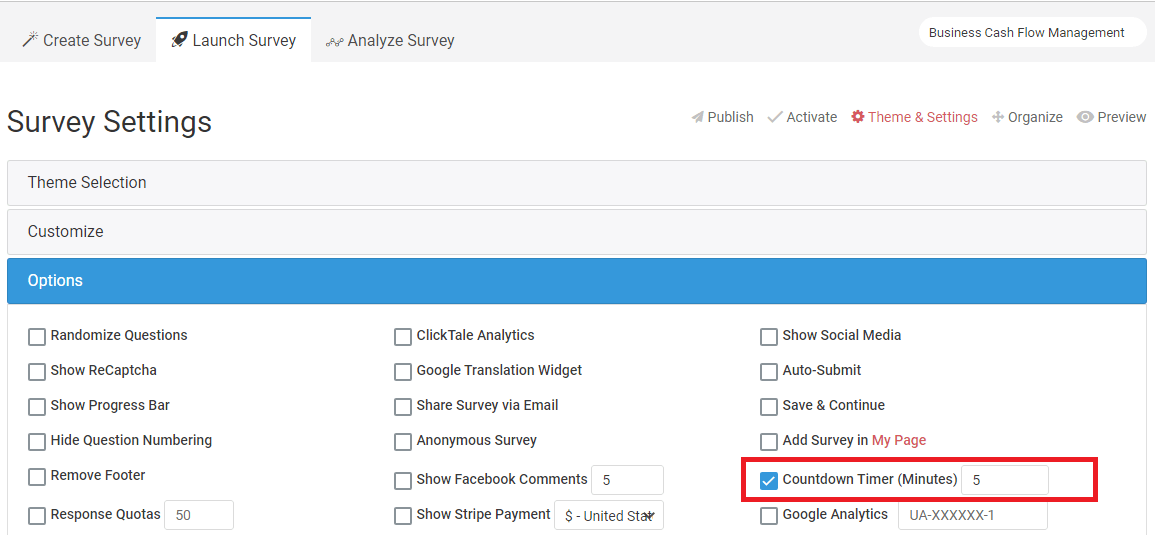 Step 3 : Set Countdown Timer checkbox checked & Minutes from drop-down.
Step 4 : Click Save button. -
Can I have an exit URL at the end of my survey?
If you want the respondent to view a website or page once he/she has ended the survey, you can add a link by following these steps.Step 1 : Go to your dashboard and select the survey where you want to make the changes
Step 2 : Go to Launch > Settings > Exit Link
Step 3 : Enter the URL Address which you want your respondent to followStep 4 : Click Save button.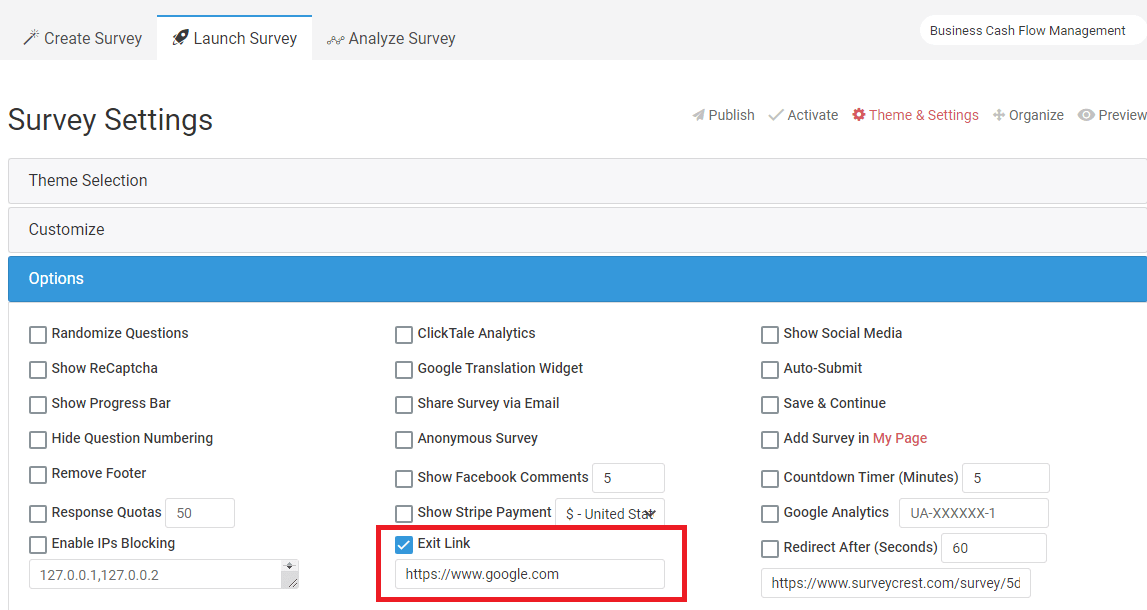
-
What is meant by anonymous survey and how can I enable it?
When you select the option for an anonymous survey, information about the respondent’s geo location, IP address etc. will not be stored. What this basically means is that there will be no respondent tracking so you will only have access to their forms data. If you want to make your survey anonymous, follow these steps.Step 1 : Go to your dashboard and select the survey where you want to make the changes
Step 2 : Go to Launch Survey > Settings > Anonymous Survey
Step 3 : Click Save button.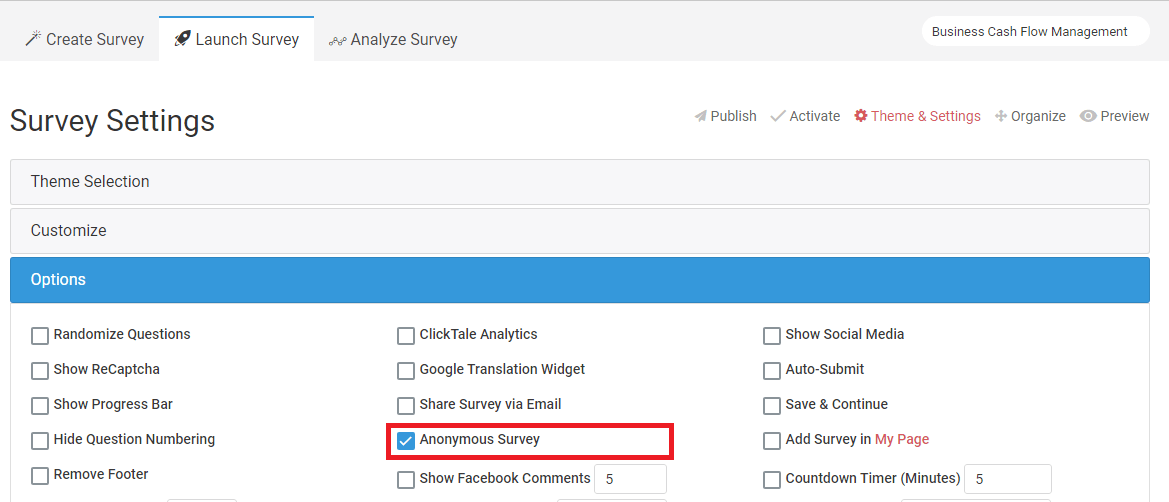
-
How do I create custom, printable business cards?
Business card hopes to provide an easy way to make printable business cards. Once you're done creating your custom business card design, simply click the "Download Card PDF" button, and a PDF document will be created of your printable business cards. Unlike other free business card software, our Business Card Maker allows you to make business cards online.
Steps to make your business cards:
1. Login to your account at SurveyCrest.com. On the Dashboard click on the survey/poll/form/quiz you want to create business card. Go to Launch > Publish > Business Card.
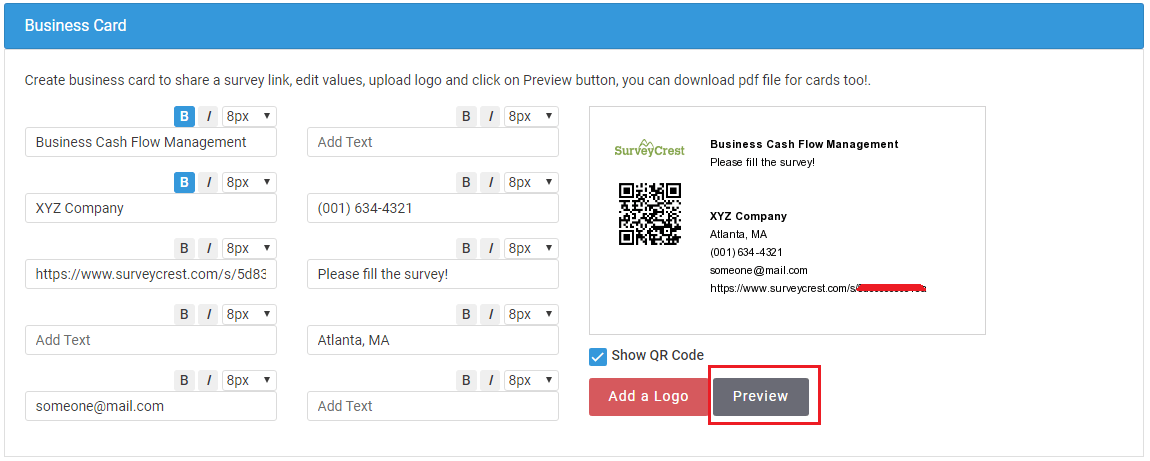
2. Enter the information you wish to include on your business cards.
3. Before you download you may be able to see preview of that business card by click on preview button. After preview it show you “Download Card PDF” button.
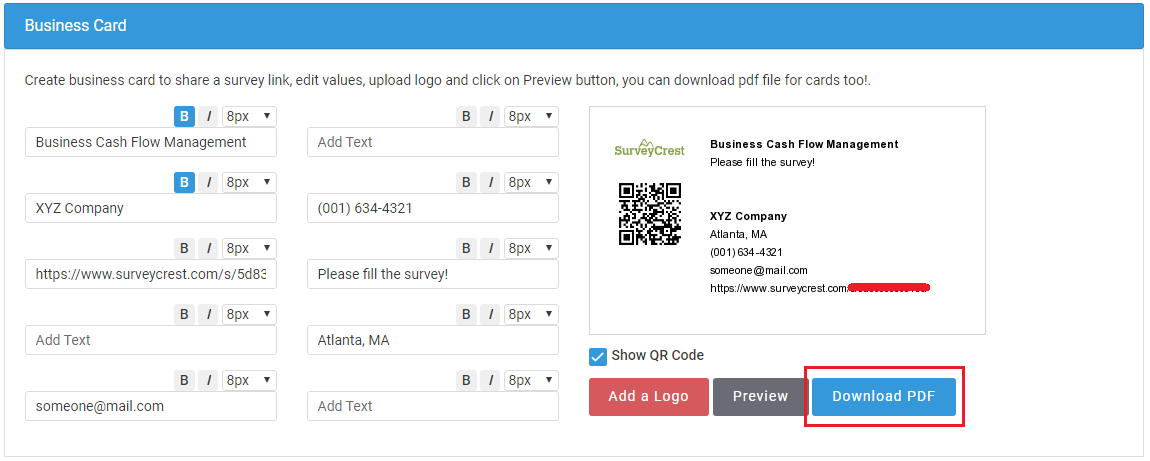 4. You will get a business card in form of PDF file by click on “Download Card PDF” button.
 -
What is a RSS-Feed and how do I use it?
A survey RSS-Feed is a way for you to give out a single URL, embed that URL in your site to publish frequently updated information.How to Enable Survey RSS Feed?1. Go to Analyze > Response
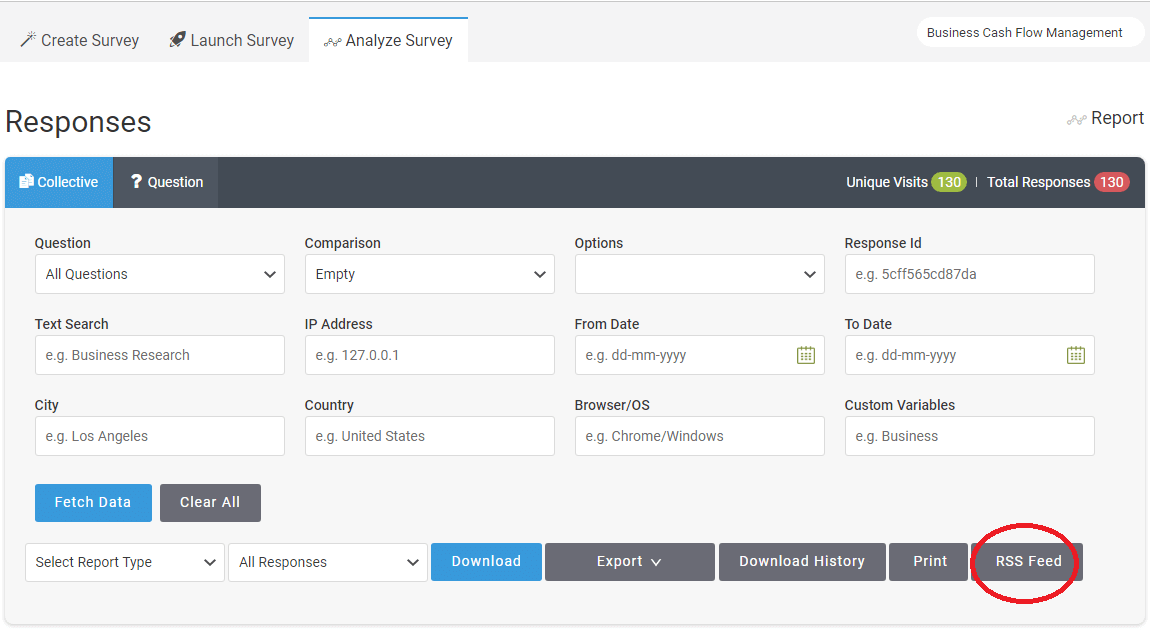 2. Enable RSS-Feed by toggling ON & OFF
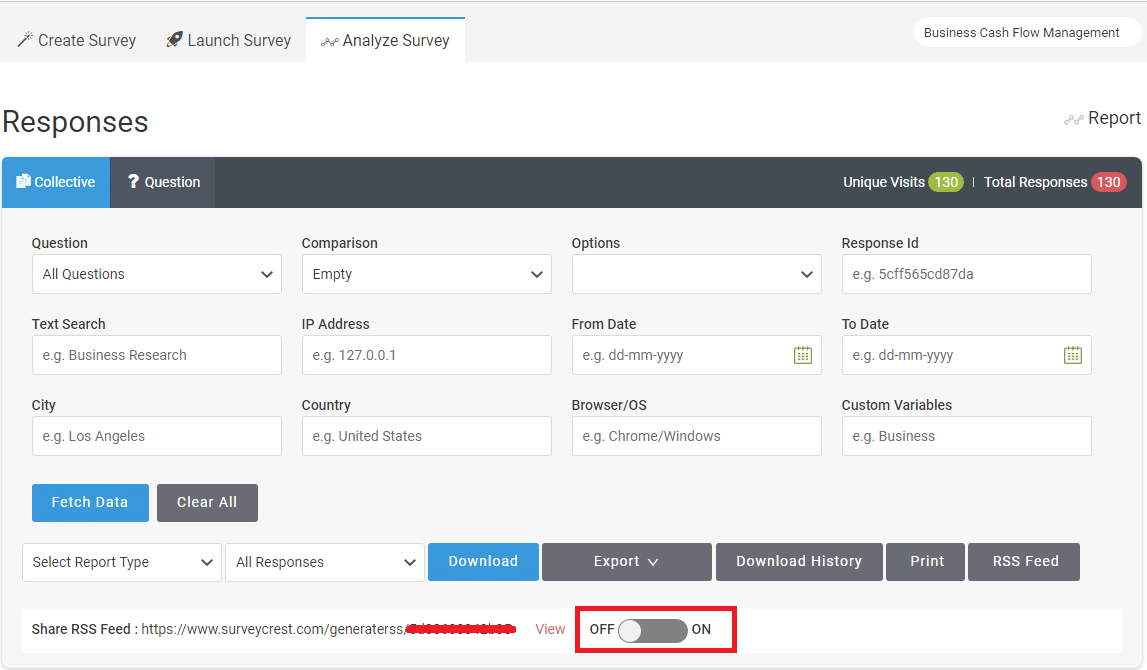 3. Copy the given link for your survey feed into your blog or website.
 -
How do I integrate Eventbrite with SurveyCrest?
Eventbrite helps you easily organize contacts or allows you to add attendees as contacts within your e-mail invites.How It Works:1. Login to SurveyCrest2. Go to Dashboard > Publish > Email Campaign > Address Book > Add Emails from Eventbrite
 3. It will redirect you to eventbrite site login page for authentication
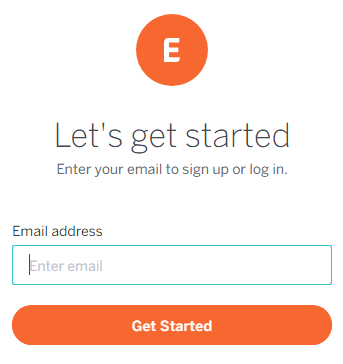 4. After valid login it will ask you for permissions.
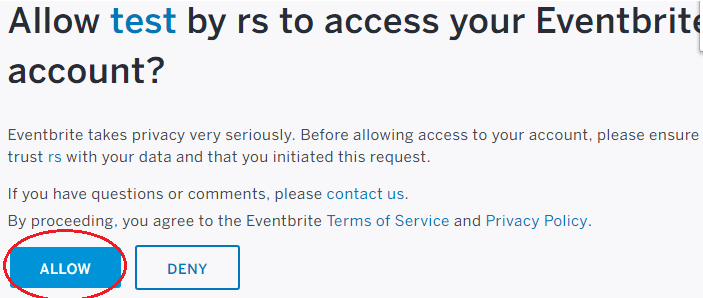 5. Finally it will show you fetched emails or contact list.
-
How do I import my emails from my Gmail account?
You can import your Google account emails into surveycrest for publish survey.1. Go to Dashboard > Publish > Email Campaign > Address Book > Import emails from Gmail
 2. Login into GMAIL.3. Accept permission4. It will show you list of Gmail contacts.
 5. Select emails and click on insert button to add contacts in your surveycrest address book.
 -
How do I import my emails from my Yahoo account?
You can import your Yahoo account emails into surveycrest for publish survey.1. Go to Dashboard > Publish > Email Campaign > Address Book > Import emails from Yahoo
 2. Login into YAHOO.3. Accept permission4. It will show you list of yahoo contacts.
 5. Select emails and click on insert button to add contacts in your surveycrest address book.
 -
How do I import my emails from my Hotmail account?
You can import your Hotmail account emails into surveycrest for publish survey.1. Go to Dashboard > Publish > Email Campaign > Address Book > Import emails from Hotmail
 2. Login into HOTMAIL.3. Accept permission.4. It will show you list of Hotmail contacts.
 5. Select emails and click on insert button to add contacts in your surveycrest address book.
 -
How do I import my emails from my Salesforce account?
You can import your Salesforce account emails into SurveyCrest for publish survey.1. Go to Dashboard > Publish > Email Campaign > Address Book > Import emails from Salesforce
 2. Login into salesforce.3. Accept permission.4. It will show you list of Salesforce contacts.
 5. Select emails and click on insert button to add contacts in your surveycrest address book.
 -
What does the Verify Email option means?
In order to publish survey by mail you must need to verify your email first.To find out " Verify Email " option , follow the steps below :1. Go to SurveyCrest > My Account > Profile
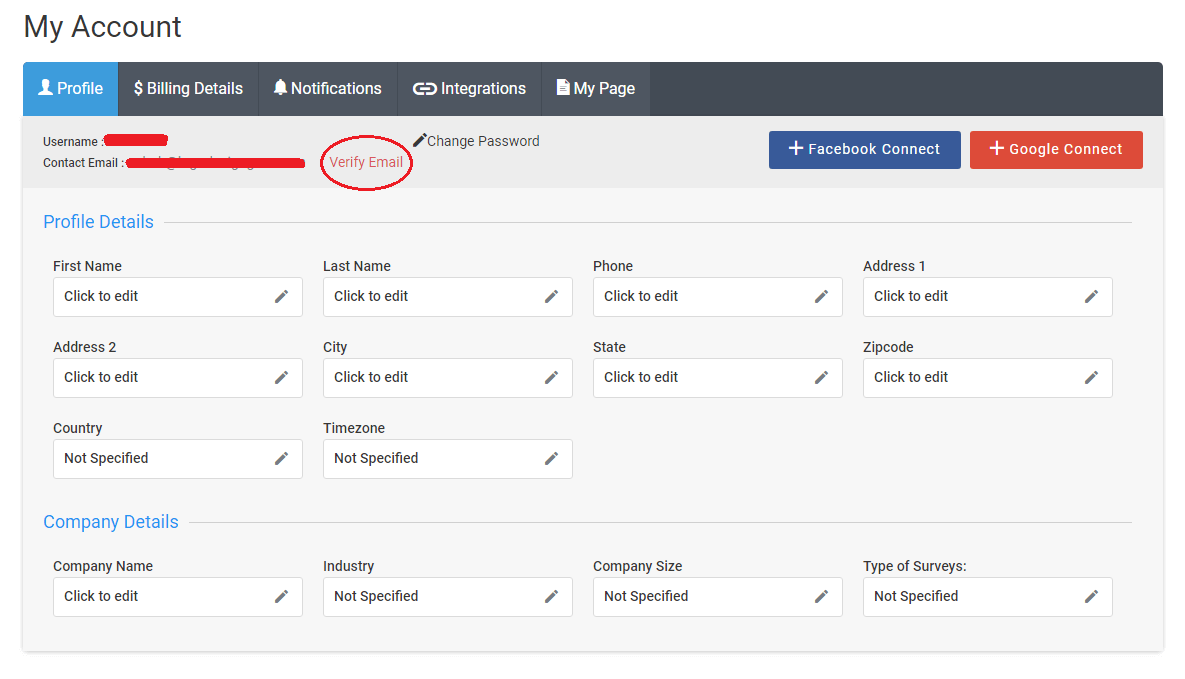 OR2. Go to Dashboard > Publish > Email Campaign
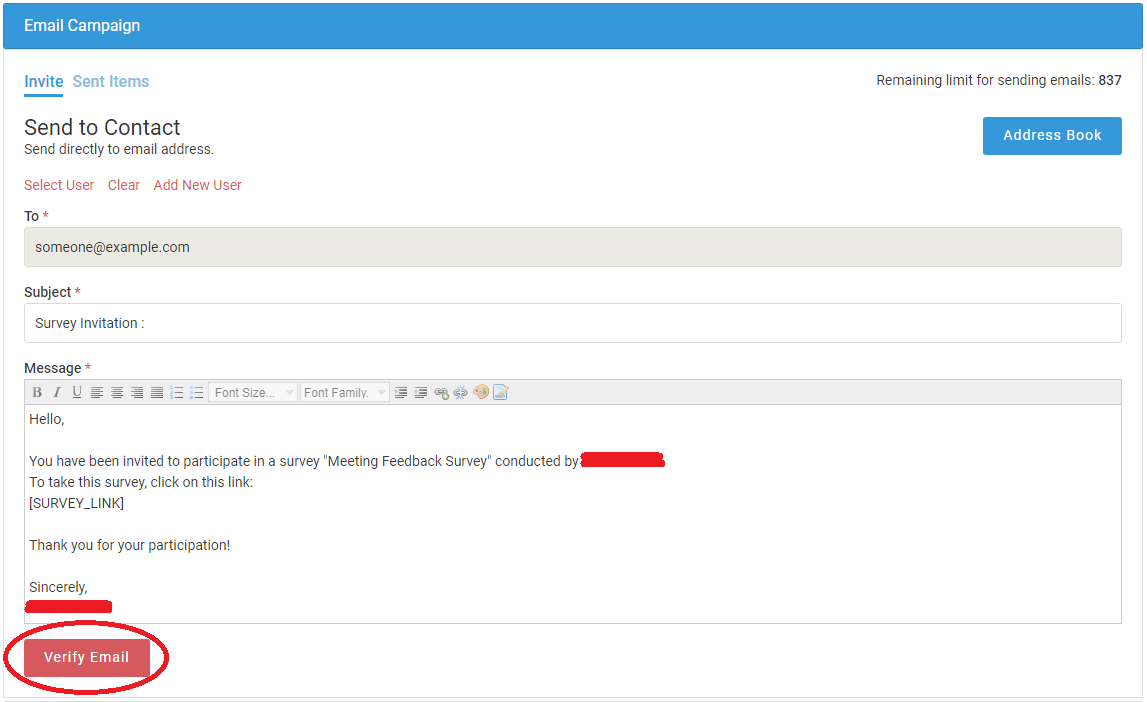 3. Click " Verify Email " button or link to complete the verification process.
 HOW TO COLLECT AND ANALYZE RESULTS
-
How can I check the responses collected for my survey/poll?
Go to your ‘Dashboard’ and under the ‘Responses’ column, click on the icon for the particular survey/poll. You will get results of all the responses submitted by users in a paginated layout. To check on responses to other surveys/poll, you can click on next/previous.

-
How can I change my email notification or web notification settings?
 You can easily change your notification setting by going to My Account > Notification. SurveyCrest notifications are divided into two parts for your convenience. One section deals with all the alerts related to your survey/poll/form/quiz while the other deals with the notifications which are related to response. Just choose the ones you would like to activate.
 -
How can I get survey/poll reports?
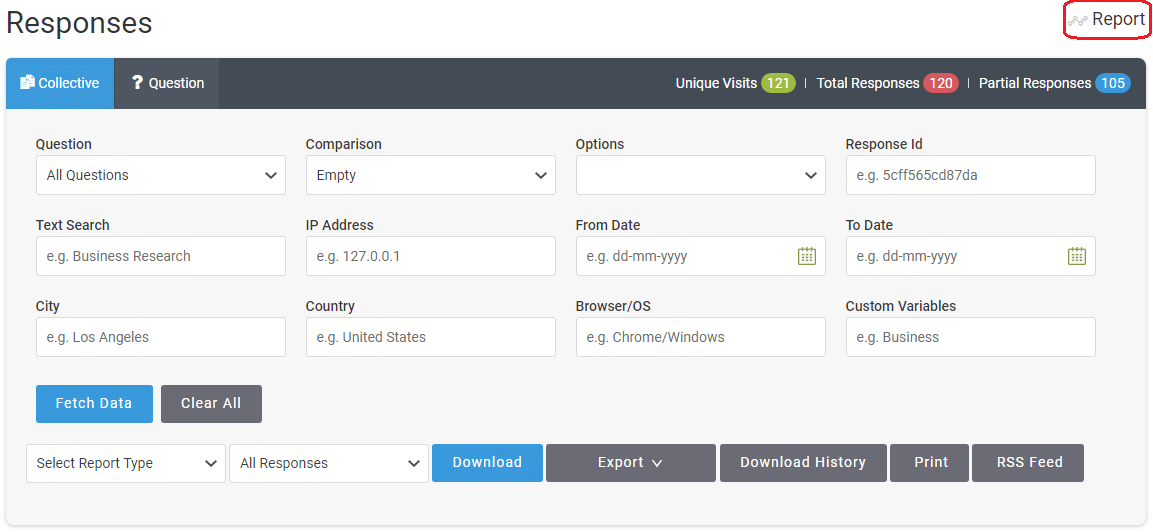
When you click on your survey’s/poll's/form's/quiz's icon in the ‘Responses’ column in your ‘Dashboard’, you will get grouped responses for each question. You can review these in detailed reports in the “Analyze” section. You can also review responses of individual questions.Alternatively, to get your survey/poll/form/quiz report, click on the particular survey/poll, then go to Analyze > Report > and choose the type of report, graphical or numerical, that you want to see or download.
-
How can I print survey/poll reports?
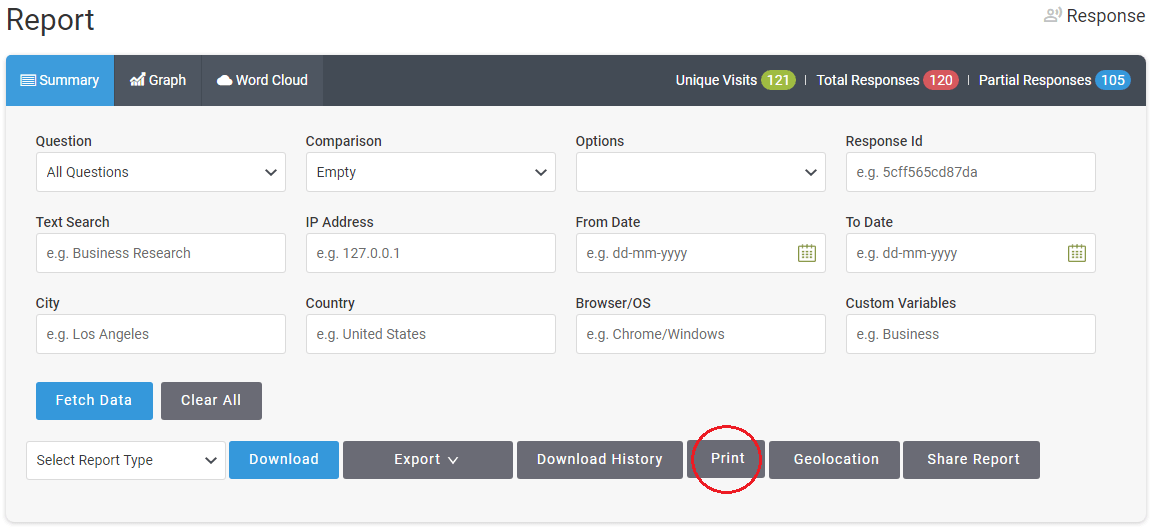
Go to the ‘Dashboard’ and mouse over on three dots " . . . " button will show popup where you may can click on the report icon for the particular survey/poll/form/quiz . There will be a ‘Print’ button. You can click that to print the summary of responses for your survey/poll/form/quiz.
-
Can I search specific results within the responses to my survey/poll?
Yes. Go to ‘Responses’ / 'Report' column in your ‘Dashboard’, or click on Analyze > Responses or Report tab, a form will open up where you can search the responses and results according to your specific criteria.
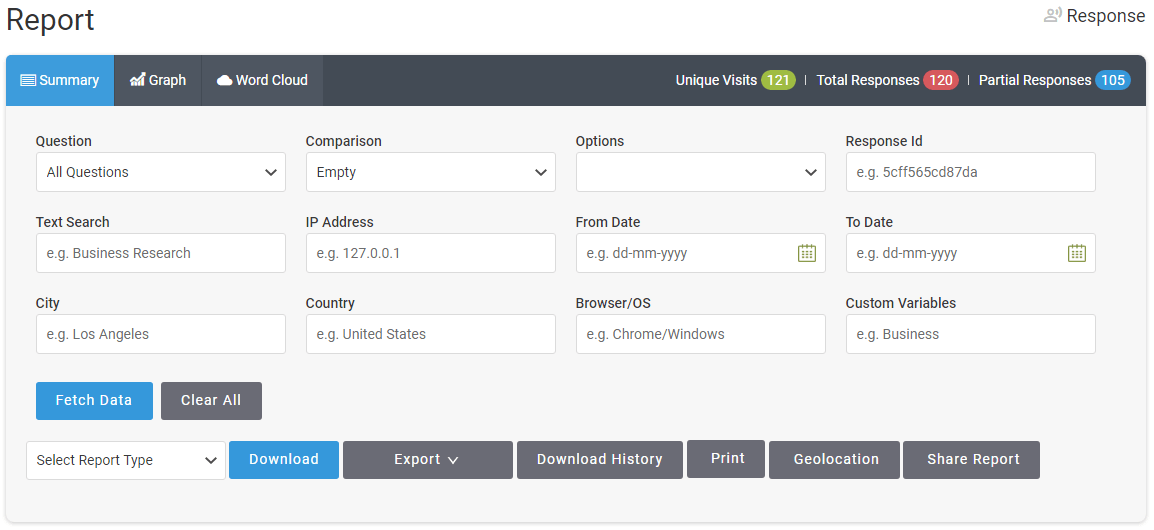 Choose to filter the responses according to individual questions or collectively by clicking on the sub tabs. You can “Fetch Data” according:
- Question
- Comparison
- Question options
- Respondent’s ID
- IP Address of respondent
- Particular term in the survey/poll
- City
- Country
- Browser / OS
- Date
- Custom Field
*For multiple choice option questions, results for mean, standard deviation, variance and standard deviation errors are also shown.
You can view results in tabulated or graphical format by clicking on “See Graph” on the right.
You can share the responses in hard copy by clicking on “Print”.
If you want a soft copy then you can click on “Export to Google Docs” but you need to verify your Google account once before using this feature.
You can “Download” your responses in any format you want like Excel, CSV, PDF or Word.
You may also share the report by clicking on the “Share Report” icon on the right.
-
What is this IP address search?
SurveyCrest now allows you to find data related to location as well by setting up and filtering data connected with IP addresses.
-
How can I get my survey/poll report in Excel, CSV, PDF or Word format?
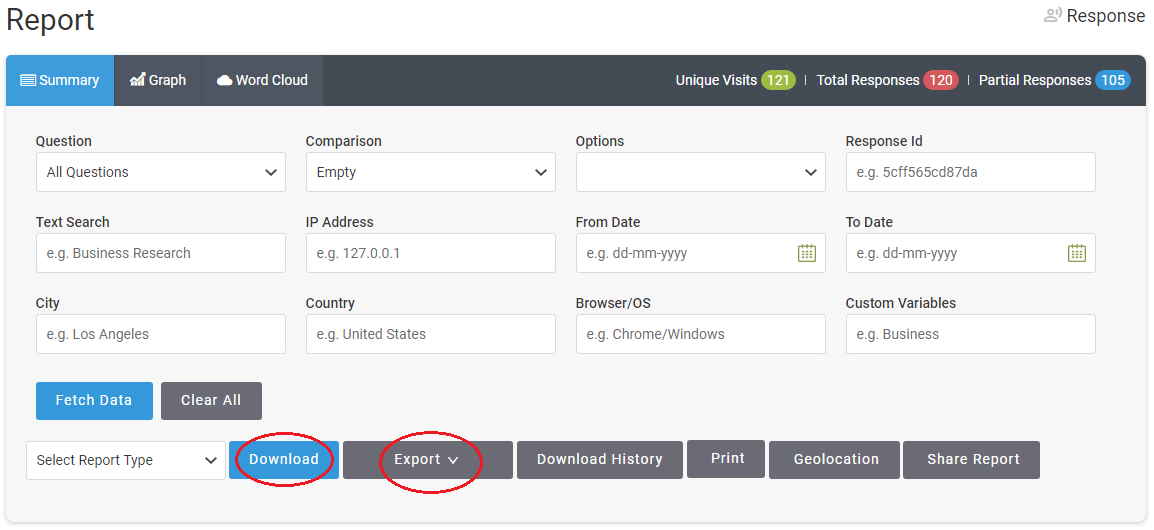
Once your survey/poll/form/quiz/email-survey is complete its time duration for res-ponders to fill in, you can generate a report for the responses you have received. This can be exported to Excel, CSV, PDF or Word. Go to Dashboard > Response / Report, fill the type of data you want to export and click on “Fetch Data”. Once data is fetched, you can export / download to any of the above format file as you like.
-
How long does it take for my survey/poll to reach my respondents?
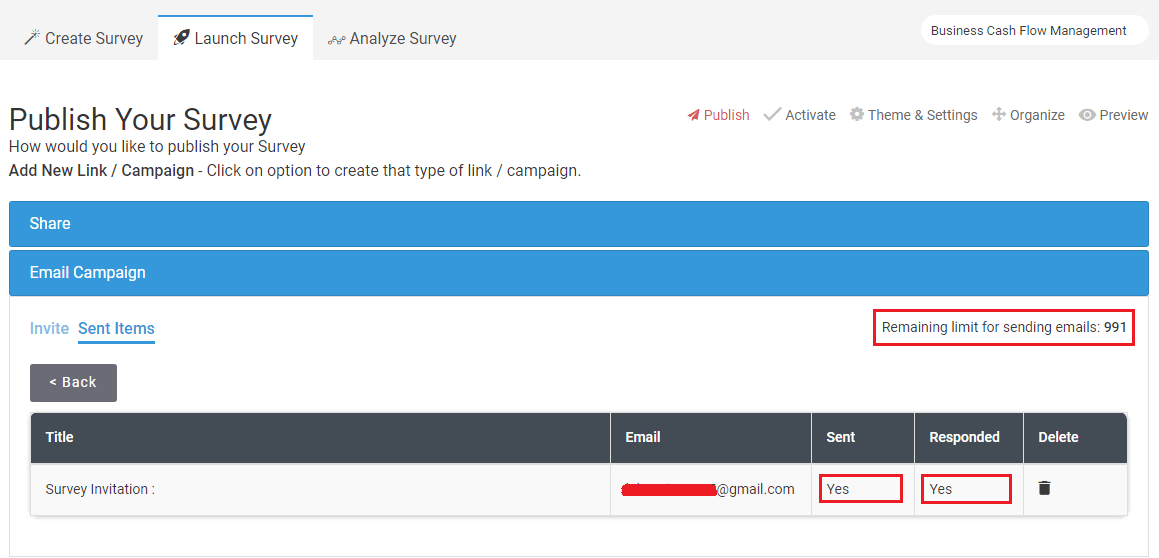
Usually, depending on the list of your contacts, it takes 2-4 hours for our system to complete sending the email list. You can check the status of emails sent out by going to Launch > Publish > Email Campaign and check the counter.
-
How can I extend the time duration of my survey/poll?
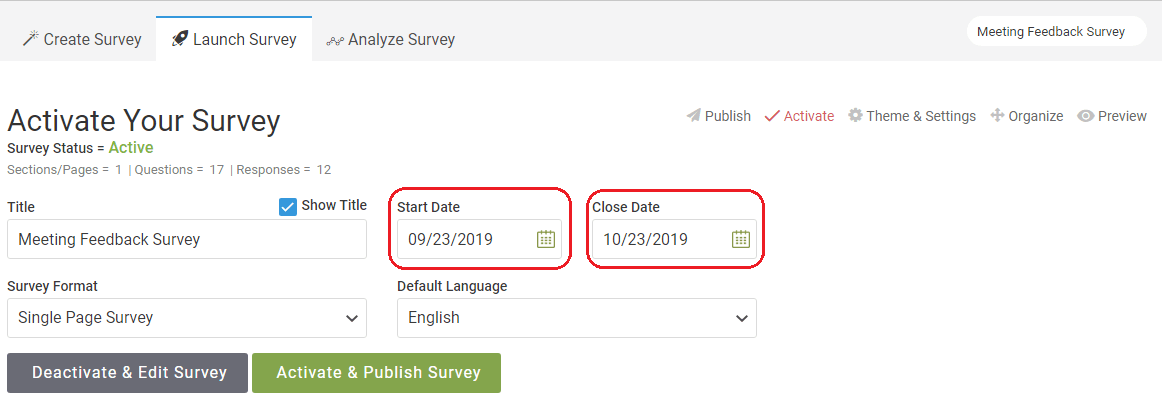
You can edit the time frame of survey/poll by going to your Dashboard > Status. This will take you to the Activate page where you can edit and extend the time frame of your survey/poll/form/quiz/email-survey.
-
Can I customize the look of my survey/poll?
Yes, you can. You can personalize the look of your survey/poll/form/quiz with different themes & font family styles, a customized Thank You page, a URL redirect to your own website, and/or customize a message for closed survey/poll/form/quiz. You can also insert your company logo. Simply go to Launch Survey > Settings and choose the type of personalization you want for your survey/poll/form/quiz.
You can also customize your survey/poll URL by going to Launch Survey > Activate and giving a unique title to your online survey/poll/form/quiz. This could be your company name, a reference number or title of your survey/poll/form/quiz.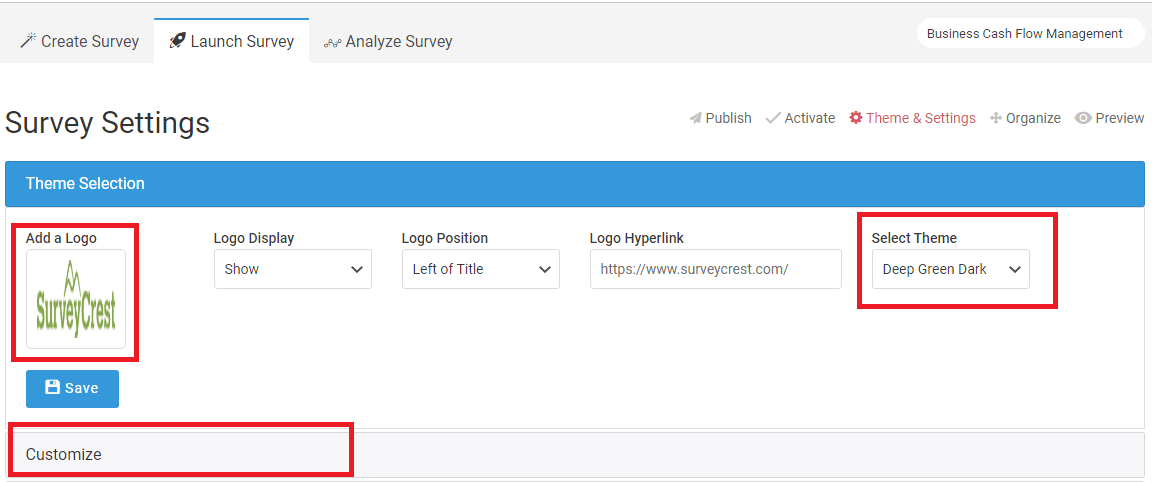
-
Do you offer any statistical analysis features?
Yes, we do. Currently we offer only statistical analysis for multiple choice option type questions. The numeric results are published in the reports under the responses of the questions.
-
How to export my survey/poll reports?
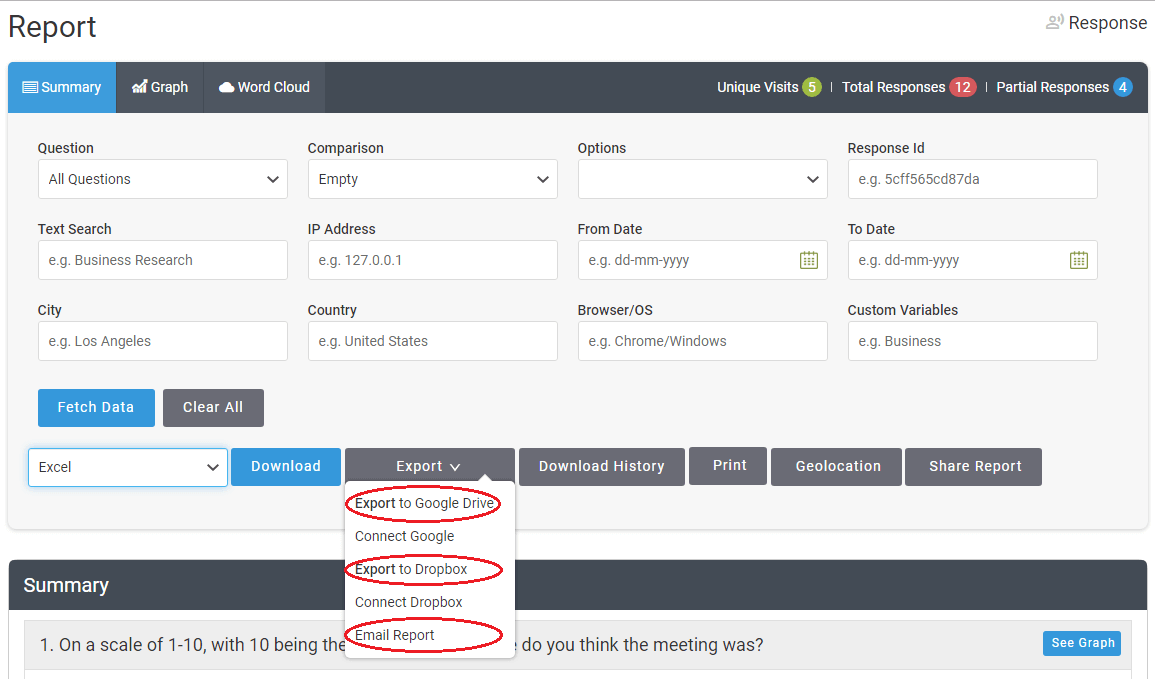
Once your survey/poll is complete the time duration for responders to fill in, you can generate a report for the responses you have received. This can be exported to Excel, CSV, PDF, Word or choose to " Export to Google Docs " from export drop-down . Go to Dashboard > Report / Response , fill the type of data you want to export and click on “Fetch Data”. Once data is fetched, you can export to any of the above format file as you like.
-
How can I see my download file history?
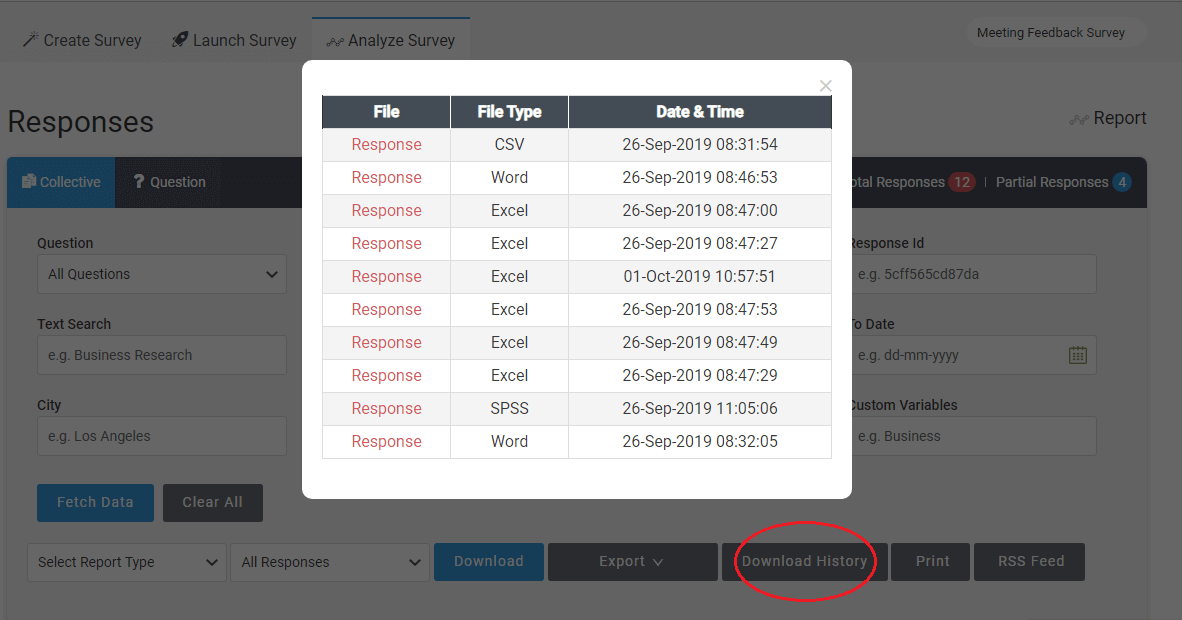 Go to Analyze > Response. You can see the download file history for your response by clicking on the “Download History” tab next to the export button.Alternately, go to Analyze > Report and follow the same process to see the download history for your reports.
 -
Is there an option to download graphical reports of my survey/poll for a presentation?
Yes, there is. If you intend to use your survey/poll/form/quiz/email-survey report presented in a graphical format, choose the particular survey/poll/form/quiz/email-survey from the Dashboard, then go to Analyze > Report > Graph. Here you will see the option to “Export Info-graphic”, click on it.
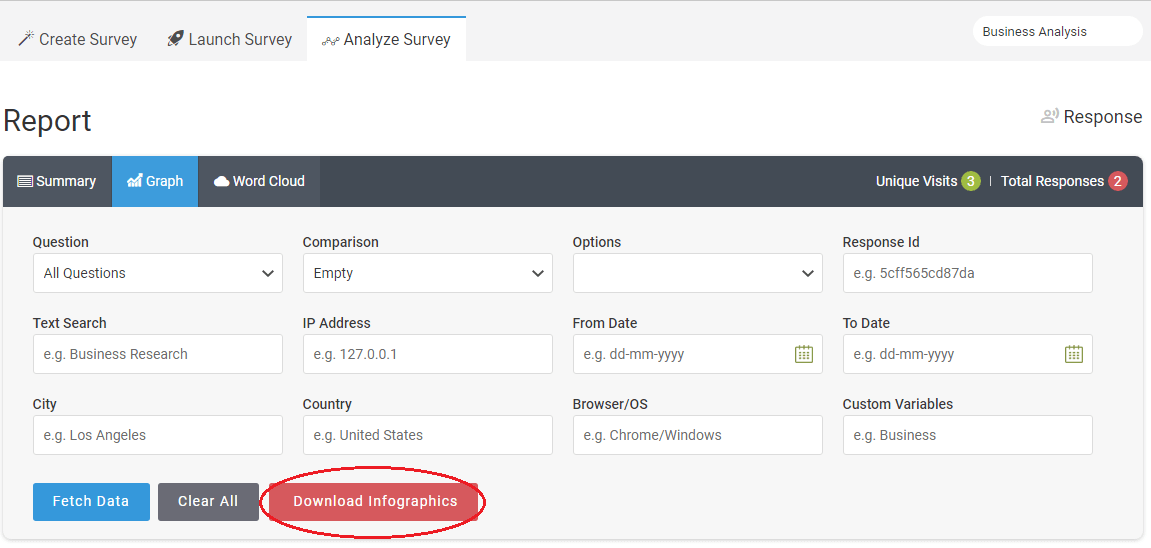
Alternatively, on the right hand side, a small drop down menu will give you the options of printing the whole graphic report or downloading it in PNG, PDF, JPG, and SVG formats.
-
How do I customize content for my Thank You Page?
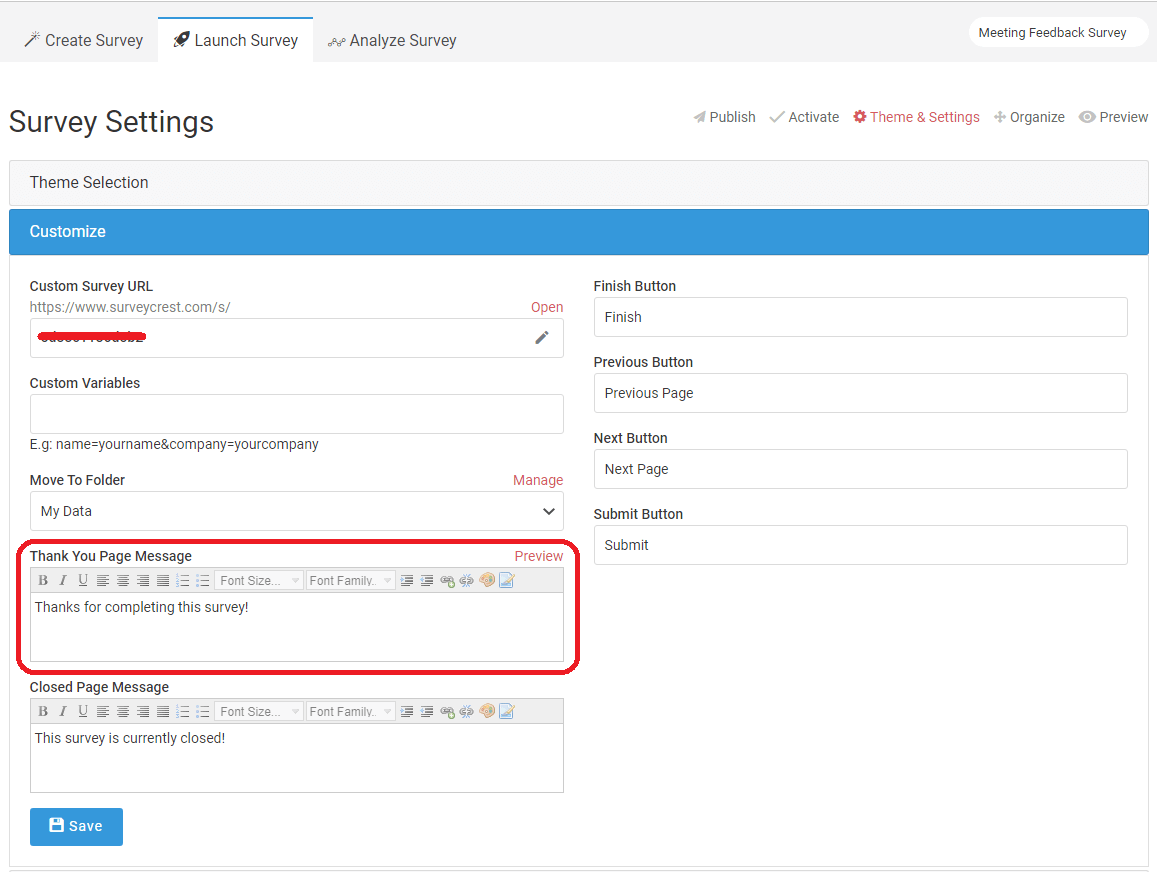 Go to Launch Survey > Settings > Thank You Text. You can set content for your “thank you page” by typing into the text box. This message will appear when visitors have completed your survey/poll/form/quiz. This can also be customized to direct them to your own site by entering the URL in the field “Redirect After” of options tab.
 -
What options do I have to view my response?
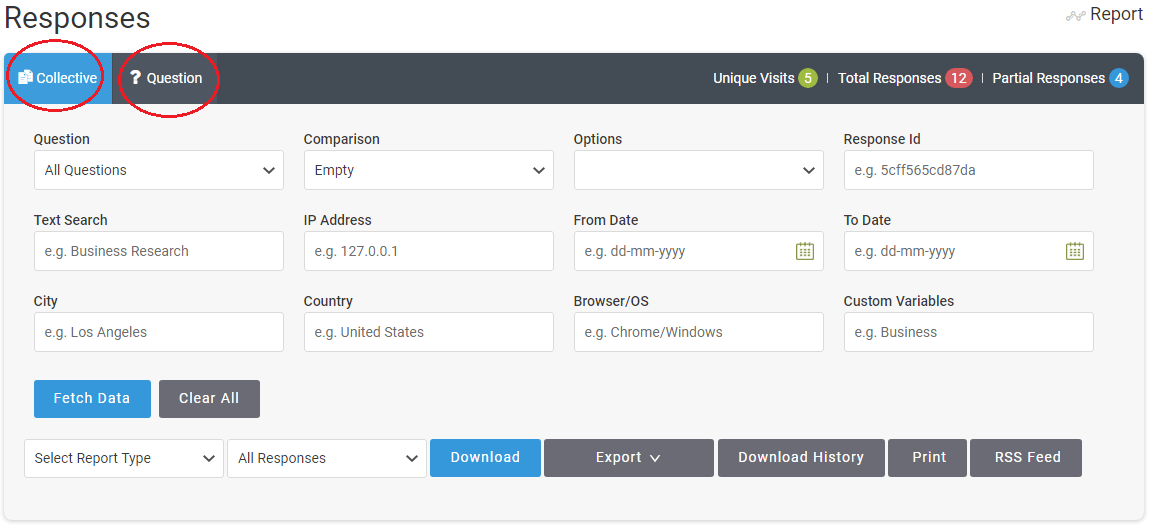 When you go to Analyze Survey > Response, you have two options to view your survey/poll/form/quiz/email-survey response. You can either see the responses for each survey/poll/form/quiz/email-survey by going through them individually through the collective response tab, or you can view all the responses compiled next to the question through the questions tab.
 -
What options do I have to view my report?
 You can view your report in the form of a Summary , Graph or Word Cloud when you go to Analyze > Report. You can also download a detailed info-graphic from the graph report.
 -
How can I export my reports to Dropbox?
 Go to Analyze Survey > Response. You can easily export your response to Dropbox by mouse over on “Export”. After mouse over on “Export”, choose “Authenticate Dropbox” and then “Export to Dropbox” once the authentication is complete.Alternately, go to Analyze Survey > Report and follow the same process to export your report to Dropbox.
 -
Can I see a map of where responses came from?
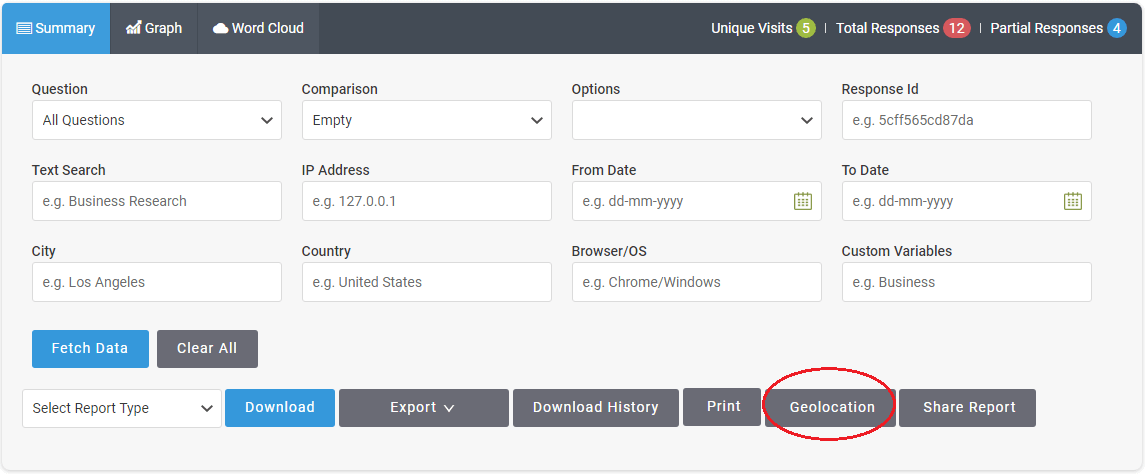 SurveyCrest lets you see the geographic location of your responses. You can view it by going to Analyze Survey > Report > Geolocation. The Geolocation will display which country your responses came from.
 -
What is the Response Comment Field?
You can use the response comment field to add or edit comments for each of the responses that you have received. Go to analyze and click on response to access this feature.

-
Do I Have The Option Of Hiding My Survey/Poll Title?
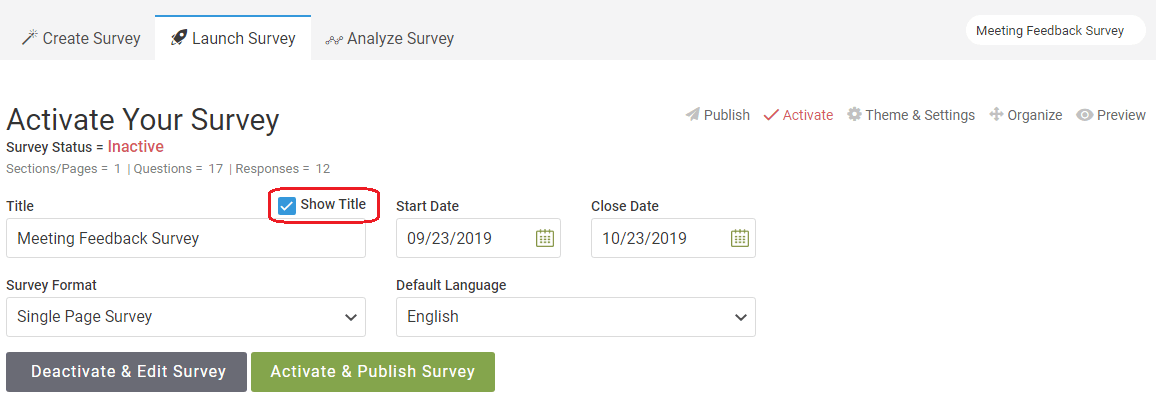
You can hide your survey/poll/form/quiz title by going to launch, clicking activate and unchecking the ‘Show Title’ box.
-
How Can I Search With Respondent Browser/Geo-Location And Custom Data?
You can search your respondent data using Browser OS, City, Country, IP Address or Custom data fields by simply entering the values and clicking on the fetch data button.

-
Can I edit the responses of each of the forms that have been filled?
Once one or more of your survey’s forms have been filled, you can edit the responses by going through these steps.Step 1 : Go to your dashboard and select the survey where you want to make the changes
Step 2 : Click analyze
Step 3 : Click the response option which is next to the report on the far right
Step 4 : Scroll down and click the pencil or edit option which is next to the bin
Step 5 : You will be redirected to the form which was filled by the respondent and you can make your changes here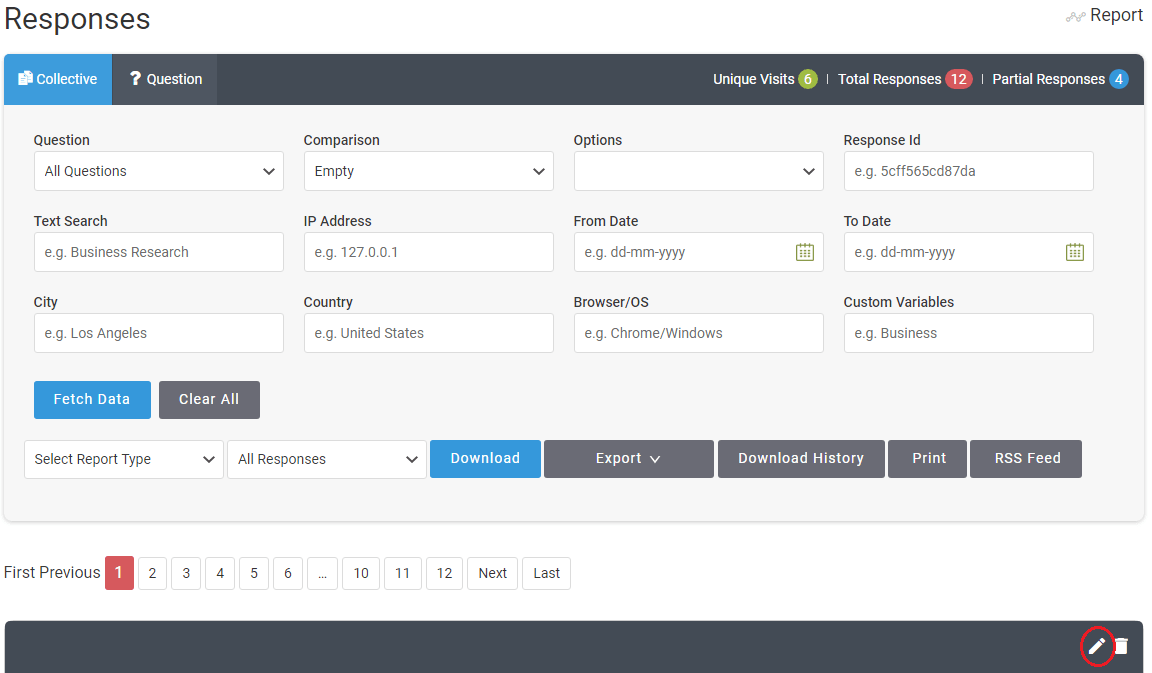
-
How do I setup a Stripe account and integrate it with SurveyCrest?
Payment Collection with Stripe:The Survey stripe payment type allows you to set up an order or donation form for purchasers to select various products and services and submit a payment! We've integrated with Stripe to bring you this commonly requested feature!Stripe Integration Setup:1. Sign up for a new Stripe account at https://manage.stripe.com/register (or login to your existing Stripe account).2. You'll receive activation instructions in your inbox but you can get started right away in Test mode.
3. On your Stripe Dashboard, go to Your Account > Account Settings.
4. Go to the API Keys tab and copy both the Test Secret Key and Test Publish Key.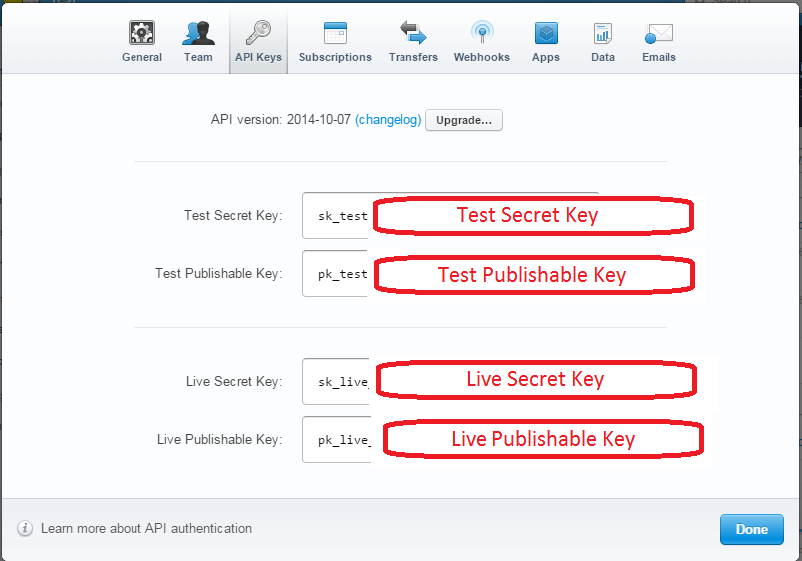
5. Login to SurveyCrest and go to My Account > Integration's > Stripe.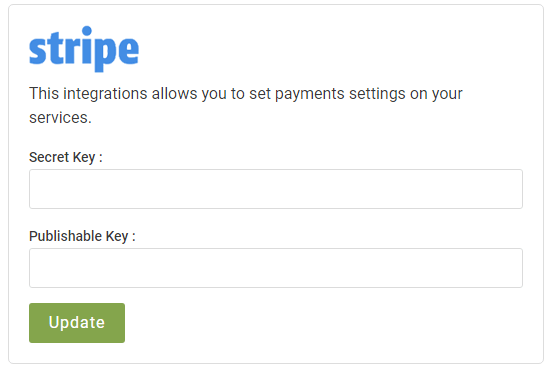
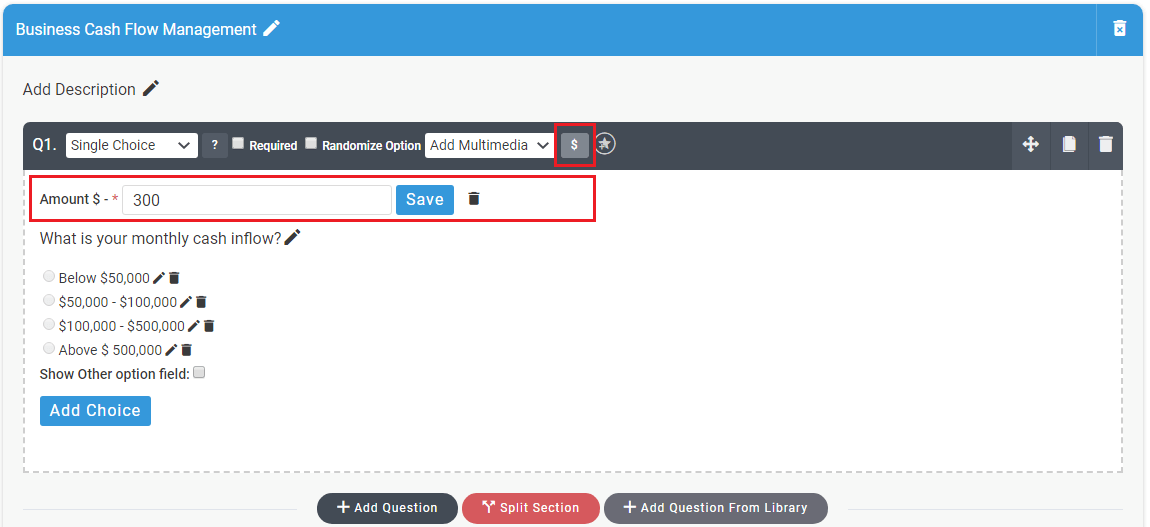
6. Paste your Secret Key & Publishable Key7. Click Update. You'll see a success message if your keys were valid!8. Go to Launch > Settings > Options > Stripe Currency > Save.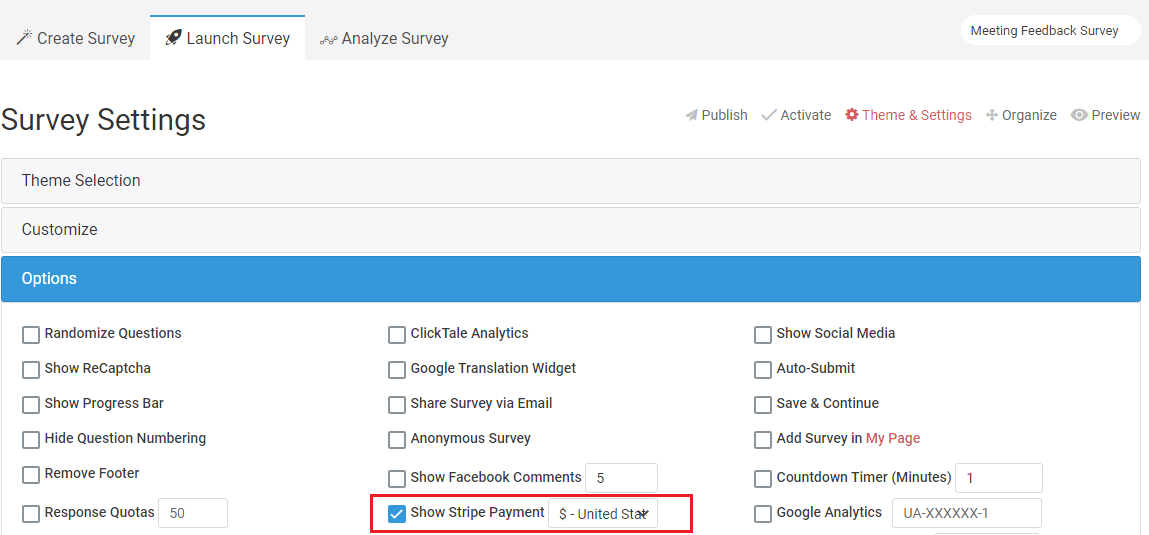 9. Go to the survey editor, click on dollar icon in question toolbar and assign your amounts to your questions.
 9. Testing your payment, first ensure that you have set up the Stripe integration using your Test API Keys. After then run the survey and you will see screen like this.
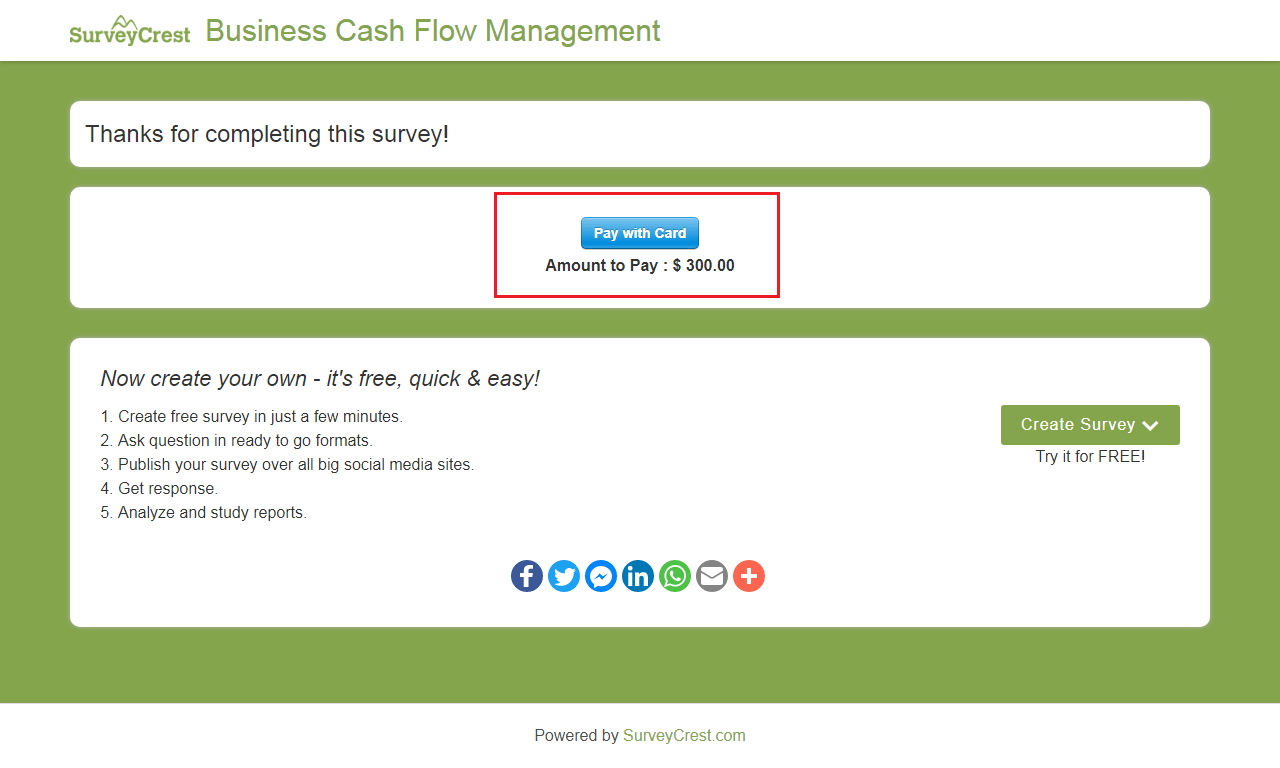
 10. After submitting form you will lead to payment page.
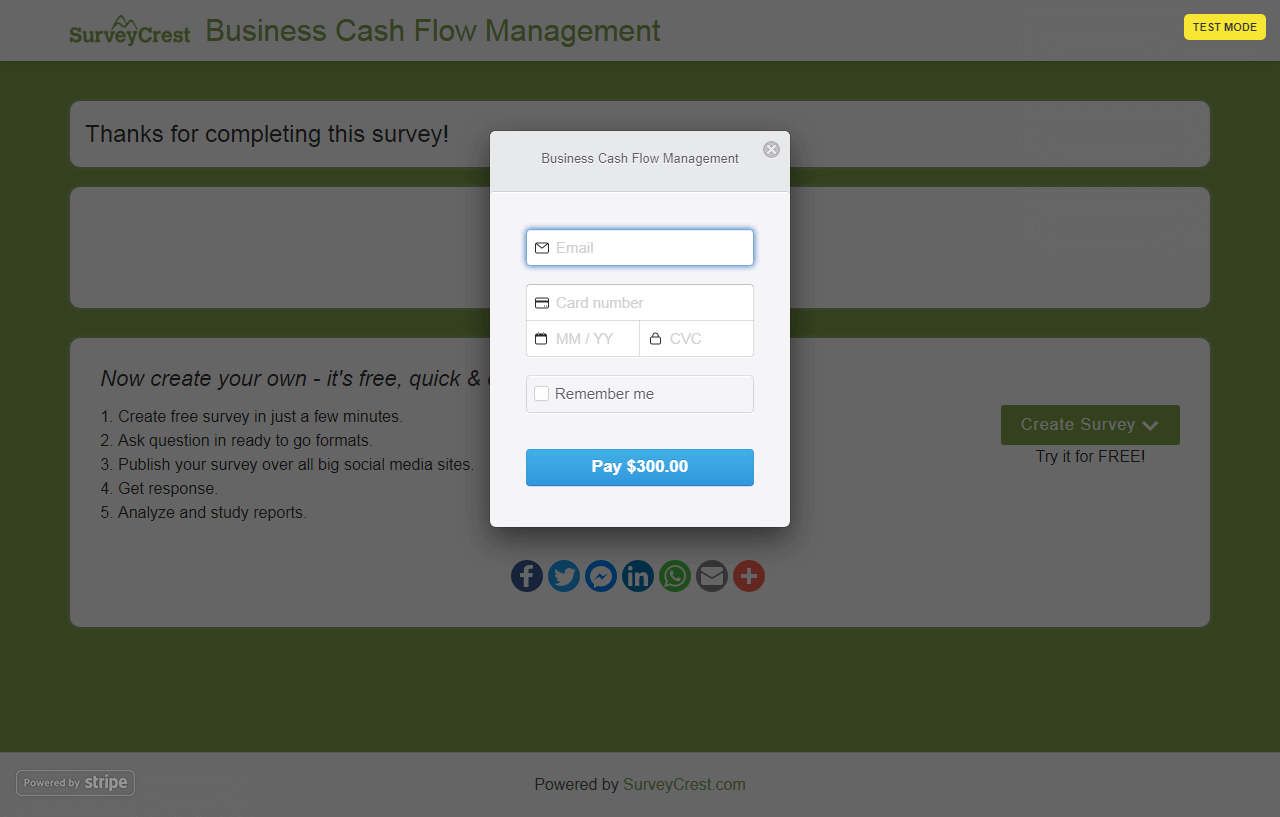
 11. Click on “Pay with Card” button will show you payment popup box, fill and submit if you want to pay given amount
-
How do I disqualify a respondent to my survey?
Setup Page Logic for Disqualified RespondentsIf a respondent doesn't meet your targeting criteria or consent to your terms, you can disqualify them from the survey using Page Logic.Using Page Logic allows you to route respondents based on their answer to a question. You can choose to allow respondents who answer a certain way to continue through the survey, or you can exit respondents from the survey based on their answer.Disqualification Logic
To add logic to disqualify respondents:To add logic to disqualify respondents:
1. Add a Multiple OR Single Choice question to the survey.
2. Click on “Page Logic” link in bottom of page.
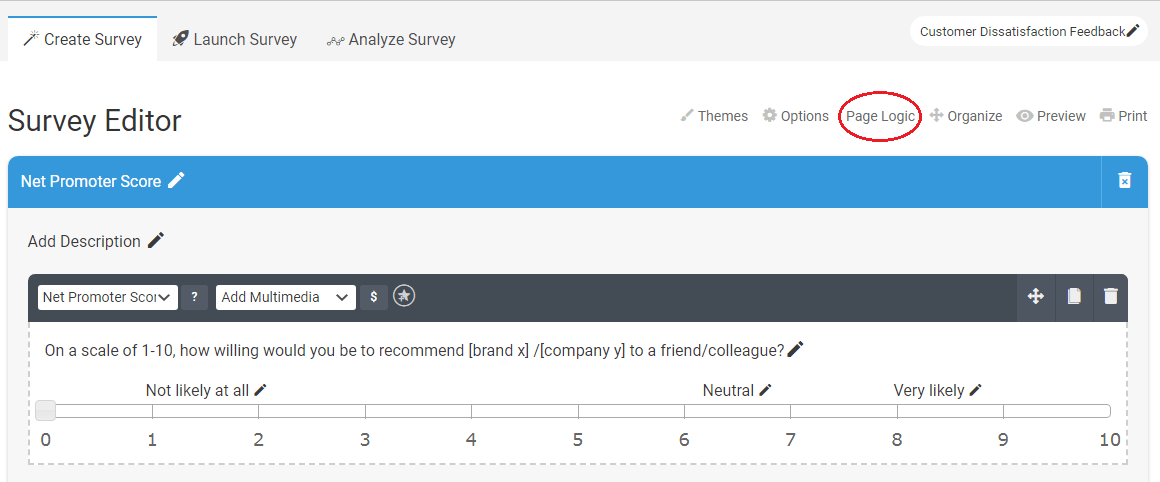 3. It will show you page logic popup.
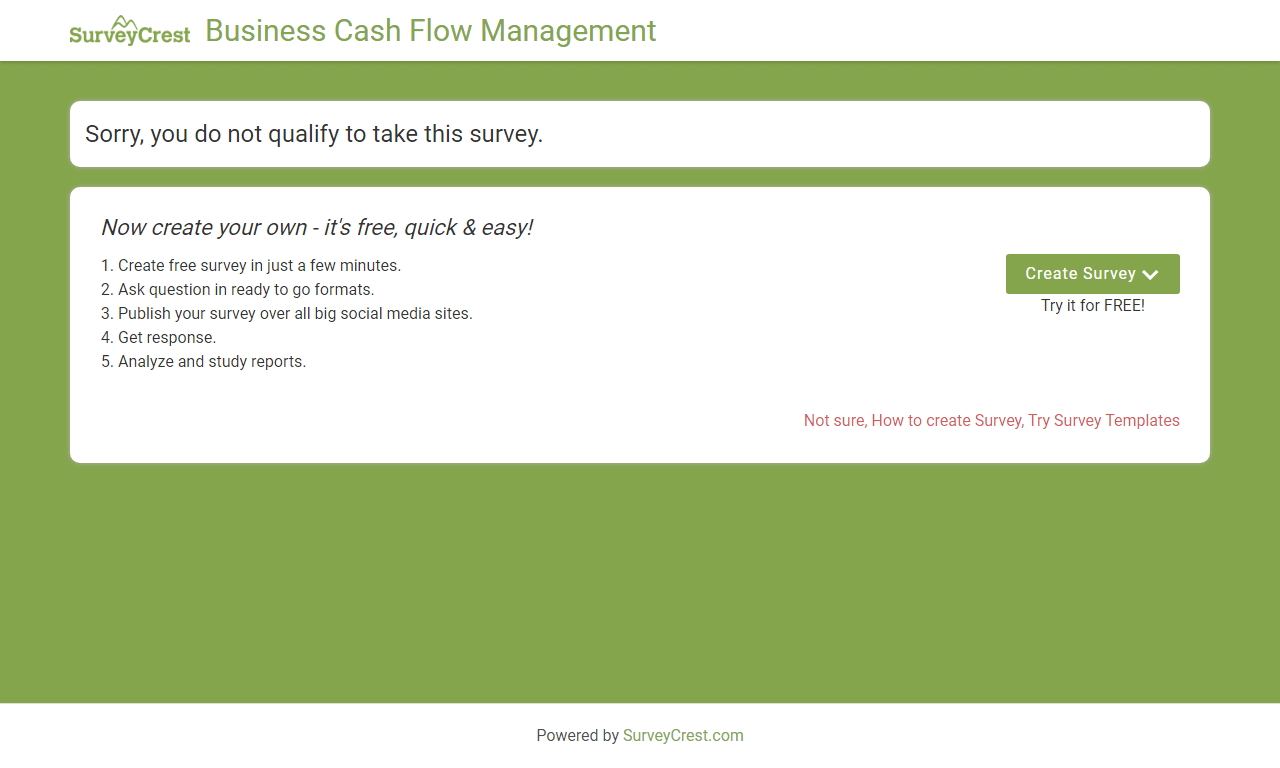
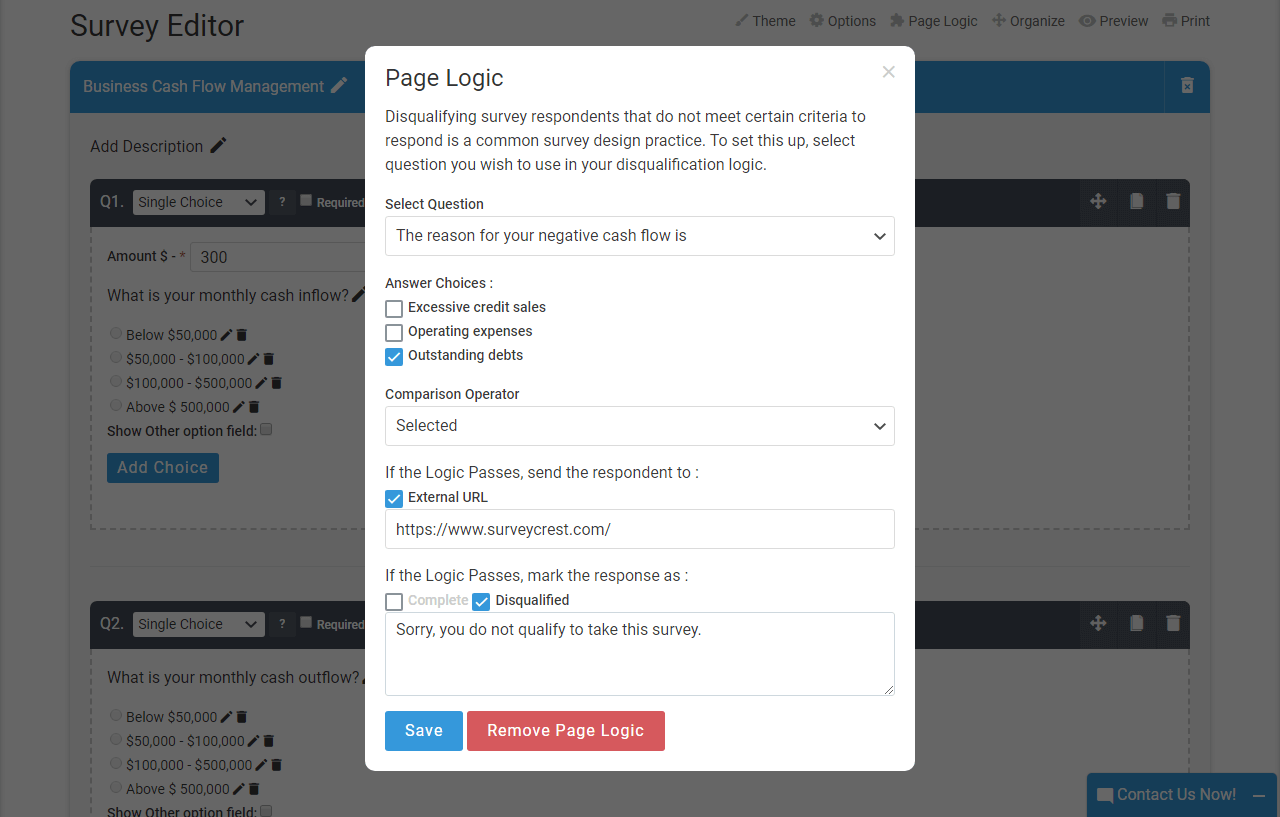 4. Select question & answer choices for disqualify a respondent.5. Choose between a disqualified message or redirecting respondents to a webpage.You can only select one disqualification option per collector. If you have multiple answer choices in the survey that can disqualify a respondent, they'll all see the same disqualification option, no matter what question actually disqualified them.
-
What is Word Cloud?
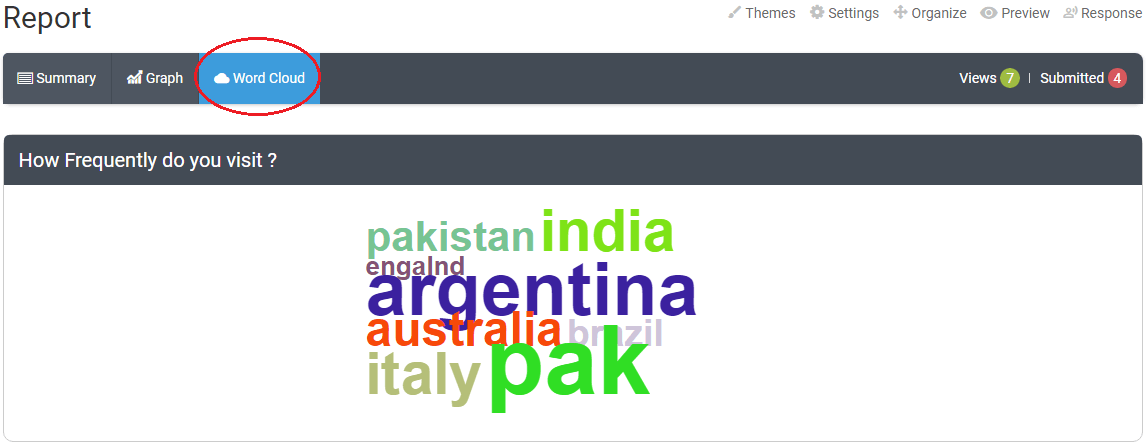
Word Cloud allow you to display words or responses as a text graphic with the most common value written in the largest text. They are popular for text analysis because they make it easy to spot word frequencies. The more frequent the work is used, the larger and bolder it is displayed and where the font size and color represent the relative frequency of different terms.
-
How do I integrate ClickTale with SurveyCrest?
Use the ClickTale Integration to collect and analyze how your respondents interact with your survey. Click Tale’s analytics service is qualitative and provides a video playback option for each individual visitor's session. You may see user behavior before they changed their answer, or how theynavigated about the survey. This sort of information can help you to redesign and optimize your survey to its potential.What kind of data can you track?1. Where your respondent’s mouse goes even if they don't click2. Record data even if they never click submit or other button.3. You can even track if your respondent wrote something into your survey, then deleted it and replaced4. Full recordings of your visitors' every movement.ClickTale account set up:1. You need to sign up or login into ClickTale account.2. Click on the projects option on the left hand side of the screen after login.3. Click on Create a new project, and then get started on the next page.4. Now, put in your site domain “www.surveycrest.com” select the project name and website category. Once all this is done, click next.
 5. Set the Estimated Traffic Page views/Day , Your Recording Ratio, Secure Pages and IP Blocking6. After set up your ClickTale project, ClickTale will provide you tracking codes that you will need to copy and paste into the www.surveycrest.com and leaving ClickTale account open so you can easily access your tracking codes.7. Go to SurveyCrest > My Account > Integrations > ClickTale
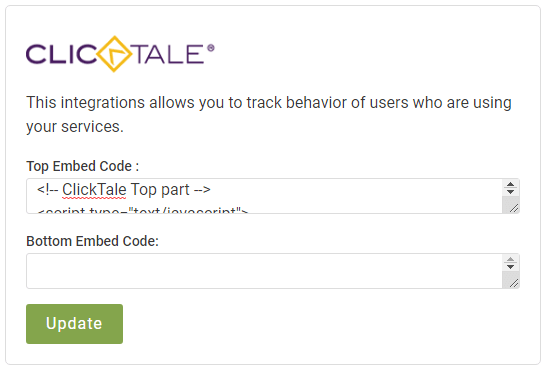 8. Copy & paste tracking codes in given fields & click update.9. Go to Launch > Settings > Options > ClickTale Analytics. Enable & Save it.
-
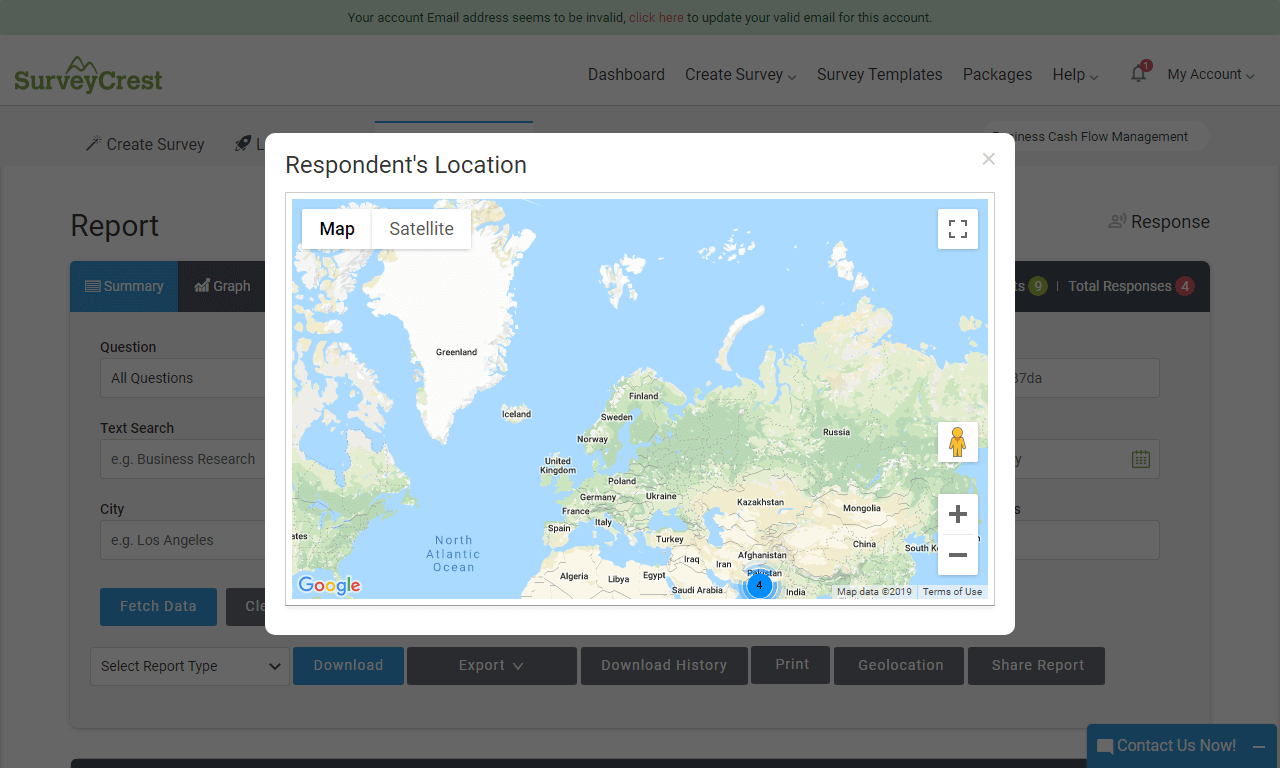
How can I see my survey respondent’s locations?
Respondent’s locations will show you number of responses came from which country.1. Go to Analyze > Report. You can see the Geolocaction button next to the Print button.
 2. Click on Geolocation button to see respondent’s locations.
-
How can I comment on any survey using SurveyCrest?
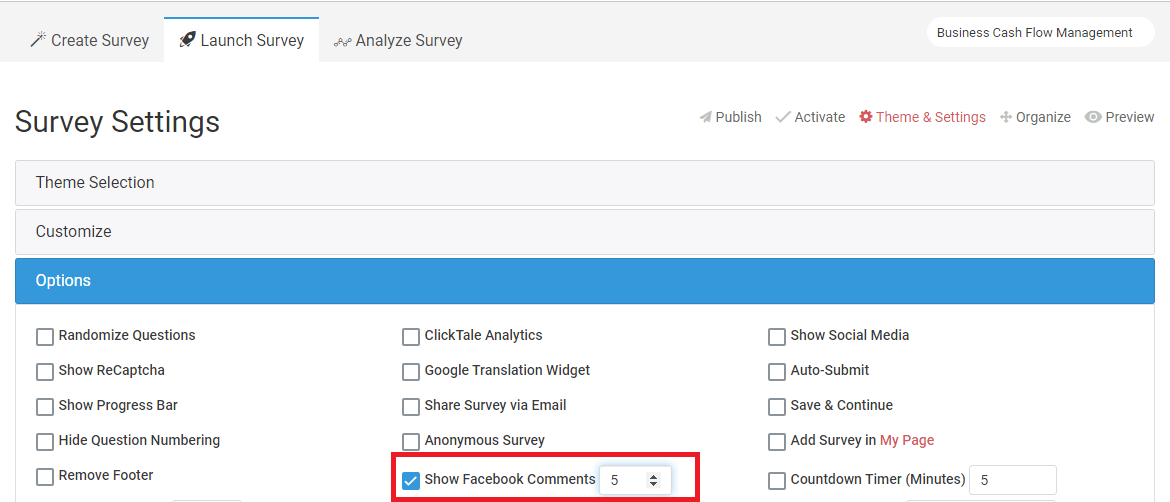
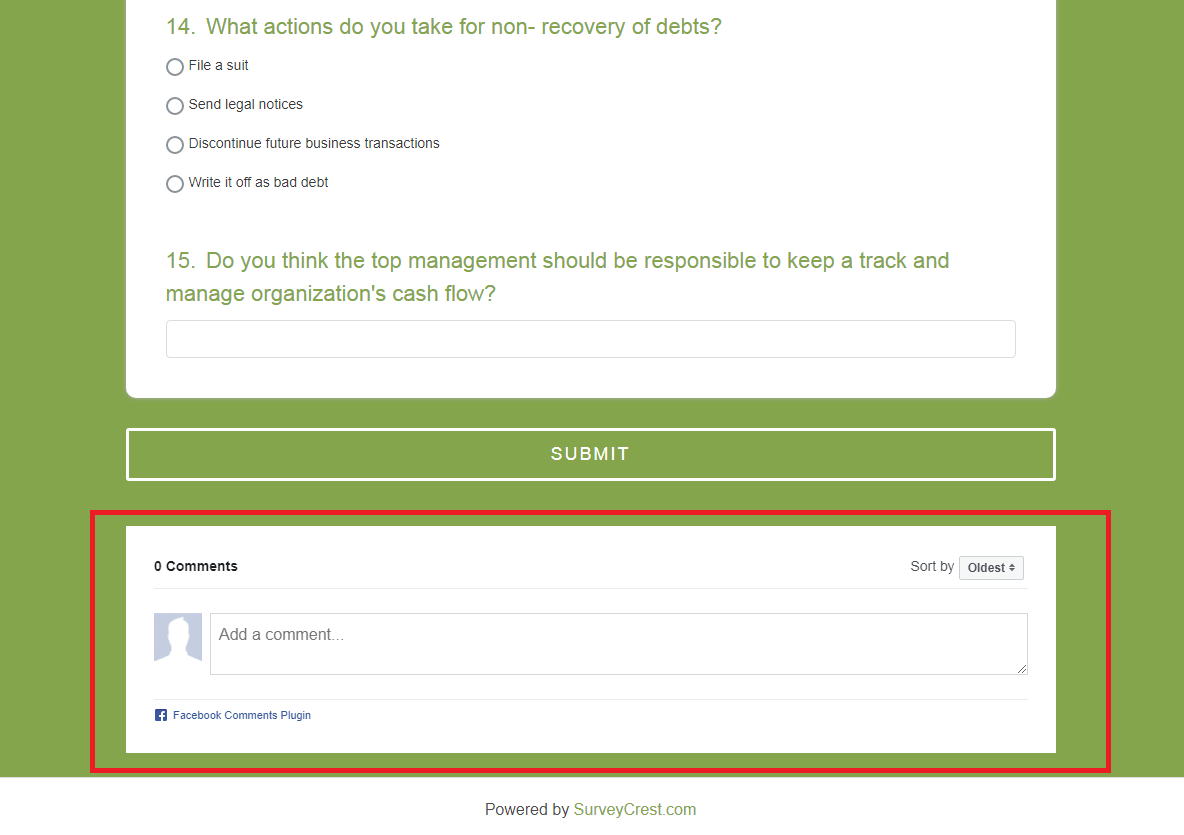
The Facebook Comments box lets people comment on surveys using their Facebook profile and shows this activity to their friends in news feed.1. Go to Launch > Settings > Options > Facebook Comments & Save it.
 2. Go to survey view.
-
How to see preview of thankyou page?
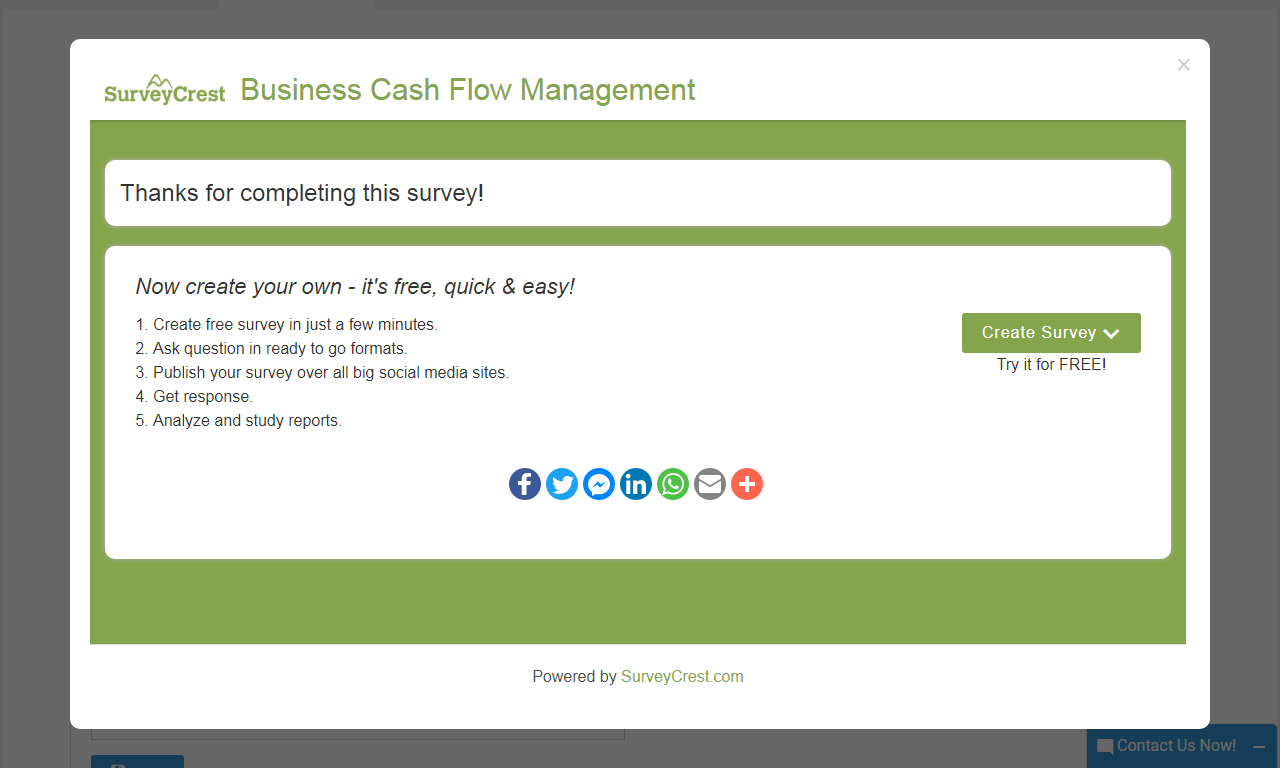
To see preview of "Thank you Page" , follow the steps below :1. Go to Launch > Settings > Customize & Button Text
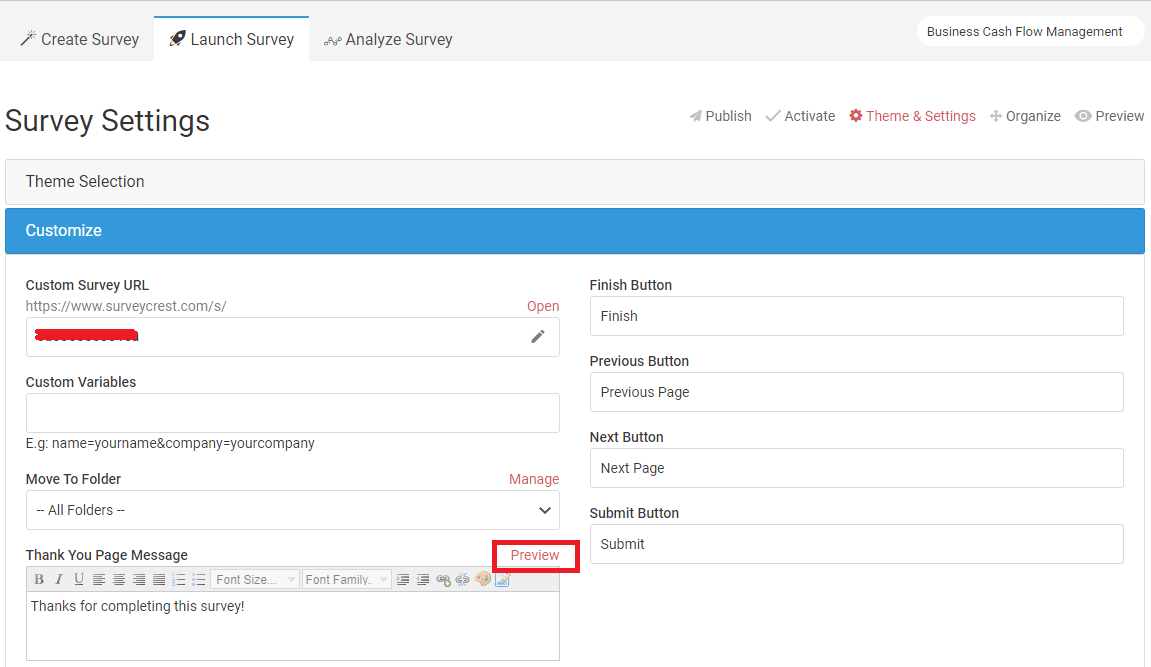 2. Click on "Preview" button to check "Thankyou Page" .
-
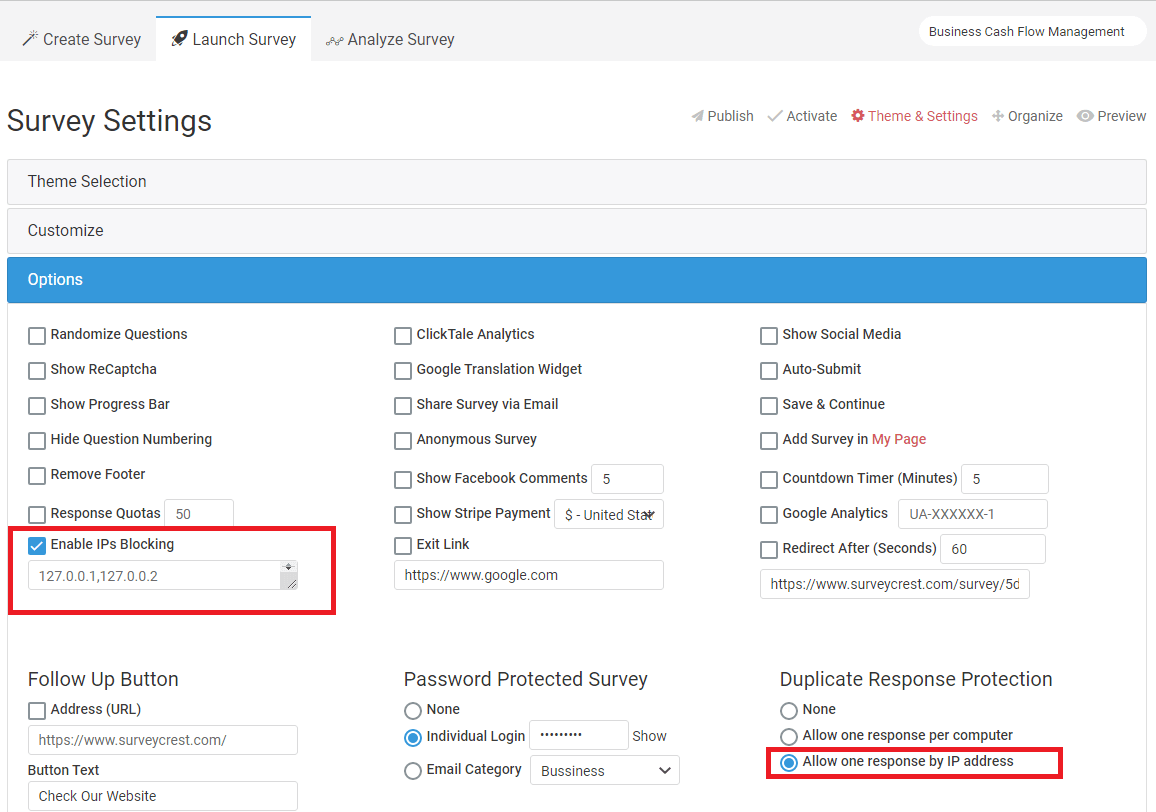
Control survey at user level by Ip Addresss.?
Control survey/poll/form/quiz access at the user ip level by specifying a range of allowed IP addresses or IP Address.
-
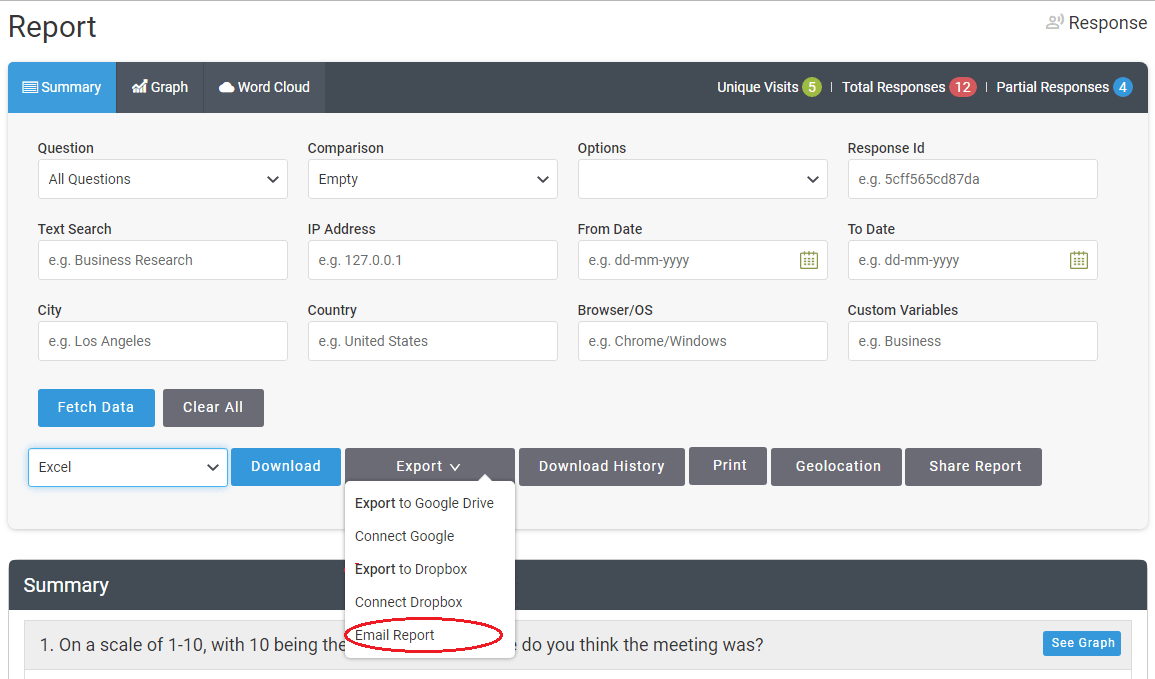
What is Email Report feature & how does it work.?
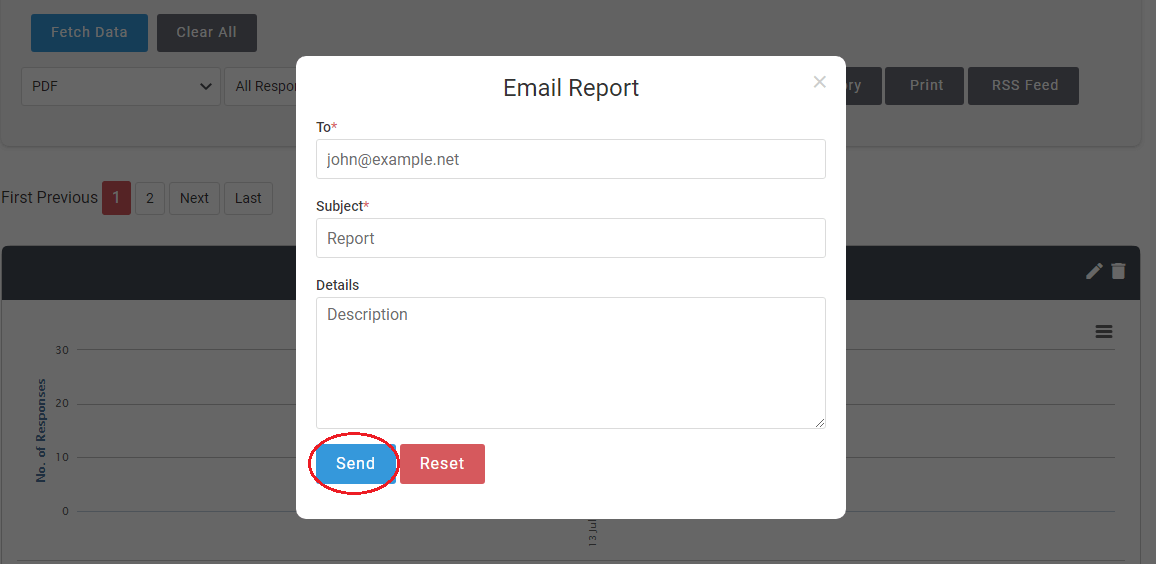
Through "Email Report" option you can share your survey report or response details in format of file to particular user or customer.Choose the particular survey/poll/form/quiz/email-survey from the Dashboard, then go to Analyze > Response/Report > Select Report Type > Export > Email Report
 Fill the required fields & click on "Send" button.
HOW TO CREATE INVOICE
-
How can the SurveyCrest Invoice tool help me?
Businesses need to issue invoices for every transaction they make. Automating invoice creation can save lots of time and effort. The SurveyCrest Invoice tool is a free customizable billing template that you can issue to your clients or customers. You can specify all payment details such as products/services, quantities, price etc.
-
How do I create an invoice with the SurveyCrest invoice tool?
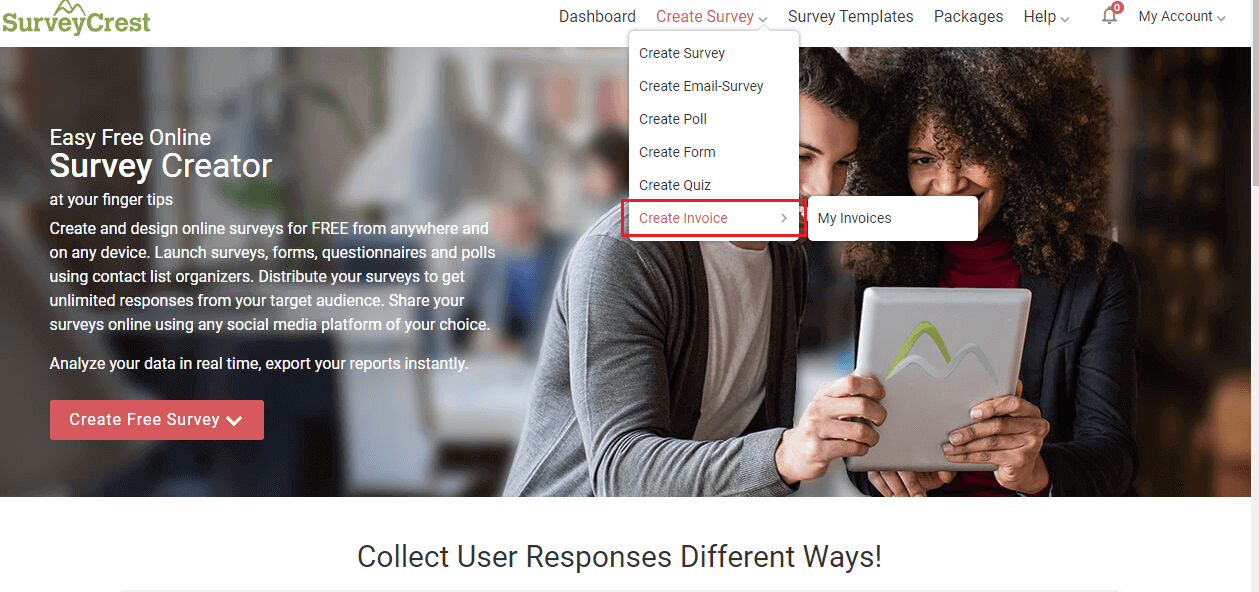
To create an invoice online using SurveyCrest tool is easy. Simply go to “Create Survey” > “Create Invoice” option.
 Sign In with your SurveyCrest account. If you don’t have an account simply, register using a valid email address.
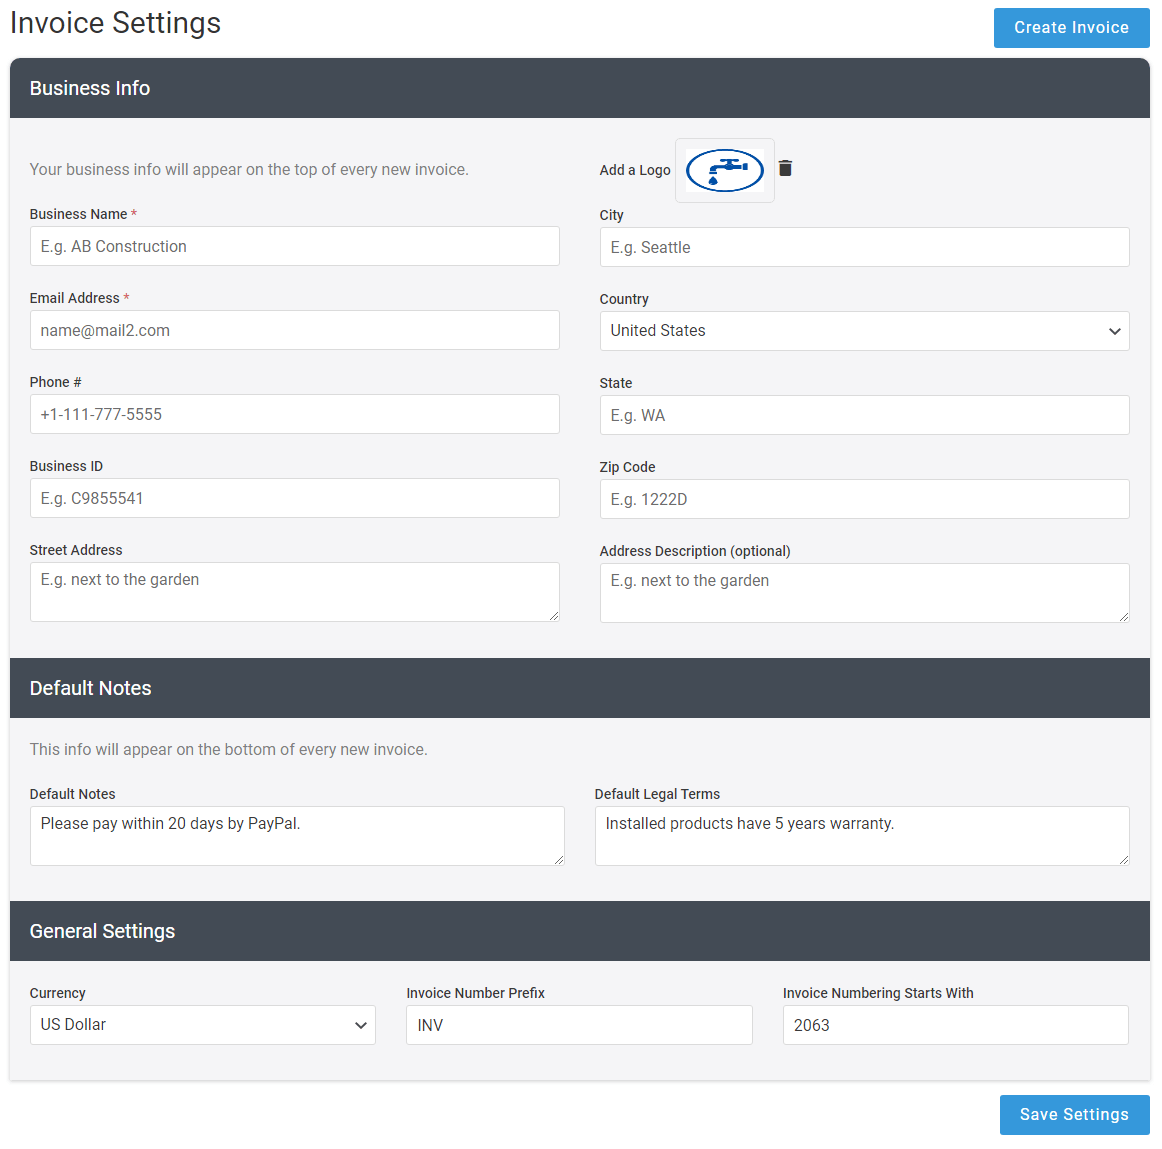
 If you are a new user, before creating any new invoice you will need to save Business Information first in Settings tab.
-
Can I save my business information in the invoice created?
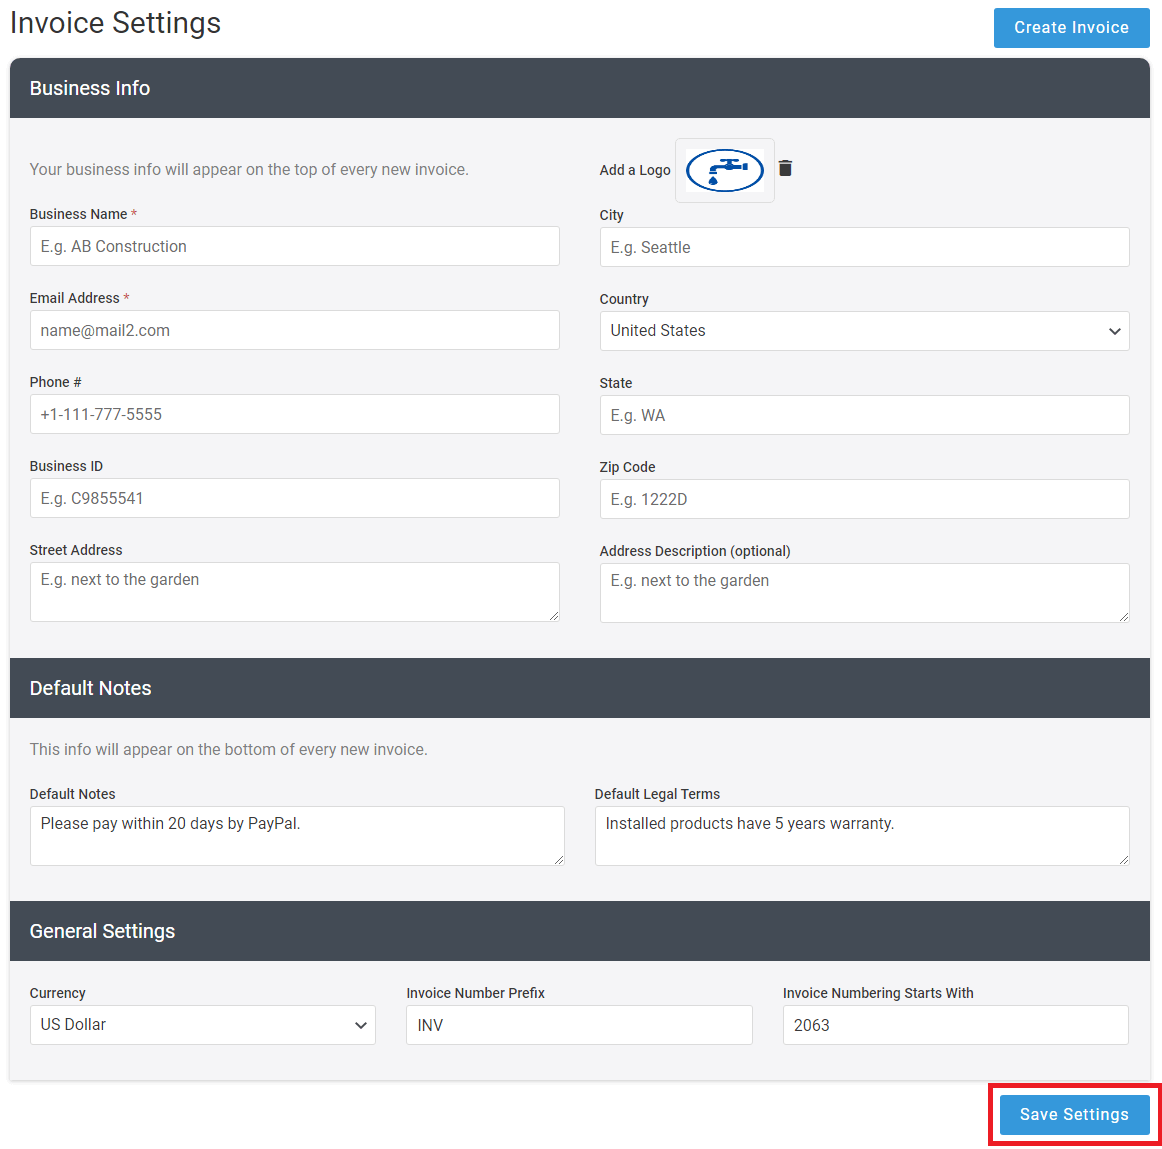
Yes. The first time you use the SurveyCrest Invoice tool you will have to input basic information such as the name of your company, business address, and other required data. This information will be included in any invoice you create.
-
How do I enter or update my business information?
You can enter or update the “Business Info” any time in “Settings” tab. After any changes click the “Save” button to apply changes.
-
How can I brand my invoice?
You can upload your official logo in the “Settings” or “New Invoice” page.The logo you upload in the business info section of “Settings” page will be the default logo of any new invoice you create or send. If you want to change or display a different logo on a specific invoice, upload that logo when you are going to create "New Invoice" .
-
How does the invoice “Settings” page work?
The “Settings” page is a main page of invoice section where you can enter, update, and save business basic information like company name, address, legal terms, conditions, invoice number, and much more. This information works as a template of any invoice you create.
-
How does the “My Invoices” page work?
The “My Invoices” page list all invoices you have created. For each invoice, you will see the invoice number, customer, payable amount, due date and the status. Here you can create "New Invoice" by clicking on new invoice button.

-
How can I create a new invoice?
Go to "My Invoices" > “New Invoice”.This will redirect you to “New Invoice” page.
 Fill out the required information of new invoice page & save this by clicking “Save as Draft” button in the end. You can also send that invoice to any customer by clicking "Send" button.
 -
How can I add new products?
You can create a list of all the products or services you offer by using the “Products/Services” page.
 Click on “New Product” & fill out product required information. Click on “Save” button to make changes.
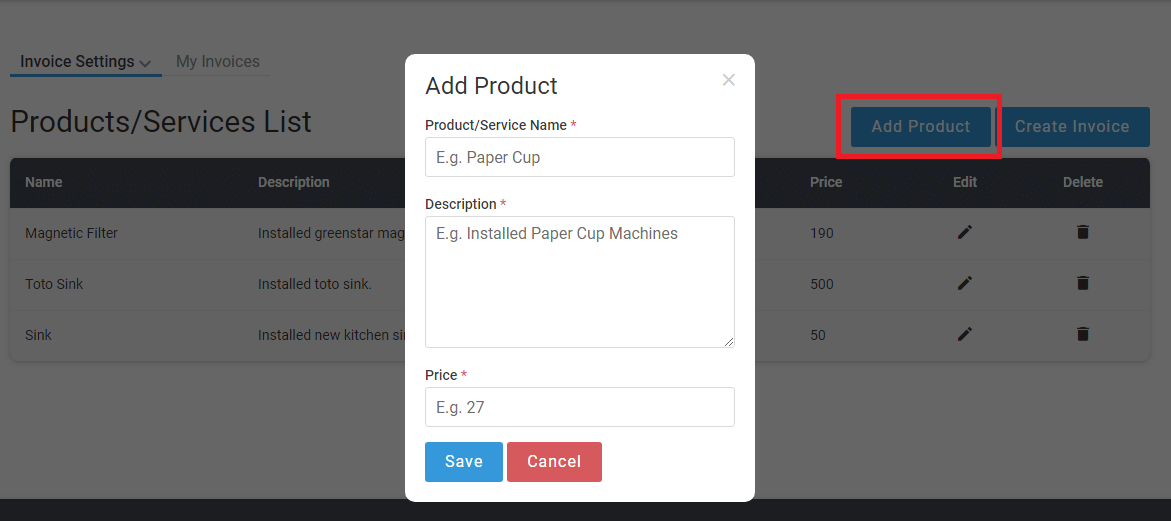 After saving it will shows you all products .
-
How can I add new customers?
Go to "My Invoices" > "New Invoice" > "New Customer" option.
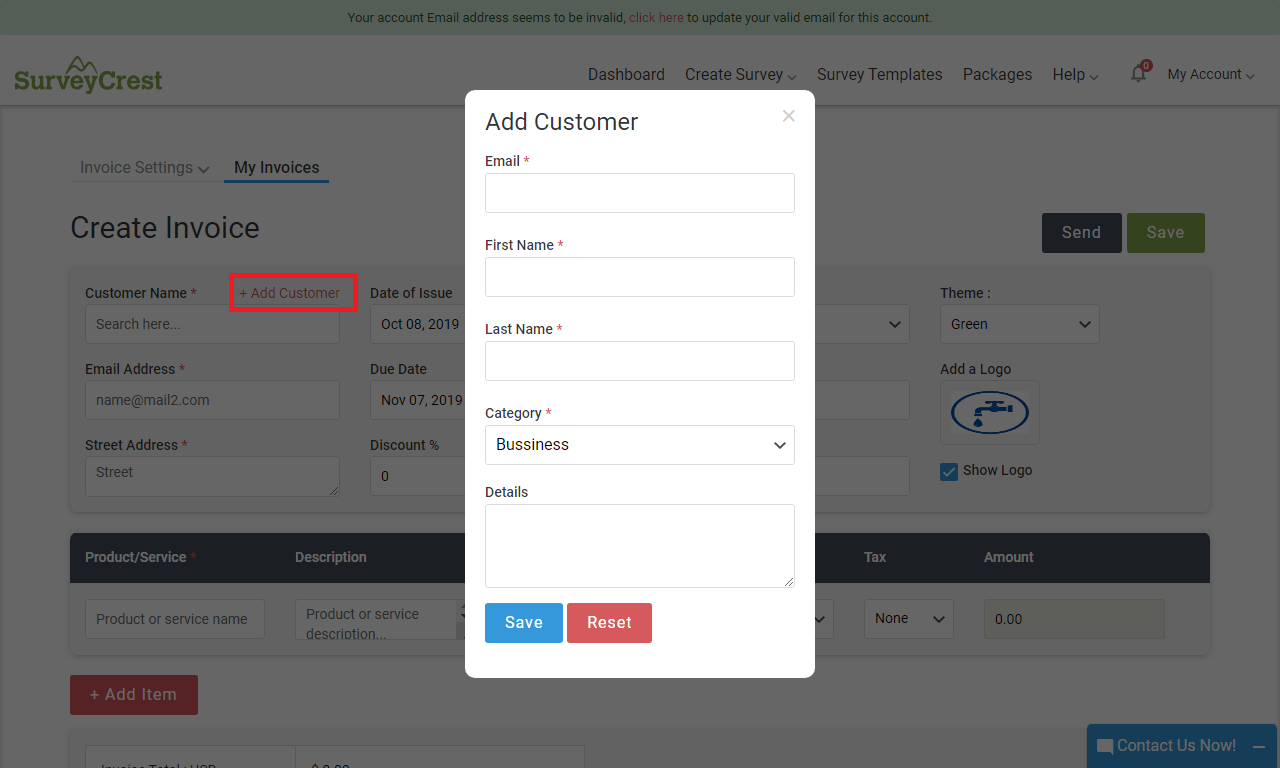
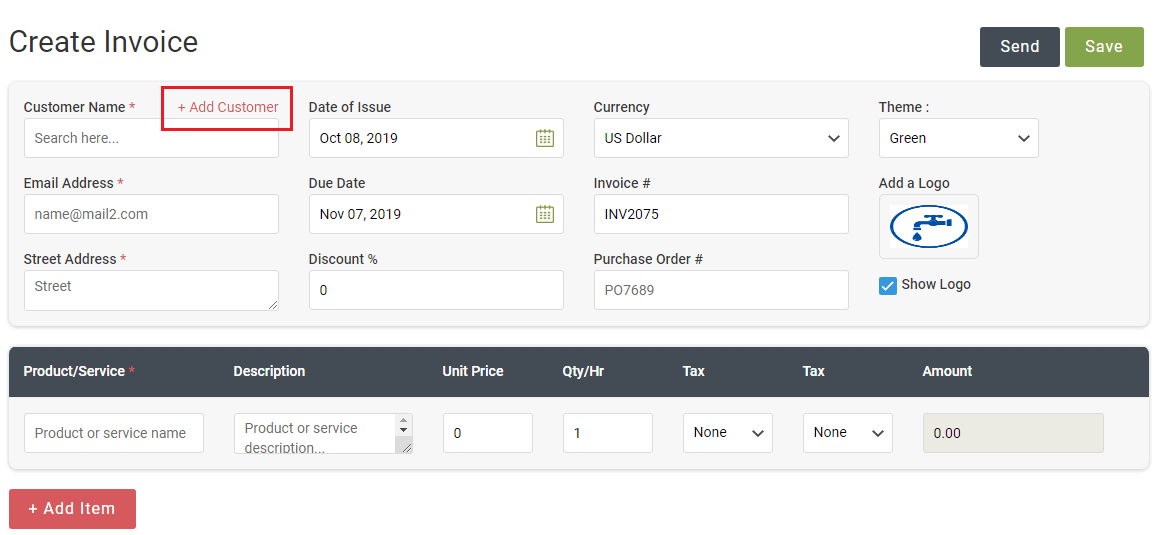 A popup will appear, fill out the customer details, & click “Save” to add this in your customer database. Use “Reset” to clear all entered data or close the pop up to exit.
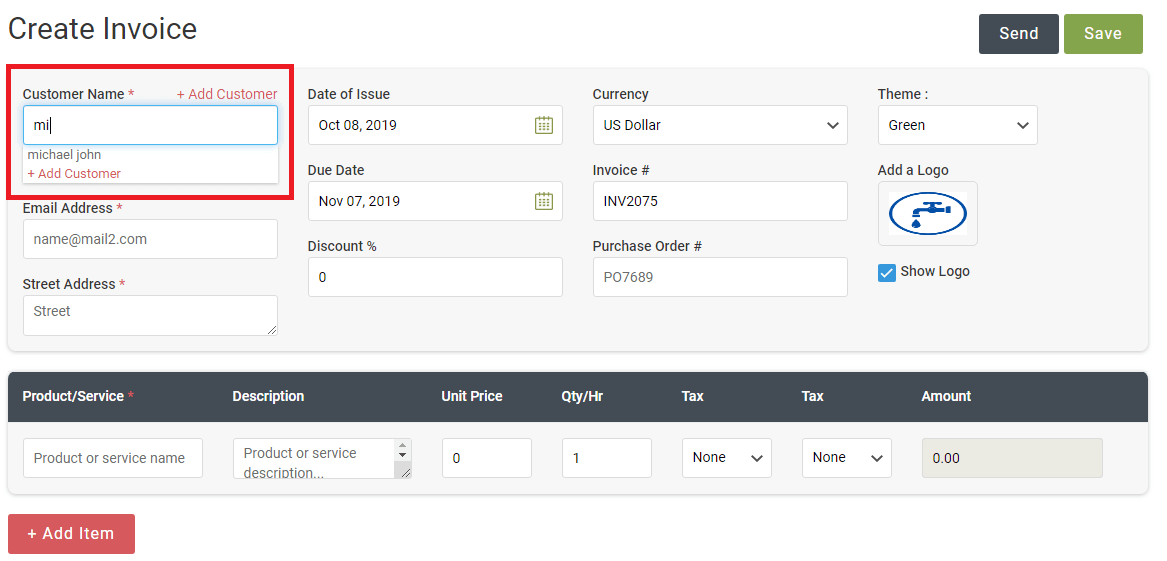
 After saving, enter name in customer input & choose name from fetched list to assign or send invoice.
-
Can I save a list of customers?
Yes! SurveyCrest lets you maintain a list of customers so you can quickly send out invoices to your frequent customers. Use the “New Customer” feature to create a customer list.
-
How do the tax rates work?
SurveyCrest lets you customize the tax rates according to the laws of your territory. Use the “Taxes” page to add applicable tax rates.
-
How do I set up tax information?
Got to “Taxes” page .
 Click “New Tax” button and enter the tax details in opened window.
 All saved tax rates will be displayed in invoice page Tax drop-down whenever you are going to create invoice.
 -
Can I track my payments?
The “My Invoices” page show you all the details like amounts owed, payments made & shows any overdue amount etc.

-
How can I send my invoice to the customer?
You can send out the invoice directly through “New Invoice” page or If you want to send any saved invoice then go to the “My Invoices” page, on mouse over particular invoice settings icon click "Send" option from list. The invoice will be sent out to the email address of the customer you specified in the draft.

-
Can I delete or disable an invoice?
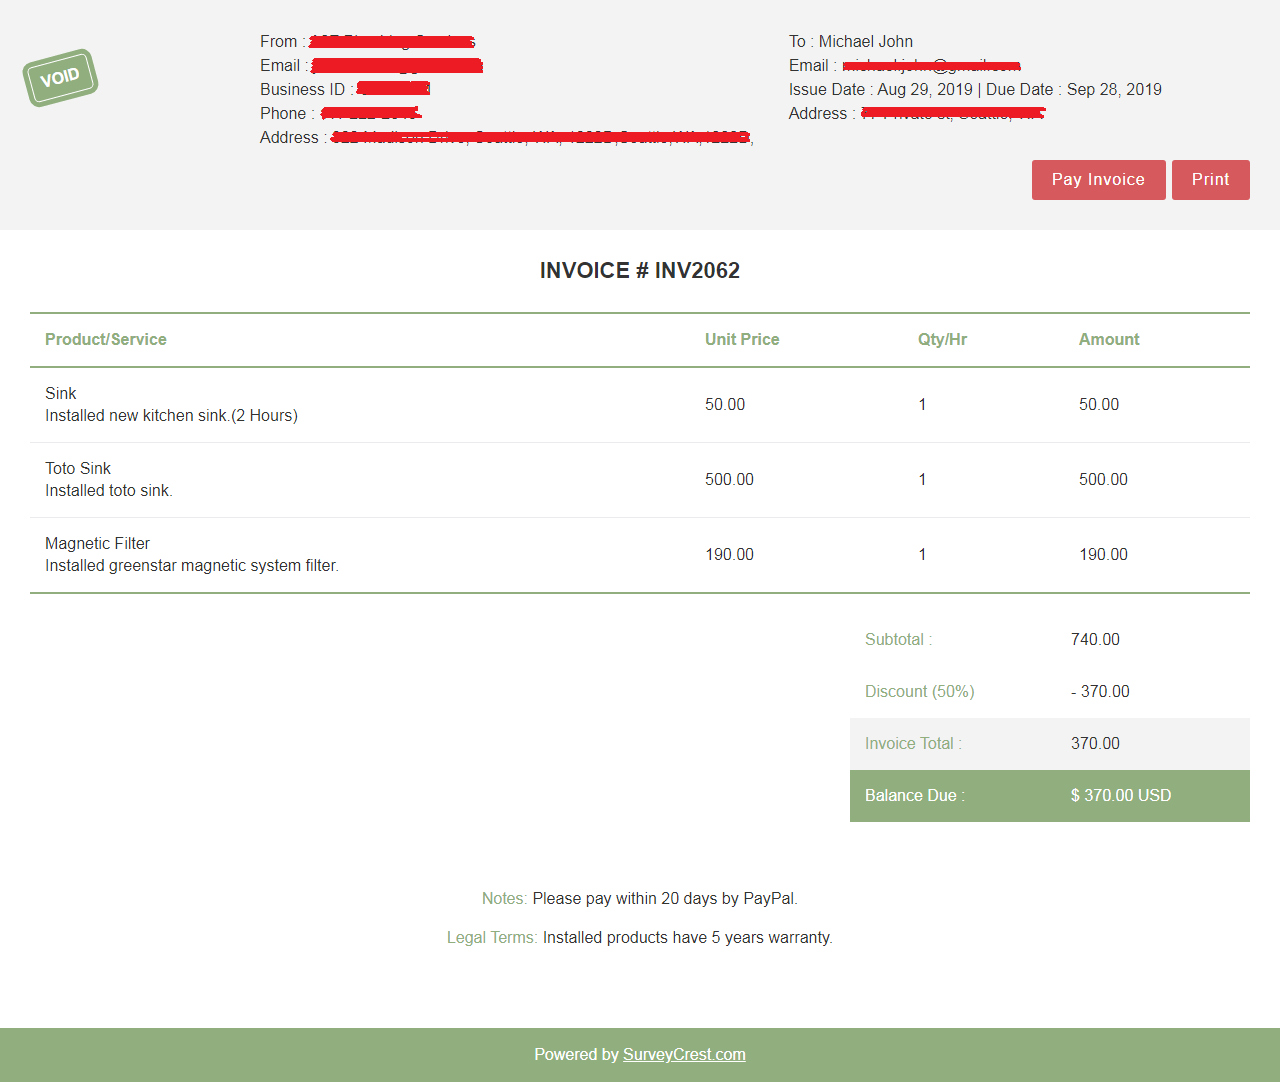
Yes you can do any action on invoice just like delete, void, print, edit, preview from the settings icon list of “My Invoices” page.Voiding any invoice will cause it to be marked as “Void” & the payments will not count towards your total amounts.
-
Can I delete the invoice that I have already sent out?
Yes you can delete the invoice; however, it will still be accessible to the customer. It’s better to mark it as Void, so that the customer will know that payment is not expected.
